Inductors Introduction
General
In this phase, the builder undertakes the most tedious part of the build, the winding, installation, and testing of the 4 coils and the transformer.
Note that, while the schematic calls for a L5 coil, this has been eliminated as not needed/used in the 6m, 4m, and the 2m versions.
The inductors are band-specific items and their values and turn counts will depend on which version of the converter you are building (6m, 4m, or 2m). In the installation tasks below, the band-specific items are separated out into band-specific "Bill of Material" (BOM) pages for your convnience.
The inductors are tested for continuity following installation, using points on the board physically removed from the actual solder joints of the inductor's leads, but still electrically connected via the board traces.
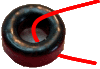 Remember, when winding toroidal inductors, a single pass through the core counts as 1 turn. You might want to review
Leonard KC0WOX's excellent 10-minute video on winding toroidal coils and transformers.
Remember, when winding toroidal inductors, a single pass through the core counts as 1 turn. You might want to review
Leonard KC0WOX's excellent 10-minute video on winding toroidal coils and transformers.
Also, please refer to the common component mounting instructions for toroids
Inductors Schematic
(Resistor testpoints (hairpin, top, or left-hand lead), as physically installed on the board, are marked in the schematic with red dots)
(Click for Full Schematic)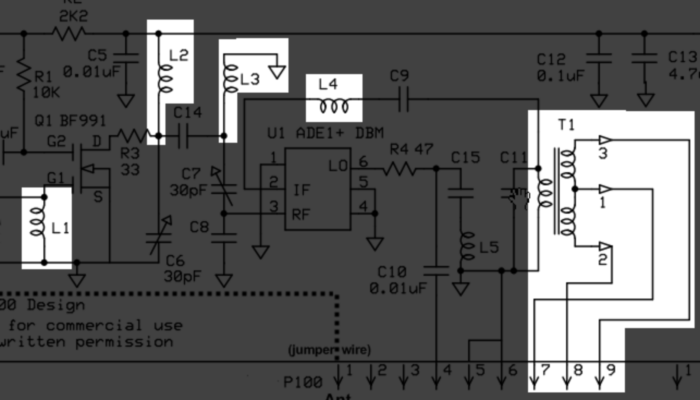
Inductors Bill of Materials
Stage Bill of Materials
(resistor images and color codes courtesy of WIlfried, DL5SWB's R-Color Code program)
| Check | Designation | Component | Marking | Category | Orientation | Notes | Circuit |
|---|---|---|---|---|---|---|---|
| ❏ | L1 | band-specific | misc | Inductors | |||
| ❏ | L2 | band-specific | misc | Inductors | |||
| ❏ | L3 | band-specific | misc | Inductors | |||
| ❏ | L4 | band-specific | misc | Inductors | |||
| ❏ | L5 | band-specific | misc | L5 is unused in current design | Inductors | ||
| ❏ | T1 | band-specific | misc | Inductors | |||
| ❏ | T25-12 | T25-12 toroid core | green
 | toroid | Inductors | ||
| ❏ | T25-6 | T25-6 toroid core | yellow
 | toroid | Inductors | ||
| ❏ | wire26 | #26 magnet wire | wire | Inductors | |||
| ❏ | wire30 | #30 magnet wire | wire | Inductors |
Band Specific Items for 6m Band
| Check | Designation | Component | Marking | Category | Orientation | Notes | Circuit |
|---|---|---|---|---|---|---|---|
| ❏ | L1 | 0.35uH 11T #26 on T25-6(yellow) (7") | yellow | coil | Inductors | ||
| ❏ | L2 | 0.35uH 11T #26 on T25-6(yellow) (7") | yellow | coil | Inductors | ||
| ❏ | L3 | 0.35uH 11T #26 on T25-6(yellow) (7") | yellow | coil | Inductors | ||
| ❏ | L4 | 0.78uH 17T #30 on T25-6(yellow) (9") | yellow | coil | Inductors | ||
| ❏ | T1 | 0.53 uH 14T/2x7 bifilar #30 on T25-6(yellow) (8") | yellow | transformer | Inductors |
Band Specific Items for 4m Band
| Check | Designation | Component | Marking | Category | Orientation | Notes | Circuit |
|---|---|---|---|---|---|---|---|
| ❏ | L1 | 0.22uH 9T #26 on T25-6(yellow) (7") | yellow | coil | Inductors | ||
| ❏ | L2 | 0.22uH 9T #26 on T25-6(yellow) (7") | yellow | coil | Inductors | ||
| ❏ | L3 | 0.22uH 9T #26 on T25-6(yellow) (7") | yellow | coil | Inductors | ||
| ❏ | L4 | 0.53 uH 14T #30 on T25-6 (10") | yellow | coil | Inductors | ||
| ❏ | T1 | 0.13uH 7T/2x4 bifilar #30 on T25-6(yellow) (6") | yellow | transformer | Inductors |
Band Specific Items for 2m Band
| Check | Designation | Component | Marking | Category | Orientation | Notes | Circuit |
|---|---|---|---|---|---|---|---|
| ❏ | L1 | 0.08uH 6T #26 on T25-12(green) (5") | green | coil | Inductors | ||
| ❏ | L2 | 0.06 5T #26 on T25-12(green) (4") | green | coil | Inductors | ||
| ❏ | L3 | 0.06 5T #26 on T25-12(green) (4") | green | coil | Inductors | ||
| ❏ | L4 | 0.53 uH 14T #30 on T25-6 (10") | yellow | coil | Inductors | ||
| ❏ | T1 | 0.13uH 7T/2x4 bifilar #30 on T25-6(yellow) (6") | yellow | transformer | Inductors |
Inductors Summary Build Notes
- Wind and Install Coils
- Wind and Install Transformer
- Test the Stage
Inductors Detailed Build Notes
Top of the Board
Wind and Install Coils
Wind and Install coils L1, L2, L3, and L4
Note: L5 is not required on any of the manifestations of the current design.
| Check | Designation | Component | Marking | Category | Orientation | Notes |
|---|---|---|---|---|---|---|
| ❏ | L1 | band-specific | misc | |||
| ❏ | L2 | band-specific | misc | |||
| ❏ | L3 | band-specific | misc | |||
| ❏ | L4 | band-specific | misc | |||
| ❏ | L5 | band-specific | misc | L5 is unused in current design |
| Check | Band | Designation | Component | Marking | Category | Orientation | Notes |
|---|---|---|---|---|---|---|---|
| ❏ | 6m | L4 | 0.78uH 17T #30 on T25-6(yellow) (9") | yellow | coil | ||
| ❏ | 6m | L3 | 0.35uH 11T #26 on T25-6(yellow) (7") | yellow | coil | ||
| ❏ | 6m | L2 | 0.35uH 11T #26 on T25-6(yellow) (7") | yellow | coil | ||
| ❏ | 6m | L1 | 0.35uH 11T #26 on T25-6(yellow) (7") | yellow | coil | ||
| ❏ | 4m | L4 | 0.53 uH 14T #30 on T25-6 (10") | yellow | coil | ||
| ❏ | 4m | L3 | 0.22uH 9T #26 on T25-6(yellow) (7") | yellow | coil | ||
| ❏ | 4m | L2 | 0.22uH 9T #26 on T25-6(yellow) (7") | yellow | coil | ||
| ❏ | 4m | L1 | 0.22uH 9T #26 on T25-6(yellow) (7") | yellow | coil | ||
| ❏ | 2m | L4 | 0.53 uH 14T #30 on T25-6 (10") | yellow | coil | ||
| ❏ | 2m | L3 | 0.06 5T #26 on T25-12(green) (4") | green | coil | ||
| ❏ | 2m | L2 | 0.06 5T #26 on T25-12(green) (4") | green | coil | ||
| ❏ | 2m | L1 | 0.08uH 6T #26 on T25-12(green) (5") | green | coil |
Wind and Install Transformer
Wind and install T1
You should review the materials in the pdf file Winding_T1_for_the_20m_SR_Lite_II, which depicts winding and installing a toroidal transwformer (the 8x2 transformer was for the Softrock Lite II, but the techniques are the same here, with the turn counts being different).
Take care in winding and installing this transformer, since it has a real effect on image rejection issues that might be experienced in operation once completed.
| Check | Designation | Component | Marking | Category | Orientation | Notes |
|---|---|---|---|---|---|---|
| ❏ | T1 | band-specific | misc |
| Check | Band | Designation | Component | Marking | Category | Orientation | Notes |
|---|---|---|---|---|---|---|---|
| ❏ | 6m | T1 | 0.53 uH 14T/2x7 bifilar #30 on T25-6(yellow) (8") | yellow | transformer | ||
| ❏ | 4m | T1 | 0.13uH 7T/2x4 bifilar #30 on T25-6(yellow) (6") | yellow | transformer | ||
| ❏ | 2m | T1 | 0.13uH 7T/2x4 bifilar #30 on T25-6(yellow) (6") | yellow | transformer |
Inductors Testing
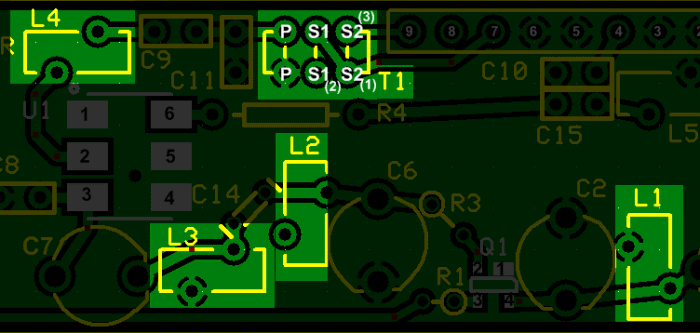
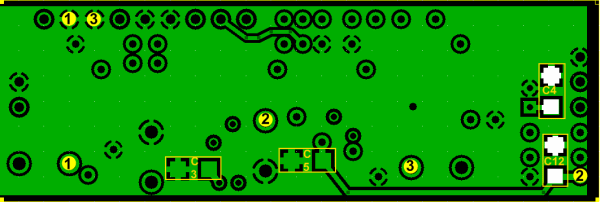
Test coils L1-L3 for Continuity
Test Setup
With power OFF, test for continuity between the numbered test points (they are numbered in the bottom view as 1 thru 3, corresponding to L1 - L3).
Test Measurements
| Testpoint | Units | Nominal Value | Author's | Yours |
|---|---|---|---|---|
| Testpoints numbered 1 | ohms | 0.0 | 0.0 | _______ |
| Testpoints numbered 2 | ohms | 0.0 | 0.0 | _______ |
| Testpoints numbered 3 | ohms | 0.0 | 0.0 | _______ |
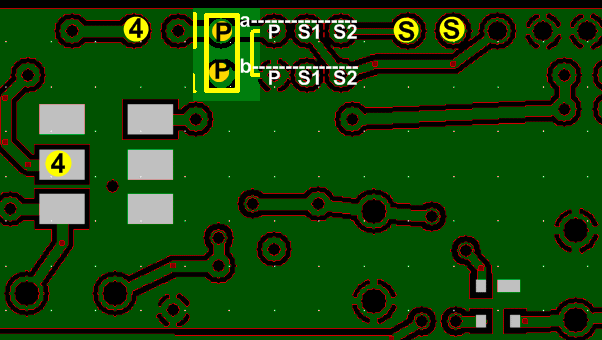
Test L4 and T1 Continuity
Test Setup
Test L4 continuity by checking the resistance between the points labeled 4 on the topside view.
Similarly, test the continuity of the primaries and secondaries of T1 by probing points "P" and points "S" with your ohmmeter (the points have black letters on a yellow background dot).
Test Measurements
| Testpoint | Units | Nominal Value | Author's | Yours |
|---|---|---|---|---|
| Testpoints "4" | ohm | 0.0 | 0.0 | _______ |
| Testpoints "P" | ohm | 0.0 | 0.0 | _______ |
| Testpoints "S" | ohm | 0.0 | 0.0 | _______ |