Introduction
This is the home page for the Detailed Builder's Notes for the Softrock RXTX V6.3 Software Defined Radio transceiver, the latest in a series of SDR kits offered by Tony Parks KB9YIG. Availability, Pricing, and Ordering can be found at: Tony's website.
These notes are also available in PDF form here, thanbks to Craig AB9IV.
These notes were developed as the author moved through an actual build. The kit is a multi-band transceiver, using plugable bandpass filter and PA/LPF boards to provide operation across popular ham bands from 160m to 10m. This build focuses on the implementation using 80/40 meter plug boards . These instructions and included component bills of material provide the guidance for constructing all plug boards for all bands, however, pictures and examples will be based on the 80/40 m boards .
Much of the documentation was initially developed from the original RXTX V6.2 and Lite+Xtall V9.3 documentation and based upon an excellent work by Leonard, KC0WOX, without which this could not have been accomplished. As the build progressed, the author posted necessary changes to the affected web pages and logged them in the "revisions" page. If your browser is caching pages, you may need to hit the "refresh" key (F5 on IE and Firefox) to get the latest version of the page.
The intent in providing these detailed instructions is to help the less experienced
builder through what might otherwise be a daunting task.
The instructions provide a stage-by-stage build process, allowing
the builder to build a single stage and then test it ("sanity check") before
moving on to the next stage.
While it is in the nature of amateur radio operators to probe and experiment, it should be known that this kit and its design, as expressed herein,was carefully designed to specifications. The builder can expect to achieve published specifications and results if, and only if, he/she builds this kit in strict accordance with the design documented herein. Any modifications of, omissions from, or departures from the design or its components are done only at the builder's peril.
If you are a more experienced builder and would prefer to build the kit entirely and then test it (i.e., you would prefer not to follow the staged approach herein), here is the very abbreviated sequence of steps for building the main board see Ed, KT6F's excellent pictorial blog of his build process):
- mount all the SMT caps
- mount all the SMT ICs. If a CMOS Si570 is used do not mount U8
- mount all the resistors and diodes using the board silkscreen patterns to determine if the part is mounted flat to the board or hairpin style. If a CMOS Si570 is used, omit R43.
- If a CMOS Si570 is used be sure to add the CMOS jumper wire
- mount all the ceramic caps except for C34 which is mounted after J3 and J4 are mounted
- mount all the electrolytic caps (observe the polarity marks)
- mount transistors
- mount J3 and J4 with using the 9-pin piece of header as a tool to get good alignment of J3 and J4.
- mount C34
- mount U4 using #4 hardware
- mount J1 and J2
- mount the PIC 8-pin socket
- mount the DIP switch
- build PA/Filter board(s)
- build BPF board(s)
For the rest of us, read on.
Some stages may provide considerable background info. For those who would rather skip the background info and just get with the building, the critical steps and tests in each stage will be highlighted by special Icons:
This icon identifies a construction step in the build stage
This icon identifies a test operation in the build stage
This icon identifies a test (not strictly needed) you can perform if you have an oscilloscope. One should be able to successfully build and test this kit with only a DMM of average accuracy.
This icon indicates that the builder can use a ham transceiver (RX or TX) to perform a test on frequency related tests.
This icon indicates that the builder should be especially aware of a possible "gotcha" in the current build step.
The builder can register into the Softrock users group on Yahoo to pose any questions, comments, or issues to the many talented users/builders who are constantly posting to and reading from that group.
Any comments or corrections should be directed to the author, Robby WB5RVZ, and would be most appreciated.
Credit is due to several sources, including, but not limited to, Tony KB9YIG, Leonard KC0WOX, and Alex VE3NEA.
Schematic
Each stage will begin with a subset of the overall schematic diagram. You can reference the two full diagrams provided with the kit by clicking on the following links:
- Sheet 1 - TX and Misc
- Sheet 2 - RX
- Sheet 3 - Band-specific PA and Filter Boards
- Sheet 4 - Band-specific RX Bandpass Filter Boards
- Sheet 5 - Additional Low Pass Filters (for 80 and 30m)
Schematic subsets have been annotated with "fat" dots on the "hairpin" end of resistors which are mounted as such. For flat-mounted resistors, the dot corresponds to the left-hand lead (if the resistor is mounted horizontally) or the top lead (if the resistor is mounted vertically). This provides the builder with come convenient test points (i.e., the "hairpin", "top", or "left-hand" leads) immediately recognizable in the schematics.
Bill of Materials
Before beginning work on the kit, you should inventory it against the Billof Materials. In each stage, there will be a subset of the Bill of Materials related to that stage alone. You can use that subset as a checklist of the components to be installed in the stage.
Build Notes
Each stage will have a set of graphics (board top and bottom) and Summary and Detailed instructions on how to complete that stage. Where there may be "gotchas" or special techniques or special sequences of tasks, they will be noted under the "Build It" icon
The summary instructions for each page will immediately follow the stage schematic. It is an abbreviated set of tasks for that build stage, summarizing the detailed build notes which follow, and ending with a clickable link to go diretly to the Testing Section. This will enable the builder to review the entire stage and then, print out the first 1 or 2 pages of the stage to serve as a hardcopy schematic, BOM, and sequenced tasklist for that stage.
- Inventory the kit
- Build and test the 12, 5 and 3.3 Vdc power supplies
- Build and test the Local Oscillator
- Build and test the Dividers
- Build and test the RX OpAmps
- Build and test the RX Mixer(QSD)
- Build and test the RX BPF(s);
- Build and test the TX OpAmps
- Build and test the TX Mixer (QSE)
- Build and test the PTT circuits
- Build and test the RX Switching circuits
- Build and test the PA/Filter(s)/
- Install the External Connectons
Testing
Each stage will have a "Testing" Section, outlining one or more tests that, when successfully completed, provide you with the confidence and assurance that you are heading in the right direction towards a fully tested and built transceiver. This kit can be built and reliably tested using nothing more than a common multimeter.
Most stages will have a current draw test, in which the builder tests the stage's current draw in two different ways:
- First, testing the draw through a current-limiting resistor
- Then, when that test is OK, removing the current-limiting resistor and measuring the real current draw.
Tests assume that the builder has a decent digital multimeter of sufficiently high input impedance as to minimize circuit loading issues. Measurements will be taken of current draws, test point voltages, and resistances.
When you perform a test, you should always record the results of the test where indicated in the Testing section. This will make troubleshooting via the reflector much easier, since you will be communicating with the experts using a standard testing and measurement regime.
When comparing measurements to those published in these notes, the builder should be aware that actual and expected values could vary by as much as +/- 10%. The idea behind furnishing "expected/nominal" measurement values is to provide the builder with a good, "ballpark" number to determine whether or not the test has been successful. If the builder has concerns about his measurements, he should by all means pose those concerns as a query in the Softrock reflector so the experts can provide assistance.
The
IQGen or DQ-Gen
programs available free from Michael Keller, DL6IAK, can be used in
a pinch to get the sound card to produce audio tones for injection into the circuit.
You can always use Rocky to generate I and Q signals for tests requiring these audio signals (this is the author's preferred way)
Background Info
Tools
Soldering
View above video example on Youtube
- Read the Primer on SMT Soldering at the Sparkfun site. It is a very good read and it speaks great truths. Then take the time to watch the video tutorial on soldering an SOIC SMD IC.
- Solder Stations. Don't skimp here. Soldering deficiancies account for 80 percent of the
problems surfaced in troubleshooting. It is preferable to have an ESD-safe station, with a
grounded tip. A couple of good stations that are relatively inexpensive are:
-
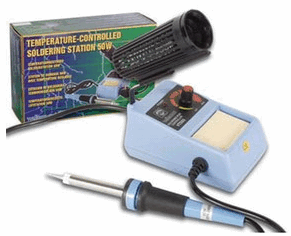 Velleman VTSS5U 50W Solder Station (approx $20 at Frys)
 -
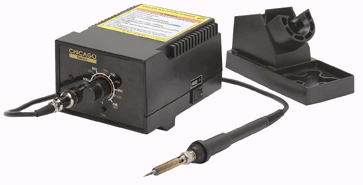 Harbor Freight ESD Solder Station (under $50)
-
ESD Protection
Work Area
- You will need a well-lit work area and a minimum of 3X magnification (the author uses a cheap magnifying flourescent light with a 3X lens. This is suplemented by a hand-held 10 X loupe - with light - for close-in inspection of solder joints and SMT installation.
- You should use a cookie sheet or baking pan (with four sides raised approximately a half an inch) for your actual work space. It is highly recommended for building on top of in order to catch stray parts, especially the tiny SMT chips which, once they are launched by an errant tweezer squeeze, are nigh on impossible to find if they are not caught on the cookie sheet.
Misc Tools
- It is most important to solidly clamp the PCB in a holder when soldering. A "third-hand" (e.g., Panavise or the Hendricks kits PCB Vise) can hold your board while soldering. In a pinch, you can get by with a simple third-hand, alligator clip vise. Jan G0BBL suggests "A very cheap way is to screw a Large Document Clip to a woodblock which will clamp the the side of a PCB."
- Magnifying Head Strap
- Tweezers (bent tip is preferable).
- Diagonal side cutters.
- Small, rounded jaw needle-nose pliers.
- Set of jewelers' screwdrivers
- An Exacto knife.
- Fine-grit emery paper.