Description of Smoke Test Elmer Station
Builders will come here every time they have completed a stage (or have performed any rework). This station compares the current draw of the builder's board under current-limited and unlimited conditions.
Resources
Supplies
| Item | Qty | Notes |
|---|---|---|
| 9V battery | 1 | (a spare is recommended) |
| UNCOATED cookie sheet | 1 | (ESD protection) |
| ground wire | 1 | (for grounding cookie sheeet) |
Tools
| Item | Qty | Notes |
|---|---|---|
| Smoke-test Harness | 1 | (see below) |
| DMM | 1 | measures mA current draw |

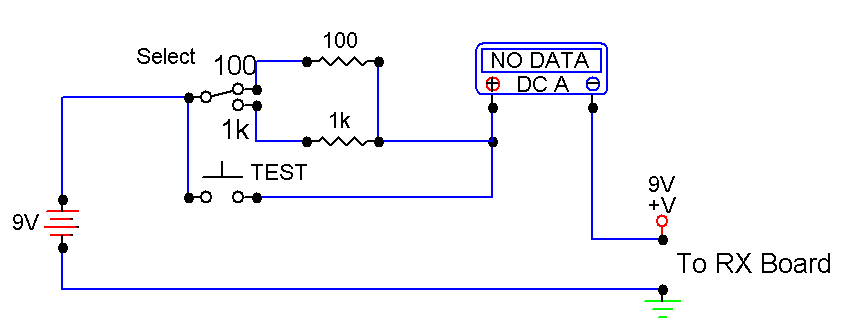
WB5RVZ smoke test harness. This little box takes 9V in from the battery. It allows the operator to select one of two series current-limiting resistances (1k ohm or 100 ohm). The harness then provides 9 Vdc through the selected current-limiting resistor to the rig/board under test. The Elmer can then determine whether to momentarily bypass the current-limiting resistor by pressing a momentart "Test" switch, permitting the readout of the rig/board's true current draw. The 9V snap lead coming out of the test harness is reversed so the polarity is correct when the board under test has its 9V snap lead connected to the harness's output 9V snap lead.Instruments
This station requires a DMM (e.g., the Harbor Freight $2.99 special) capable of measuring current in mA. To be on the safe side, do not attempt to measure voltages with the DMM dedicated to this station.
Process
At the end of each stage, as well as whenever the builder has made changes to the board as a result of troubleshooting or rework, the builder will physically bring their board to the Smoke Test station. The Elmer will connect the board to the test harness and conduct the limited and unlimited tests appropriate to the most recent stage the builder has completed.
Station Setup
- Ensure the test harness' input 9V snap lead is connected to a good 9V battery
- Turn the DMM OFF
- Connect the red lead to the "V/mA/Ohm" jack on the DMM and to the red terminal post on the test harness
- Connect the black lead to the "COM" jack on the DMM and to the black terminal post on the test harness
- Set the DMM to measure DC current in the 200 mA range
Details
Example
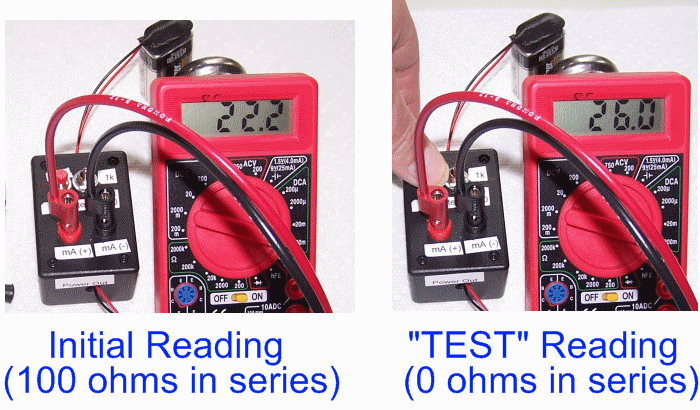
The picture below shows the Mixer Stage test being performed in 2 steps:
Initial Reading - Limited Current Draw
First with the resistor selector switch set to put the current limiting resistor of 100 Ω into the circuit;"Test" Reading - Unlimited Current Draw
(Assuming limited draw is within acceptable range) Then with the "Test" switch pressed (taking the current-limiting resistor out ofthe circuit).
Note that the values are within acceptable range - see the table below).
Procedure for Smoke Test
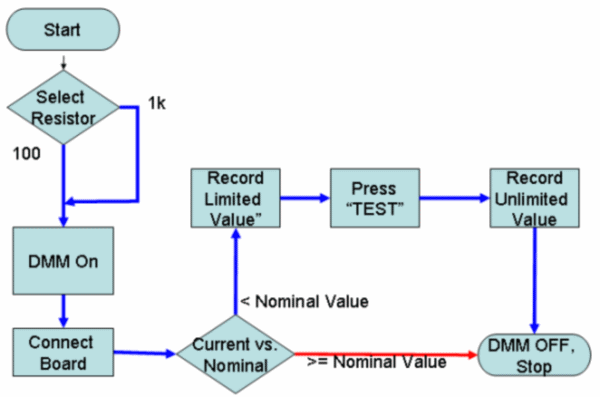
Here is the testing sequence the Elmer will follow for each builder who arrives at the station for a test:
Select Resistor
Based upon the stage being tested (see char below), set the resistance switch on the test harness to either 1kΩ or 100ΩDMM ON
Turn the DMM ON (ensure it is set to 200mA DC current range)Test
Connect the board to the test harness' output 9V snap leadPass (initial current < Limited, Nominal Value)
If the current (in mA) is LESS THAN the "Limited" "Nominal" value for the stage being tested (see the chart below) then:"Test" UnLimited Current Draw
Press and hold the pushbutton "Test" Switch (i.e., take the selected current limiting resistor out of the path).-
Read UnLimited Current
Still holding the "Test" pushbutton switch, check the reading against the "Typical" value in the chart below. Any reading within plus/minus 10-15% is OK.
Fail (current >= Limited, Nominal Value)
If the limited current in mA is GREATER THAN OR EQUAL TO the "Limited" "Nominal" value for the stage being tested then:- STOP TESTING - Do NOT press the "Test" pushbutton - you will blow the meter's fuse!
- REFER THE BUILDER TO TROUBLESHOOTING/REWORK STATION
-
DMM OFF
When done testing, remember to turn the DMM OFF (to preserve the DMM battery.
| Stage | Lim/Unlimited | Resistance | uom | Nominal | Typical |
|---|---|---|---|---|---|
| Power Supply | Limited | 1k | mA | < 9 | 3.7 |
| UnLimited | mA | < 6 | 4.0 | ||
| Local Oscillator | Limited | 1k | mA | < 9 | 6.6 |
| UnLimited | mA | < 20 | 12.7 | ||
| Divider | Limited | 100 | mA | < 20 | 16.2 |
| UnLimited | mA | < 25 | 16.3 | ||
| Op-Amps | Limited | 100 | mA | < 30 | 23.4 |
| UnLimited | mA | < 30 | 23.7 | ||
| Mixer | Limited | 100 | mA | < 30 | 23.5 |
| UnLimited | mA | < 30 | 23.8 |
Pay Special Attention To
Blowing the fuse on the DMM
One sure way to blow the fuse on the test harness is to switch the harness to "unlimited" when the "limited" test has failed.
Another way (of course this has never happened to anyone here!) is to attempt a voltage mesurement with the DMM when the setting is on a current range
- If a fuse IS blown, there should be some spare (500 mA/250V FAST action) fuses in the Station kit.
Build Stages Supported
This station supports all build stages except the BPF stage