Auto Band Pass Filters Introduction
General
This stage implements the automatic bandpass filtering circuit. The circuit uses two quad multiplexer switches to switch one of four bandpass filters into the QSD input. The filters provide continuous coverage, in four "chunks", from 1.8MHa through 30 MHz (with some under and overlaps).
Switching is automatic, via the two binary signals, "FL SEL 0" and "FL SEL 1". The ATTiny 85 Microcontroller has a built-in band plan which associates any output frequency of the Local Oscillator to the most appropriate filter and issues the corresponding bits to "FL SEL 0" and "FL SEL 1", per the following truth table:
Filter Selection Truth Table
| Sel 1 (R12) | Sel 0 (R13) | Filter | LF (MHz) | HF (MHz) |
|---|---|---|---|---|
| L | L | 0 | 1 | 4 |
| L | H | 1 | 4 | 8 |
| H | L | 2 | 8 | 16 |
| H | H | 3 | 16 | 30 |
These notes detail the construction of each of the four bandpass filters, with a simple continuity test at the end of each filter's construction to verify soldering of the leads of the coils.
If you are unfamiliar with toroid and binocular inductor construction, please see the WB5RVZ Construction hints for inductors.
(Note: completed photos of this and the next stage were, unfortunately not taken at stage-end. The completed photos shown are from the final stage, with the uninstalled sections photoshopped out. Apologies.)
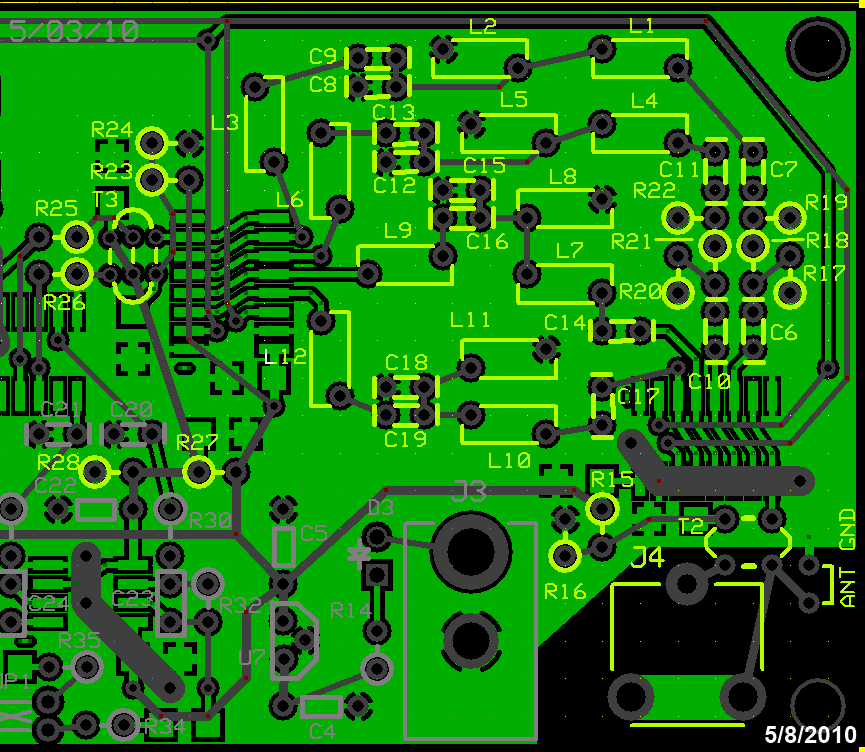
(go directly to build notes)Auto Band Pass Filters Schematic
(Resistor testpoints (hairpin, top, or left-hand lead), as physically installed on the board, are marked in the schematic with red dots)
(Click for Full Schematic)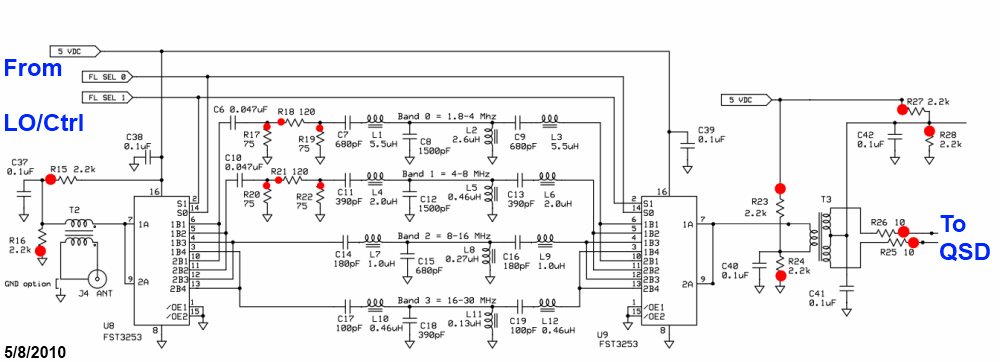
(above schematic has clickable areas that can be used for navigation)
(go directly to build notes)Auto Band Pass Filters Bill of Materials
Stage Bill of Materials
(resistor images and color codes courtesy of WIlfried, DL5SWB's R-Color Code program)
| Check | Count | Component | Marking | Category |
|---|---|---|---|---|
| ❏ | 2 | 10 ohm 1/4W 1% | br-blk-blk-gld-br
 | 1/4W |
| ❏ | 2 | 120 1/6W 5% | brn-red-brn-gld
 | 1/6W |
| ❏ | 4 | 2.2k 1/6W 5% | red-red-red-gld
 | 1/6W |
| ❏ | 2 | 2.2k 1/6W 5% | red-red-red-gld
| 1/6W |
| ❏ | 4 | 75 1/6W 5% | vio-grn-blk-gld
 | 1/6W |
| ❏ | 2 | BN-43-2402 (no markings!) | none
 | Binocular core |
| ❏ | 2 | 0.047 uF 5% | 473
 | Ceramic |
| ❏ | 2 | 100 pF 5% | 101
 | Ceramic |
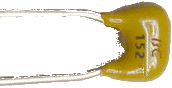
| ❏ | 2 | 1500 pF 10% | 152
 | Ceramic |
| ❏ | 2 | 180 pF 5% | 181
 | Ceramic |
| ❏ | 3 | 390 pF 5% | 391
 | Ceramic |
| ❏ | 3 | 680 pF 5% | 681
 | Ceramic |
| ❏ | 1 | 0.13 uH: 7T #30 (5") on T25-6 core | yellow
 | coil |
| ❏ | 1 | 0.27 uH: 10T #30 (6") on T25-6 core | yellow
| coil |
| ❏ | 3 | 0.46 uH: 13T #30 (7") on T25-6 core | yellow
| coil |
| ❏ | 2 | 1.0 uH: 19T #30 (9") on T25-6 core | yellow
| coil |
| ❏ | 2 | 2.0 uH: 27T #30 (12") on T25-6 core | yellow
| coil |
| ❏ | 1 | 2.6 uH: 31T #30 (13") on T25-6 core | yellow
| coil |
| ❏ | 2 | 5.5 uH: 45T #30 (18") on T25-6 core | yellow
| coil |
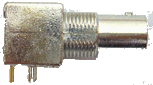
| ❏ | 1 | BNC Connector Male - PCB mount |
 | Jack |
| ❏ | 1 | Magnetic Wire, enameled #30 | Magnetic | |
| ❏ | 1 | Magnetic Wire, enameled #30 | Magnetic | |
| ❏ | 1 | Magnetic Wire, enameled #30 | Magnetic | |
| ❏ | 1 | Magnetic Wire, enameled #30 | Magnetic | |
| ❏ | 6 | 0.1 uF | (smt) black stripe
 | SMT 1206 |
| ❏ | 2 | FST3253 mux/demux switch | FST3253
 | SOIC-16 |
| ❏ | 12 | T25-6 toroid core | yellow
| Toroid |
| ❏ | 1 | 4T bifilar #30 on BN-43-2402 (9") |
| xfrmr |
| ❏ | 1 | 4T/2Tbifilar #30 on BN-43-2402 (7") |
| xfrmr |
Auto Band Pass Filters Summary Build Notes
- Install BPF In/Out Components
- Install and Continuity Test the 160m BPF
- Install the 160m Inductors
- Install the 160m Static Components
- Install and Continuity Test the 80/40m BPF
- Install the 80/40m Inductors
- Install the 80/40m Static Components
- Install and Continuity Test the 30/20/17m BPF
- Install the 30/20/17m Inductors
- Install the 30/20/17m Static Components
- Install and Continuity Test the 15/12/10m BPF
- Install the 15/12/10m Inductors
- Install the 15/12/10m Static Components
- Install Bottomside Components
- Install Antenna Jack
- Test the Stage
Auto Band Pass Filters Detailed Build Notes
Top of the Board
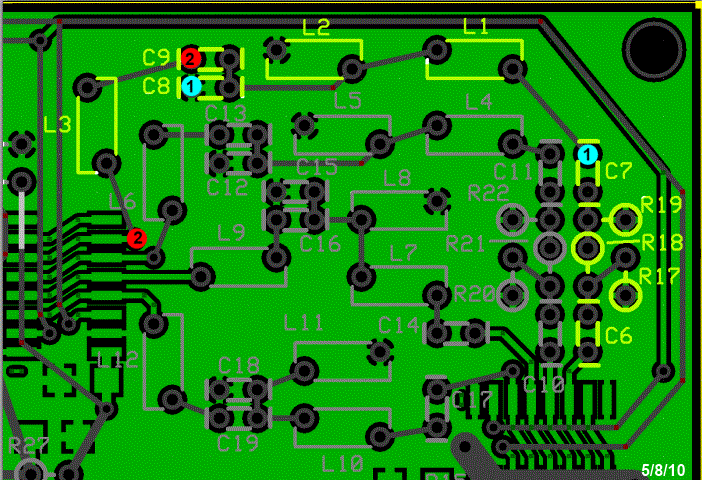
Install BPF In/Out Components
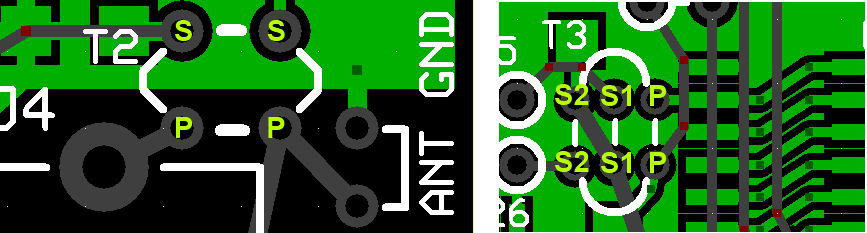
Includes winding and installing the two transformers (one binocular, one toroidal), T2 and T3.
Once the transformers are wound and installed, you should turn the board over and run continuity tests on the primary and secondary windings, per the above diagram
| Check | Designation | Component | Marking | Category | Orientation | Notes |
|---|---|---|---|---|---|---|
| ❏ | R23 | 2.2k 1/6W 5% | red-red-red-gld
| 1/6W | W-E | |
| ❏ | T02 | 4T bifilar #30 on BN-43-2402 (9") |
| xfrmr | ||
| ❏ | T03 | 4T/2Tbifilar #30 on BN-43-2402 (7") |
| xfrmr | ||
| ❏ | R15 | 2.2k 1/6W 5% | red-red-red-gld
| 1/6W | N-S | |
| ❏ | R16 | 2.2k 1/6W 5% | red-red-red-gld
| 1/6W | N-S | |
| ❏ | R24 | 2.2k 1/6W 5% | red-red-red-gld
| 1/6W | W-E | |
| ❏ | R25 | 10 ohm 1/4W 1% | br-blk-blk-gld-br
| 1/4W | E-W | |
| ❏ | R26 | 10 ohm 1/4W 1% | br-blk-blk-gld-br
| 1/4W | E-W | |
| ❏ | R27 | 2.2k 1/6W 5% | red-red-red-gld
| 1/6W | ||
| ❏ | R28 | 2.2k 1/6W 5% | red-red-red-gld
| 1/6W |
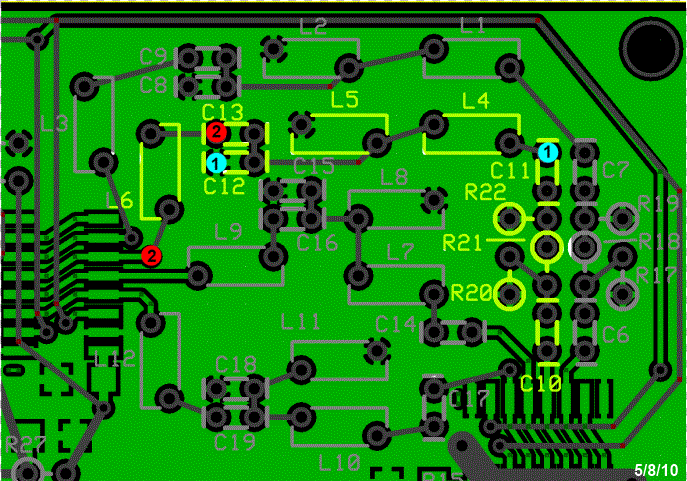
Install and Continuity Test the 160m BPF
In this step and the two steps following it, you will build the bandpass filter for the 160m passband.
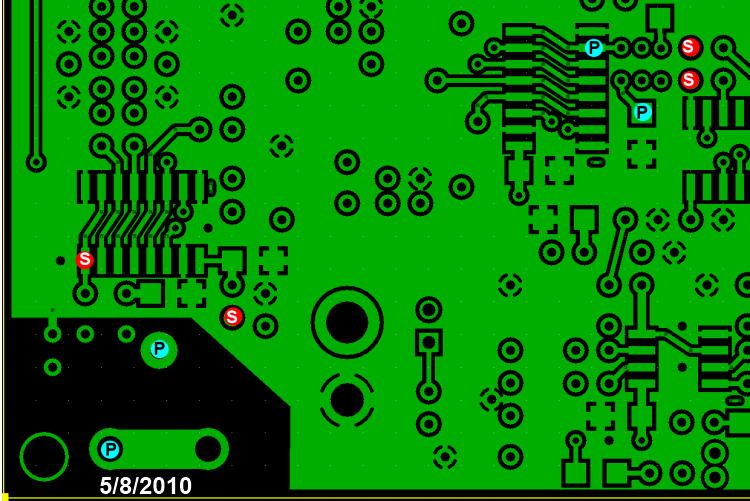
First, you want to wind and install the coils and then continuity test them. The continuity test checks for continuity between the points labeled "1" and then tests the continuity between the points labeled "2". Wherever possible, the test points have been assigned to vias removed from but electrically connected to the coils' vias, so as to give a good test of the soldering.
Once you have successfully verified continuity, you can proceed to install the remaining parts for the passband.
| Check | Designation | Component | Marking | Category | Orientation | Notes |
|---|---|---|---|---|---|---|
| ❏ | magwire_50in | Magnetic Wire, enameled #30 | Magnetic | 50 inches #30 |
Install the 160m Inductors
If you are unfamiliar with winding and installing inductors, you may want to refer to the WB5RVZ construction hints for coils (toroidal) and transformers ( toroidal and binocular). Click here for details on identifying toroid cores.
Decoding the trqansformer specifications:
Transformers' windings are specified using the pattern "nnT/wXmmT" or "wXmmT/nnT", where:
- "nn" is the number of turns in the single winding
- "mm" is the number of turns in the multiple windings
- "w" = the number of multiple windings (e.g., 2 = bifilar; 3 = trifilar, etc.)
Thus, e.g., "18T/2x9T bifilar #30" means, using #30 wire, produce a single 18 turn primary winding and two 9-turn secondary windings; "2x9T bifilar/ 18T #30" means, using #30 wire, produce two 9-turn primary windings and a single 18 turn secondary winding.
| Check | Designation | Component | Marking | Category | Orientation | Notes |
|---|---|---|---|---|---|---|
| ❏ | L01 | 5.5 uH: 45T #30 (18") on T25-6 core | yellow
| coil | ||
| ❏ | L02 | 2.6 uH: 31T #30 (13") on T25-6 core | yellow
| coil | ||
| ❏ | L03 | 5.5 uH: 45T #30 (18") on T25-6 core | yellow
| coil |
Install the 160m Static Components
| Check | Designation | Component | Marking | Category | Orientation | Notes |
|---|---|---|---|---|---|---|
| ❏ | C06 | 0.047 uF 5% | 473
| Ceramic | vert | |
| ❏ | C07 | 680 pF 5% | 681
| Ceramic | vert | |
| ❏ | C08 | 1500 pF 10% | 152
| Ceramic | horiz | |
| ❏ | C09 | 680 pF 5% | 681
| Ceramic | horiz | |
| ❏ | R17 | 75 1/6W 5% | vio-grn-blk-gld
| 1/6W | S-N | |
| ❏ | R18 | 120 1/6W 5% | brn-red-brn-gld
| 1/6W | N-S | |
| ❏ | R19 | 75 1/6W 5% | vio-grn-blk-gld
| 1/6W | E-W |
Install and Continuity Test the 80/40m BPF
In this step and the two steps following it, you will build the bandpass filter for the 80/40m passband.
First, you want to wind and install the coils and then continuity test them. The continuity test checks for continuity between the points labeled "1" and then tests the continuity between the points labeled "2". Wherever possible, the test points have been assigned to vias removed from but electrically connected to the coils' vias, so as to give a good test of the soldering.
Once you have successfully verified continuity, you can proceed to install the remaining parts for the passband.
| Check | Designation | Component | Marking | Category | Orientation | Notes |
|---|---|---|---|---|---|---|
| ❏ | magwire_24in | Magnetic Wire, enameled #30 | Magnetic | 24 inches #30 |
Install the 80/40m Inductors
If you are unfamiliar with winding and installing inductors, you may want to refer to the WB5RVZ construction hints for coils (toroidal) and transformers ( toroidal and binocular). Click here for details on identifying toroid cores.
Decoding the trqansformer specifications:
Transformers' windings are specified using the pattern "nnT/wXmmT" or "wXmmT/nnT", where:
- "nn" is the number of turns in the single winding
- "mm" is the number of turns in the multiple windings
- "w" = the number of multiple windings (e.g., 2 = bifilar; 3 = trifilar, etc.)
Thus, e.g., "18T/2x9T bifilar #30" means, using #30 wire, produce a single 18 turn primary winding and two 9-turn secondary windings; "2x9T bifilar/ 18T #30" means, using #30 wire, produce two 9-turn primary windings and a single 18 turn secondary winding.
| Check | Designation | Component | Marking | Category | Orientation | Notes |
|---|---|---|---|---|---|---|
| ❏ | L04 | 2.0 uH: 27T #30 (12") on T25-6 core | yellow
| coil | ||
| ❏ | L05 | 0.46 uH: 13T #30 (7") on T25-6 core | yellow
| coil | ||
| ❏ | L06 | 2.0 uH: 27T #30 (12") on T25-6 core | yellow
| coil |
Install the 80/40m Static Components
| Check | Designation | Component | Marking | Category | Orientation | Notes |
|---|---|---|---|---|---|---|
| ❏ | C10 | 0.047 uF 5% | 473
| Ceramic | vert | |
| ❏ | C11 | 390 pF 5% | 391
| Ceramic | vert | |
| ❏ | C12 | 1500 pF 10% | 152
| Ceramic | horiz | |
| ❏ | C13 | 390 pF 5% | 391
| Ceramic | horiz | |
| ❏ | R20 | 75 1/6W 5% | vio-grn-blk-gld
| 1/6W | S-N | |
| ❏ | R21 | 120 1/6W 5% | brn-red-brn-gld
| 1/6W | N-S | |
| ❏ | R22 | 75 1/6W 5% | vio-grn-blk-gld
| 1/6W | W-E |
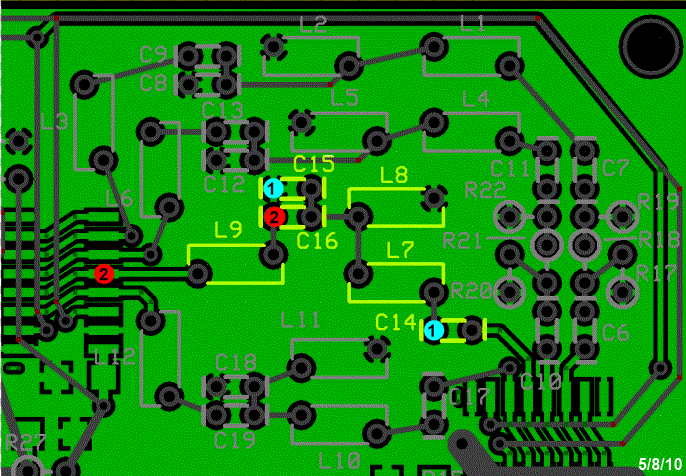
Install and Continuity Test the 30/20/17m BPF
In this step and the two steps following it, you will build the bandpass filter for the 30/20/17m passband.
First, you want to wind and install the coils and then continuity test them. The continuity test checks for continuity between the points labeled "1" and then tests the continuity between the points labeled "2". Wherever possible, the test points have been assigned to vias removed from but electrically connected to the coils' vias, so as to give a good test of the soldering.
Once you have successfully verified continuity, you can proceed to install the remaining parts for the passband.
| Check | Designation | Component | Marking | Category | Orientation | Notes |
|---|---|---|---|---|---|---|
| ❏ | magwire_24in_a | Magnetic Wire, enameled #30 | Magnetic | 24 inches #24 |
Install the 30/20/17m Inductors
If you are unfamiliar with winding and installing inductors, you may want to refer to the WB5RVZ construction hints for coils (toroidal) and transformers ( toroidal and binocular). Click here for details on identifying toroid cores.
Decoding the trqansformer specifications:
Transformers' windings are specified using the pattern "nnT/wXmmT" or "wXmmT/nnT", where:
- "nn" is the number of turns in the single winding
- "mm" is the number of turns in the multiple windings
- "w" = the number of multiple windings (e.g., 2 = bifilar; 3 = trifilar, etc.)
Thus, e.g., "18T/2x9T bifilar #30" means, using #30 wire, produce a single 18 turn primary winding and two 9-turn secondary windings; "2x9T bifilar/ 18T #30" means, using #30 wire, produce two 9-turn primary windings and a single 18 turn secondary winding.
| Check | Designation | Component | Marking | Category | Orientation | Notes |
|---|---|---|---|---|---|---|
| ❏ | L07 | 1.0 uH: 19T #30 (9") on T25-6 core | yellow
| coil | ||
| ❏ | L08 | 0.27 uH: 10T #30 (6") on T25-6 core | yellow
| coil | ||
| ❏ | L09 | 1.0 uH: 19T #30 (9") on T25-6 core | yellow
| coil |
Install the 30/20/17m Static Components
| Check | Designation | Component | Marking | Category | Orientation | Notes |
|---|---|---|---|---|---|---|
| ❏ | C14 | 180 pF 5% | 181
| Ceramic | horiz | |
| ❏ | C15 | 680 pF 5% | 681
| Ceramic | horiz | |
| ❏ | C16 | 180 pF 5% | 181
| Ceramic | horiz |
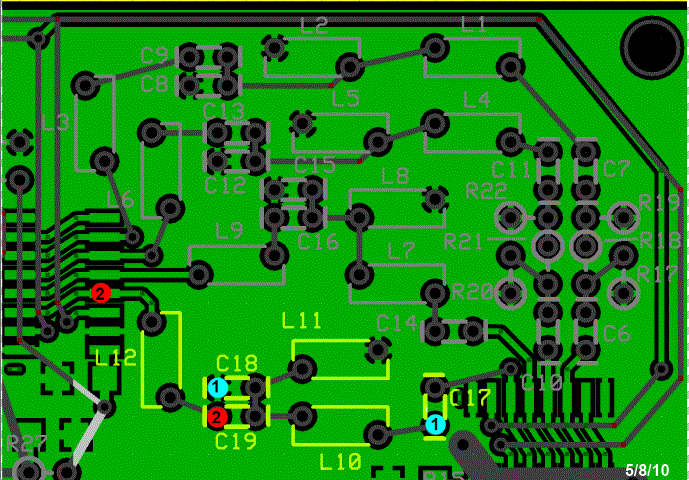
Install and Continuity Test the 15/12/10m BPF
In this step and the two steps following it, you will build the bandpass filter for the 15/12/10m passband.
First, you want to wind and install the coils and then continuity test them. The continuity test checks for continuity between the points labeled "1" and then tests the continuity between the points labeled "2". Wherever possible, the test points have been assigned to vias removed from but electrically connected to the coils' vias, so as to give a good test of the soldering.
Once you have successfully verified continuity, you can proceed to install the remaining parts for the passband.
| Check | Designation | Component | Marking | Category | Orientation | Notes |
|---|---|---|---|---|---|---|
| ❏ | magwire_19in | Magnetic Wire, enameled #30 | Magnetic | 19 inches #24 |
Install the 15/12/10m Inductors
If you are unfamiliar with winding and installing inductors, you may want to refer to the WB5RVZ construction hints for coils (toroidal) and transformers ( toroidal and binocular). Click here for details on identifying toroid cores.
Decoding the trqansformer specifications:
Transformers' windings are specified using the pattern "nnT/wXmmT" or "wXmmT/nnT", where:
- "nn" is the number of turns in the single winding
- "mm" is the number of turns in the multiple windings
- "w" = the number of multiple windings (e.g., 2 = bifilar; 3 = trifilar, etc.)
Thus, e.g., "18T/2x9T bifilar #30" means, using #30 wire, produce a single 18 turn primary winding and two 9-turn secondary windings; "2x9T bifilar/ 18T #30" means, using #30 wire, produce two 9-turn primary windings and a single 18 turn secondary winding.
| Check | Designation | Component | Marking | Category | Orientation | Notes |
|---|---|---|---|---|---|---|
| ❏ | L10 | 0.46 uH: 13T #30 (7") on T25-6 core | yellow
| coil | ||
| ❏ | L11 | 0.13 uH: 7T #30 (5") on T25-6 core | yellow
| coil | ||
| ❏ | L12 | 0.46 uH: 13T #30 (7") on T25-6 core | yellow
| coil |
Install the 15/12/10m Static Components
| Check | Designation | Component | Marking | Category | Orientation | Notes |
|---|---|---|---|---|---|---|
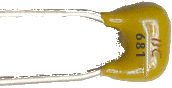
| ❏ | C17 | 100 pF 5% | 101
| Ceramic | vert | |
| ❏ | C18 | 390 pF 5% | 391
| Ceramic | horiz | |
| ❏ | C19 | 100 pF 5% | 101
| Ceramic | horiz |
Install Antenna Jack
| Check | Designation | Component | Marking | Category | Orientation | Notes |
|---|---|---|---|---|---|---|
| ❏ | J04 | BNC Connector Male - PCB mount |
| Jack |
Bottom of the Board
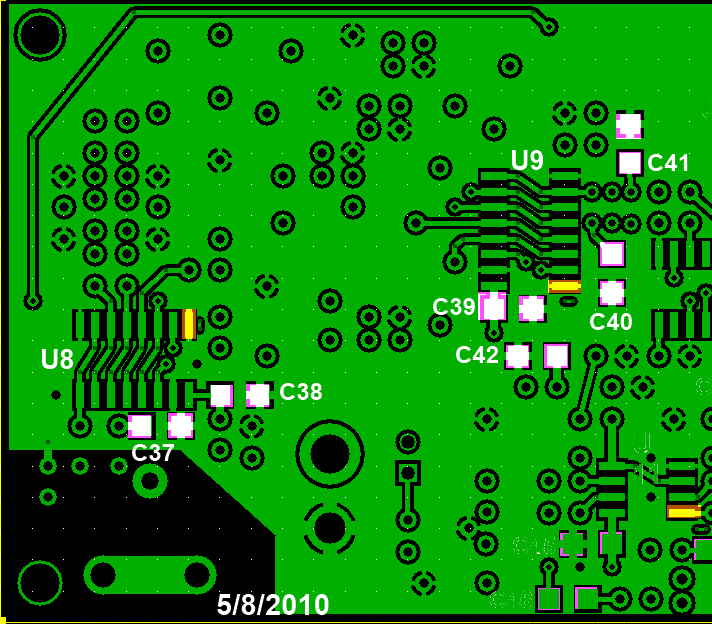
Install Bottomside Components
| Check | Designation | Component | Marking | Category | Orientation | Notes |
|---|---|---|---|---|---|---|
| ❏ | U08 | FST3253 mux/demux switch | FST3253
| SOIC-16 | Take ESD precautions | |
| ❏ | U09 | FST3253 mux/demux switch | FST3253
| SOIC-16 | Take ESD precautions | |
| ❏ | C37 | 0.1 uF | (smt) black stripe
| SMT 1206 | white pads | |
| ❏ | C38 | 0.1 uF | (smt) black stripe
| SMT 1206 | yellow pads | |
| ❏ | C39 | 0.1 uF | (smt) black stripe
| SMT 1206 | yellow pads | |
| ❏ | C40 | 0.1 uF | (smt) black stripe
| SMT 1206 | yellow pads | |
| ❏ | C41 | 0.1 uF | (smt) black stripe
| SMT 1206 | white pads | |
| ❏ | C42 | 0.1 uF | (smt) black stripe
| SMT 1206 | yellow pads |
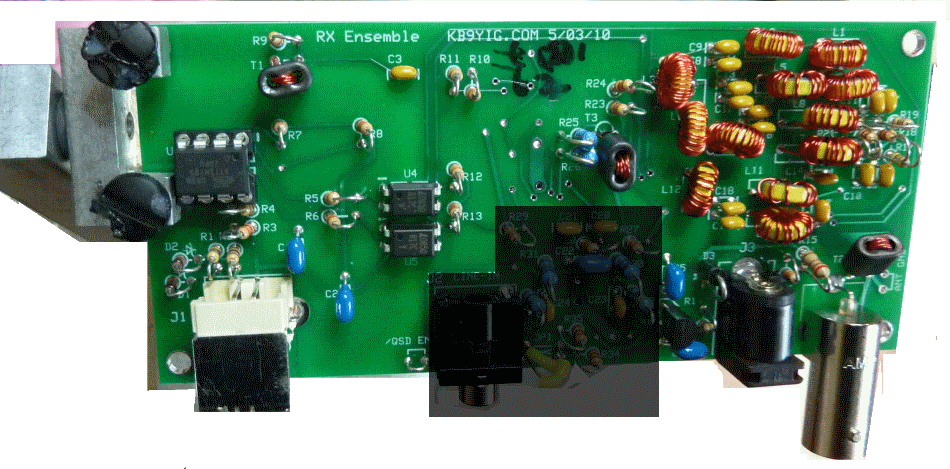
Auto Band Pass Filters Completed Stage
Top of the Board
Bottom of the Board

Auto Band Pass Filters Testing
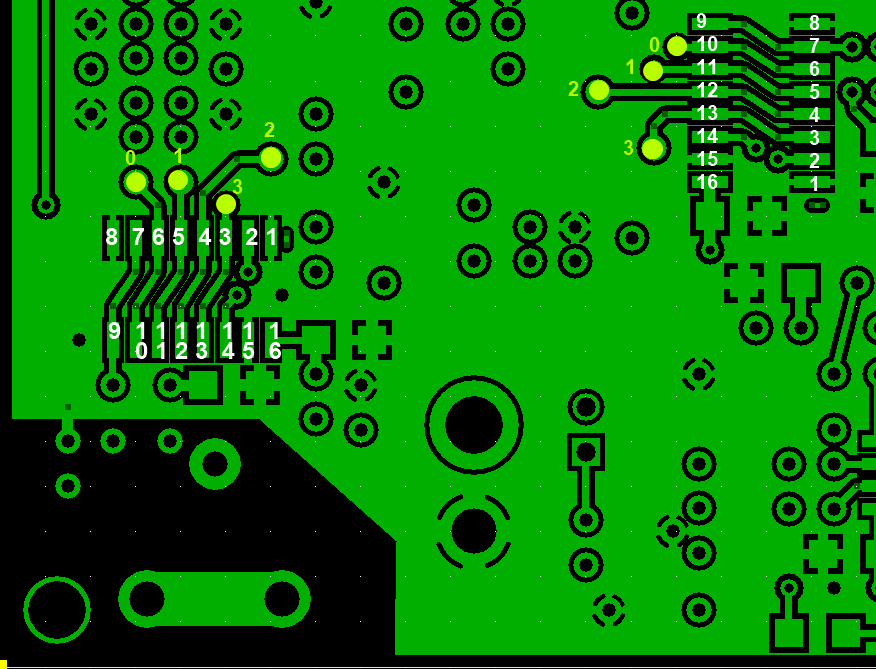
Pin Voltages on the Ics
Test Setup
Run the Filter Selection Test from the LO and Control Stage, only instead of measuring the voltages at the hairpin leads of R12 and R13, measure the voltages at the 2 and 14 PINS (not the pads) of U8 and U9. This will validate that the pins were correctly soldered to the pads and are getting the switching signals.
Perform the tests below for each of U8 and U9
Test Measurements
| Testpoint | Units | Nominal Value | Author's | Yours |
|---|---|---|---|---|
| LO=2 MHz (band 0) - Test pin 2 (FL SEL 1) | V dc | 0 | 100 mV | _______ |
| LO=2 MHz (band 0) - Test pin 14 (FL SEL 0) | V dc | 0 | 100 mV | _______ |
| LO=6 MHz (band 1) - Test pin 2 (FL SEL 1) | V dc | 0 | 100 mV | _______ |
| LO=6 MHz (band 1) - Test pin 14 (FL SEL 0) | V dc | 5 | 4.92 | _______ |
| LO=12 MHz (band 2) - Test pin 2 (FL SEL 1) | V dc | 5 | 4.92 | _______ |
| LO=12 MHz (band 2) - Test pin 14 (FL SEL 0) | V dc | 0 | 100 mV | _______ |
| LO=24 MHz (band 3) - Test pin 2 (FL SEL 1) | V dc | 5 | 4.92 | _______ |
| LO=24 MHz (band 3) - Test pin 14 (FL SEL 0) | V dc | 5 | 4.92 | _______ |
(Optional) RF Test
Test Setup
If you have a scope and a signal source (or an RF probe and a signal source)
Inject an RF signal of around 50-100 mV at the antenna jack, determine which band should switch for that RF signal, and probe the pins of U8 and U9 which should be switched to that signal:
| Band | Switched Pins |
|---|---|
| 0 (1-4 MHz) | 6 & 10 |
| 1 (4-8 MHz) | 5 & 11 |
| 2 (8-16 MHz) | 4 & 12 |
| 3 (16-30 MHz) | 3 & 13 |
Your scope should show the signal at the switched pins and not at any of the other pins.