Local Oscillator and Control Introduction
General
This stage completes the component installation for the isolated USB ground plane and implements the microcontroller and local oscillator functionality.
The microcontroller implements a USB device which can control frequency of the programmable oscillator (Si570) and provides programmatic band-select switching signals to select from among bands 0, 1, 2, and 3. These bands are "super bands" which, depending upon the builder's choice of options, provide coverage of the traditional HF bands or a set of HF bands plus 6m.
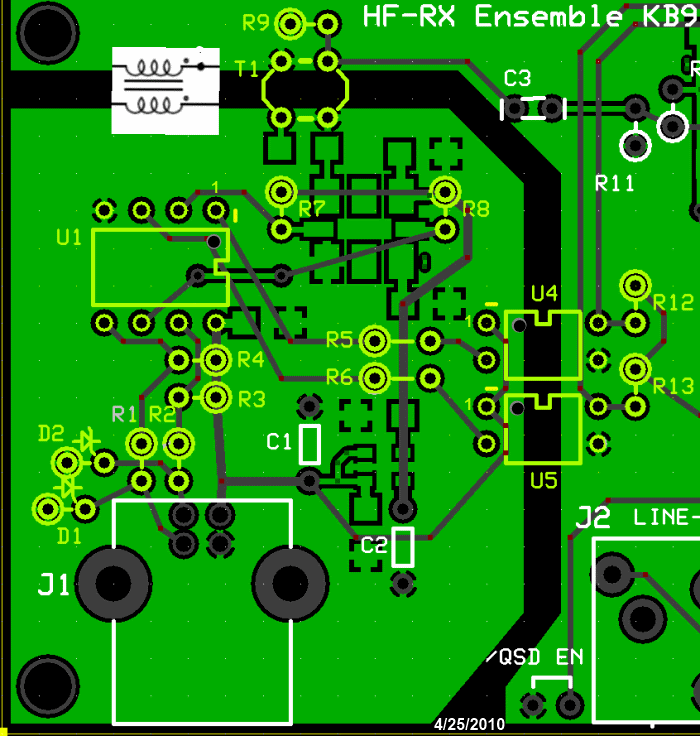
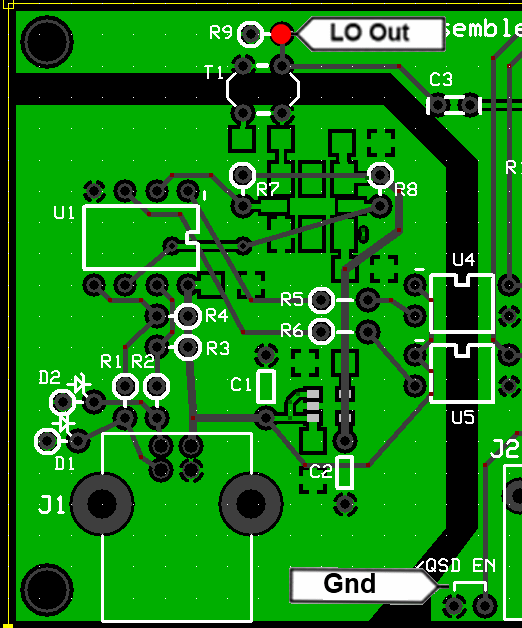
(go directly to build notes)Local Oscillator and Control Schematic
(Resistor testpoints (hairpin, top, or left-hand lead), as physically installed on the board, are marked in the schematic with red dots)
(Click for Full Schematic)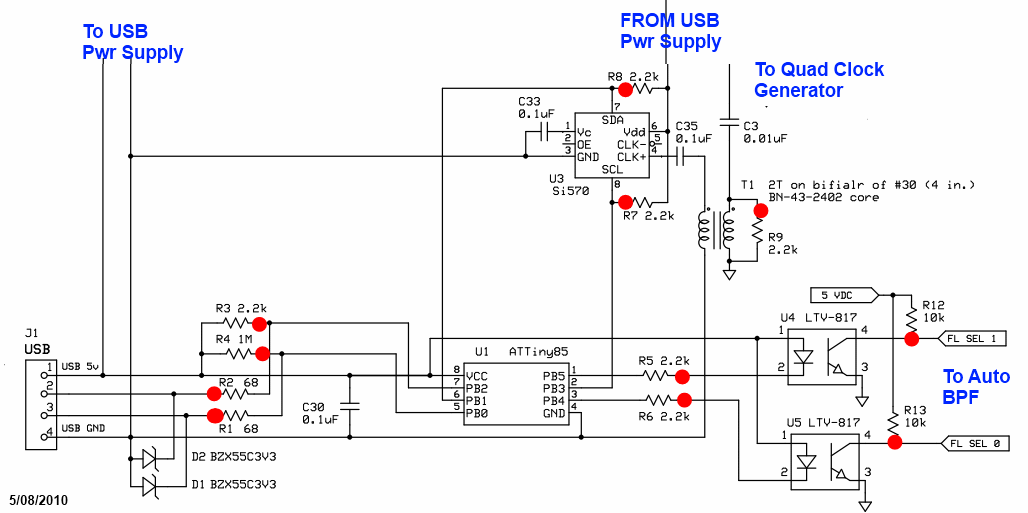
(above schematic has clickable areas that can be used for navigation)
(go directly to build notes)Local Oscillator and Control Bill of Materials
Stage Bill of Materials
(resistor images and color codes courtesy of WIlfried, DL5SWB's R-Color Code program)
| Check | Count | Component | Marking | Category |
|---|---|---|---|---|
| ❏ | 1 | 1 M 1/6W 5% | brn-blk-grn-gld
 | 1/6W |
| ❏ | 2 | 10 k 1/6W 5% | brn-blk-ora-gld
 | 1/6W |
| ❏ | 5 | 2.2k 1/6W 5% | red-red-red-gld
 | 1/6W |
| ❏ | 1 | 2.2k 1/6W 5% | red-red-red-gld
| 1/6W |
| ❏ | 2 | 68 1/6W 5% | bl-gry-blk-gld
 | 1/6W |
| ❏ | 2 | BZX55C3V3 3.3V zener diode | BZX55C
 | Axial |
| ❏ | 1 | BN-43-2402 (no markings!) | none
 | Binocular core |
| ❏ | 1 | 0.01 uF | 103
 | Ceramic |
| ❏ | 1 | ATtiny 85-20 PU w/V15.12 Firmware | AVR ATTINY85-20PU
 | DIP 8 |
| ❏ | 2 | LTV-817 Opto-Isolator | LTV 817
 | DIP-4 |
| ❏ | 1 | Si570 Programmable Oscillator | SiLabs 570
 | I2C |
| ❏ | 1 | Magnetic Wire, enameled #30 | Magnetic | |
| ❏ | 3 | 0.1 uF | (smt) black stripe
 | SMT 1206 |
| ❏ | 1 | 8 pin dip socket | Socket | |
| ❏ | 1 | 2T Bifilar #30 (4") on BN-43-2402 |
| Xfrmr |
Local Oscillator and Control Summary Build Notes
- Install Protective Topside Parts
- Install Bottomside Components
- Wind and Install T1
- Install Topside Ics
- Install Remainder of Topside Components
- Download and Install Required Software
- Test the Stage
Local Oscillator and Control Detailed Build Notes
Bottom of the Board
Install Protective Topside Parts
Install these resistors first, so as to protet against solder splashover at pins 4 and 8 off the Si570 (see below)

| Check | Designation | Component | Marking | Category | Orientation | Notes |
|---|---|---|---|---|---|---|
| ❏ | R07 | 2.2k 1/6W 5% | red-red-red-gld
| 1/6W | N-S | |
| ❏ | R08 | 2.2k 1/6W 5% | red-red-red-gld
| 1/6W | N-S |
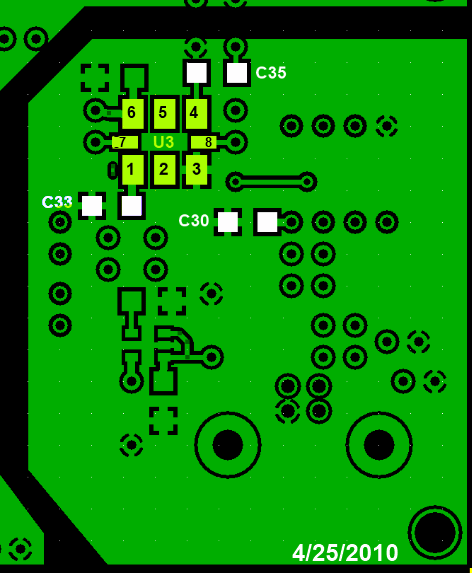
Install Bottomside Components
Watch out when installing C35 to avoid solder splashover into the adjacent holes for the T1 primary windings.
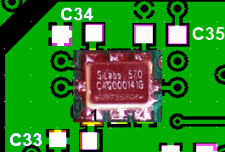
Note the orientation photo for the Si570 and install with correct orientation. Pay close attention to the pins 4 and 8, as their footpring is quite small relative to the other pads.
| Check | Designation | Component | Marking | Category | Orientation | Notes |
|---|---|---|---|---|---|---|
| ❏ | U03 | Si570 Programmable Oscillator | SiLabs 570
| I2C | ||
| ❏ | C30 | 0.1 uF | (smt) black stripe
| SMT 1206 | white pads | |
| ❏ | C33 | 0.1 uF | (smt) black stripe
| SMT 1206 | white pads | |
| ❏ | C35 | 0.1 uF | (smt) black stripe
| SMT 1206 | white pads |
Top of the Board
Wind and Install T1
This is a transformer, wound using a "bifilar" strand. The strand is made of a single wire, doubled over to make two wires, and twisted together to about 3-4 twists per inch. It is then threaded through the binocular core for the required number of turns (2). Once wound, the strand is cut at the bent end, yielding four leads. Then, check the leads with an ohmmeter to identify which leads are electrically connected.
Since the windings are both of identical length, the identification of the "primary" and the :secondary" windings is easy: select one winding (i.e., pair of leads that show continuity) and call it "primary"; the remaining winding is the "secondary" winding.
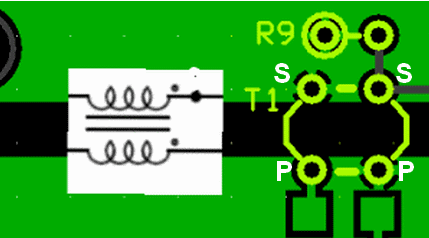
If you are unfamiliar with winding and installing inductors, you may want to refer to the WB5RVZ construction hints for coils (toroidal) and transformers ( toroidal and binocular). Click here for details on identifying toroid cores.
Decoding the trqansformer specifications:
Transformers' windings are specified using the pattern "nnT/wXmmT" or "wXmmT/nnT", where:
- "nn" is the number of turns in the single winding
- "mm" is the number of turns in the multiple windings
- "w" = the number of multiple windings (e.g., 2 = bifilar; 3 = trifilar, etc.)
Thus, e.g., "18T/2x9T bifilar #30" means, using #30 wire, produce a single 18 turn primary winding and two 9-turn secondary windings; "2x9T bifilar/ 18T #30" means, using #30 wire, produce two 9-turn primary windings and a single 18 turn secondary winding.
| Check | Designation | Component | Marking | Category | Orientation | Notes |
|---|---|---|---|---|---|---|
| ❏ | magwire | Magnetic Wire, enameled #30 | Magnetic | (total of 30 ft. provided in kit) | ||
| ❏ | T01 | 2T Bifilar #30 (4") on BN-43-2402 |
| Xfrmr | change from 3Ttrifilar |
Install Topside Ics
Double check the orientation on the two optoisolators. They should be oriented so that their "dimple" is in the upper left-hand corner.
| Check | Designation | Component | Marking | Category | Orientation | Notes |
|---|---|---|---|---|---|---|
| ❏ | SO1 | 8 pin dip socket | Socket | for ATTiny85 | ||
| ❏ | U01 | ATtiny 85-20 PU w/V15.12 Firmware | AVR ATTINY85-20PU
| DIP 8 | (dimple in upper right) | Take ESD precautions |
| ❏ | U04 | LTV-817 Opto-Isolator | LTV 817
| DIP-4 | (dimple in upper left) | Take ESD precautions |
| ❏ | U05 | LTV-817 Opto-Isolator | LTV 817
| DIP-4 | (dimple in upper left) | Take ESD precautions |
Install Remainder of Topside Components
Careful installing the resistors and diodes clustered near the USB connector area. Builders have been known to insert these into the wrong holes. Review the board layout and the orientation column below to double check the orientation.
The body of each zener is to be located above the silkscreen circles for D1 and D2 on the board with the diodes mounted standing perpendicular to the board in a hairpin fashion. The banded end of each diode is then at the lead of the diode that loops back to the circuit board.
| Check | Designation | Component | Marking | Category | Orientation | Notes |
|---|---|---|---|---|---|---|
| ❏ | D1 | BZX55C3V3 3.3V zener diode | BZX55C
| Axial | The band end of the diode is the hairpin lead - see board layout | |
| ❏ | D2 | BZX55C3V3 3.3V zener diode | BZX55C
| Axial | The band end of the diode is the hairpin lead - see board layout | |
| ❏ | C03 | 0.01 uF | 103
| Ceramic | horiz | |
| ❏ | R01 | 68 1/6W 5% | bl-gry-blk-gld
| 1/6W | N-S | |
| ❏ | R02 | 68 1/6W 5% | bl-gry-blk-gld
| 1/6W | N-S | |
| ❏ | R03 | 2.2k 1/6W 5% | red-red-red-gld
| 1/6W | E-W | |
| ❏ | R05 | 2.2k 1/6W 5% | red-red-red-gld
| 1/6W | W-E | |
| ❏ | R06 | 2.2k 1/6W 5% | red-red-red-gld
| 1/6W | W-E | |
| ❏ | R09 | 2.2k 1/6W 5% | red-red-red-gld
| 1/6W | W-E | chenged from 221 |
| ❏ | R12 | 10 k 1/6W 5% | brn-blk-ora-gld
| 1/6W | N-S | |
| ❏ | R13 | 10 k 1/6W 5% | brn-blk-ora-gld
| 1/6W | N-S | |
| ❏ | R04 | 1 M 1/6W 5% | brn-blk-grn-gld
| 1/6W | E-W |
Download and Install Required Software
All of the latest versions of essential firmware configuration programs, USB driver and their associated documentation can be obtained from Fred PE0FKO's website:
- USB driver: (search for "Download Firmware source and .hex files")
- CFGSR program: (search for "Download")
- Documentation
In order to test (and later, operate) your rig, you must download and install required software (SDR programs and Dynamic Link Libraries, along with hardware drivers. The actual steps and programs may vary, depending upon your computer's windows operating system version (XP, Vista, or Windows 7) and architecture CPU/memory (32 bit or 64 bit).
The following links are provided and, as of 7/8/2010, are current:
| Software | Role/Purpose | Download Link | Notes |
|---|---|---|---|
| CFGSR | Configure/Control Ensemble microcontroller | download | |
| SRDLL | dll for Softrock controllers | download | |
| USB driver(s) | drivers for ATTiny85 USB | download | Zip file with 32 and 64 bit drivers*. |
| WinRadHD | Simple SDR (RX only) Program | download | |
| (Windows XP) PowerSDR-IQ V1.12.20 | Version of FlexRadio's PowerSDR tailored for I/Q Soundcard-based SDRs | download | Has Si570 Control Capability |
| (Windows 7, Vista) PowerSDR-IQ V1.19.3.15 | Version of FlexRadio's PowerSDR tailored for I/Q Soundcard-based SDRs | download | Has Si570 Control Capability (Please see Christos' message 43204 on the Yahoo Reflector) |
*Note on installing PE0-FKO's USB Drivers: Fred's website has an excellent step-by-step guide to instaling the USB driver.
Install Driver
The correct procedure is to download the driver and put it in a suitable folder, then plug in the USB lead, Windows should detect new hardware has been found and you need to manually point it to the folder containing the drive. It should then install correctly. Certainly does on Win2000 and XP. On Vista or Windows 7, there used to be some issues with driver signing. There have been messages on the forum describing methods of working around these issues. One such solution is addressed in the author's MOBO4.3 builders notes.
LibUSB - "Unknown Device" Error
Others have experienced the dreaded "Unknown Device" problem upon plugging in the USB cable after having installed the LibUsb driver. This "unknown device" problem (and a remedy for those who are using Logitech cordless mouse and/or various wireless internet connection adaptors) are discussed in message #45071 and Message #47755 on the Yahoo Softrock40 Group
Install/Run CFGSR ("ConFiGureSoftRock")
Once the driver is installed, if you run 'CFGSR' that will either automatically 'open' the firmware, or if not, you need to go to the 'USB' tab and select it from the list displayed in the bottom box. Which way depends on if you have 'CFGSR' set up to auto connect on program start or not.
Test Local Oscillator
You can use 'CFGSR' to exercise the Si570 using the 'Tune' tab that makes it into a 'VFO'. Just a case of setting the frequency, and the Si570 should output a signal at 4 times the frequency displayed on the main display on the screen. The 'Test' tab can also be used to look at all the various Si570 registers etc, but probably unnecessary as if you can hear or measure the Si570 output frequency, you know it is working.
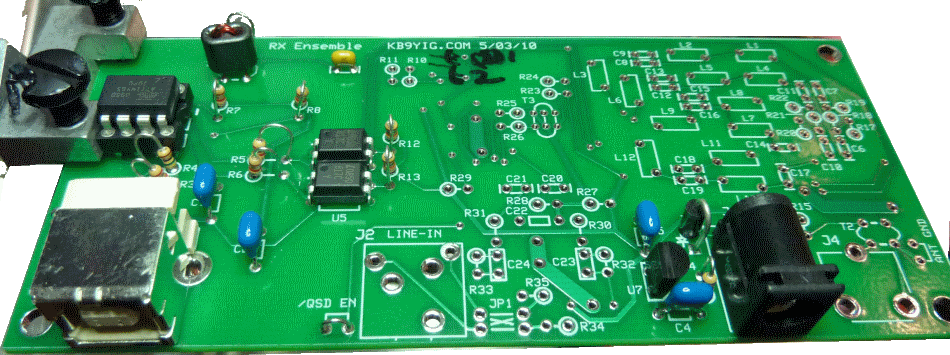
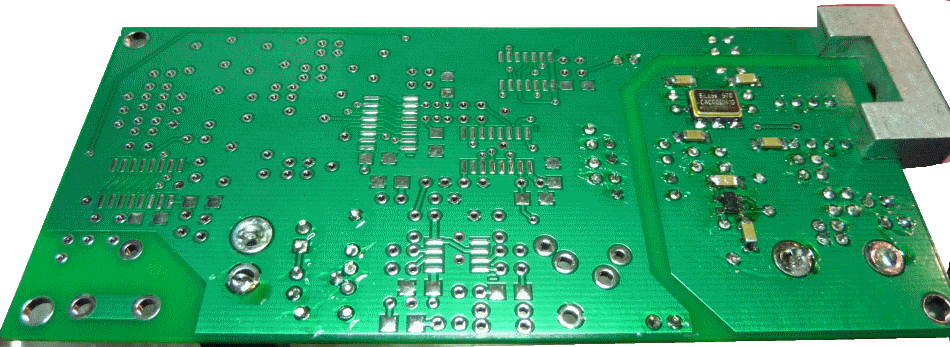
Local Oscillator and Control Completed Stage
Top of the Board
Bottom of the Board
Local Oscillator and Control Testing
Current Draw
Test Setup
Power up the regular circuit side of the board
Measure the current draw on the 12 V power lead (WITHOUT the USB plugged in)
Plug in the USB cable and keep 12V power to the main circuit
Measure the current draw on the 12 V power lead (WITH the USB plugged in). You should get a slightly higher current draw.
Test Measurements
| Testpoint | Units | Nominal Value | Author's | Yours |
|---|---|---|---|---|
| Current Draw - NO USB | mA | < 8 | 4.3 | _______ |
| Current Draw - USB plugged in | mA | < 9 | 5.3 | _______ |
Test T1 Windings
Test Setup
Using an ohmmeter, check for continuity between the right-hand pad for C35 (point marked "A") and the USB ground (point marked "B"). You should get continuity (~ 0 ohms). Then, check for continuity (~ 0 ohms) between the right-hand pad of C35 (point marked "A") and the regular ground (point marked "C"). You should NOT get continuity; if you do get continuity, then you have a short in the windings or you have your windings crossed.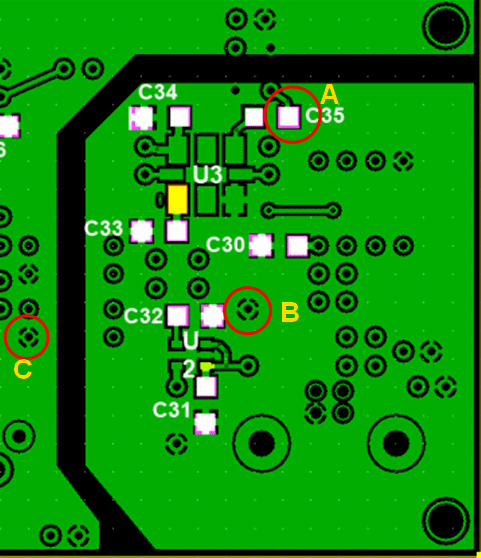
Test Measurements
| Testpoint | Units | Nominal Value | Author's | Yours |
|---|---|---|---|---|
| "A" to "B" | ohms | ~0 | _______ | |
| "A" to "C" | ohms | ~ infinity | _______ |
LO Stage Outputs
Test Setup
Here we want to measure the output (4x center frequency for dividers). It is measured WRT (regular) ground (at the R9 hairpion lead).
Setup
Be sure all software and drivers, etc., have been installed. Connect the USB jack via USB cable to the PC. You should hear the "BoopBoop" sound the PC makes when it recognizes a device (the Ensemble) has been attached to a USB port..
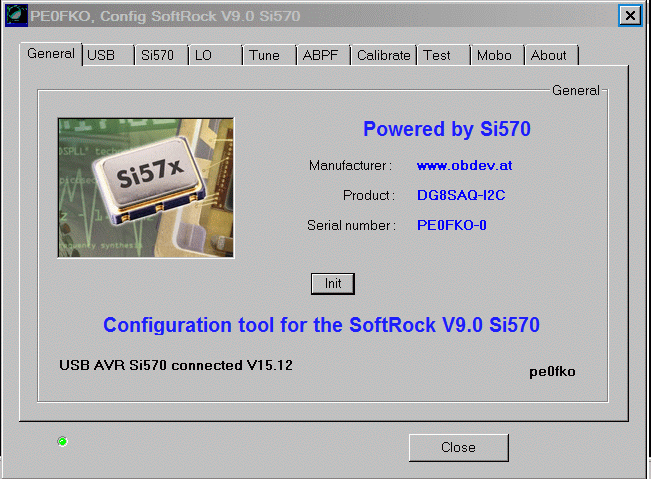
Next, run CFGSR.exe and you should get the following screen:
Then, check out the "Si570" tab. It should look like this:
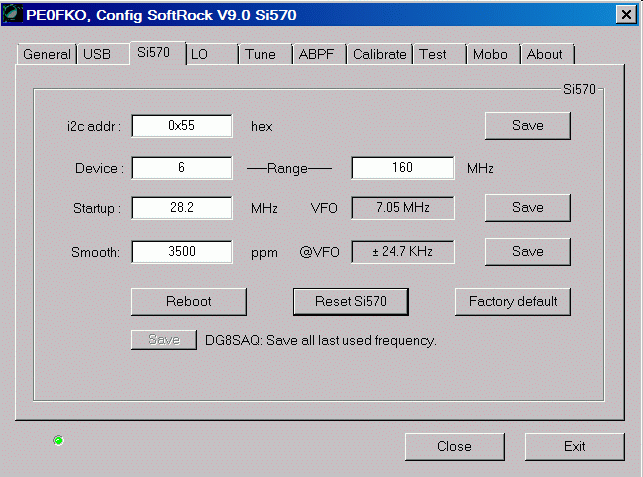
Note that the Local Oscillator's outputs are measured with respect to the analog ground plane, NOT with respect to the galvanically isolated USB groundplane. The /QSD EN shunt is a good point for this ground connection.
Using the CFGSR Software (at the "Tune" tab), test scenarios for setting the center frequency (remember, the Si570 produces a signal that is 4 times the desired center frequency).
Measure the output at the hairpin lead of R9.
Below is an example of tuning the Si570 in CFGSR, selecting a center frerquency of 6.05 MHz (with an Si570 output frequency of 4x, or 24.2MHz. (Pay no attention to the lousy oscilloscope behind the curtains - the output is really a square wave, but the scope is a cheap USB scope that doesn't sample HF square waves very well.)
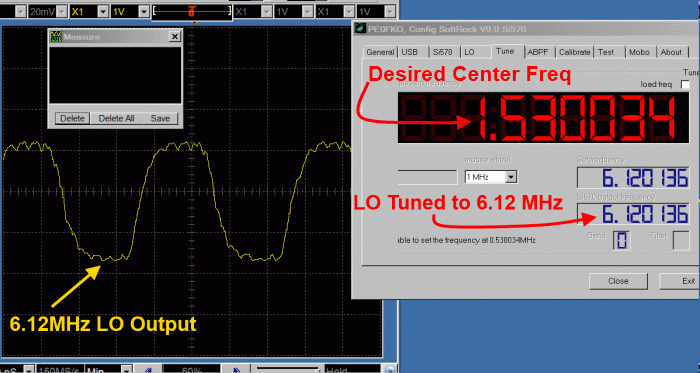
You can place your mouse on the frequency in the center frequency field and turn your mouse wheel. The center frequency will increase or decrease and the LO Output frequency (4x) will increase or decrease at a rate 4 times that of the center frequency.
John, KB6QL, discovered this trick for those with no scope, counter, or HF radio to use in testing LO output:
"Turns out that local oscillator can be tuned for a frequency that is in the FM band. So, as a quick and dirty, I got out my little MP3 player-cum-FM-radio and tuned it to that frequency and let the headset cord/ant drape over the RX. It gave me full quieting. Then I switched the RX to another frequency and the quieting was gone."
Trouble Shooting
If the LO oscillates at the factory default frequency but will not respond to your attempts to change the frequency, the very first place to look is on the soldering of the Si570, most especially pins 7 and 8. Those pins - and their soldering - constitute the single most often found cause of inability to change the frequency of the Si570.
Validate Filter Selection Outputs
Test Setup
Start up CFSR again and tune the local oscillator through four frequencies (each being in the middle of one of the bands):
- 2MHz
- 6MHz
- 12MHz
- 24MHz
Measure the voltages at "FL SEL 0" (R13 hairpin) and "FL SEL 1" (R12 hairpin) with respect to regular ground
(The high/low values at R12 and R13 are used in the ABPF switching truth table, shown in the Automatic Band Pass Filter stage's introductory paragraphs.
Test Measurements
| Testpoint | Units | Nominal Value | Author's | Yours |
|---|---|---|---|---|
| R12 (for 2 MHz band 0) | Vdc | 0 | 100 mV | _______ |
| R12 (for 6 MHz band 1) | Vdc | 0 | 100 mV | _______ |
| R12 (for 12 MHz band 2) | Vdc | 5 | 4.92 | _______ |
| R12 (for 24 MHz band 3) | Vdc | 5 | 4.92 | _______ |
| R13 (for 2 MHz band 0) | Vdc | 0 | 100 mV | _______ |
| R13 (for 6 MHz band 1) | Vdc | 5 | 4.92 | _______ |
| R13 (for 12 MHz band 2) | Vdc | 0 | 100 mV | _______ |
| R13 (for 24 MHz band 3) | Vdc | 5 | 4.92 | _______ |