Opamps and I/O Introduction
General
In this final stage, we complete the hardware installation with the addition of the dual OpAmps and the I/O from/to the PC. The final test of this will involve running the software and calibrating it, in addition to the simple tests for the opamps' hardware.
(go directly to build notes)Opamps and I/O Schematic
(Click for Full Schematic)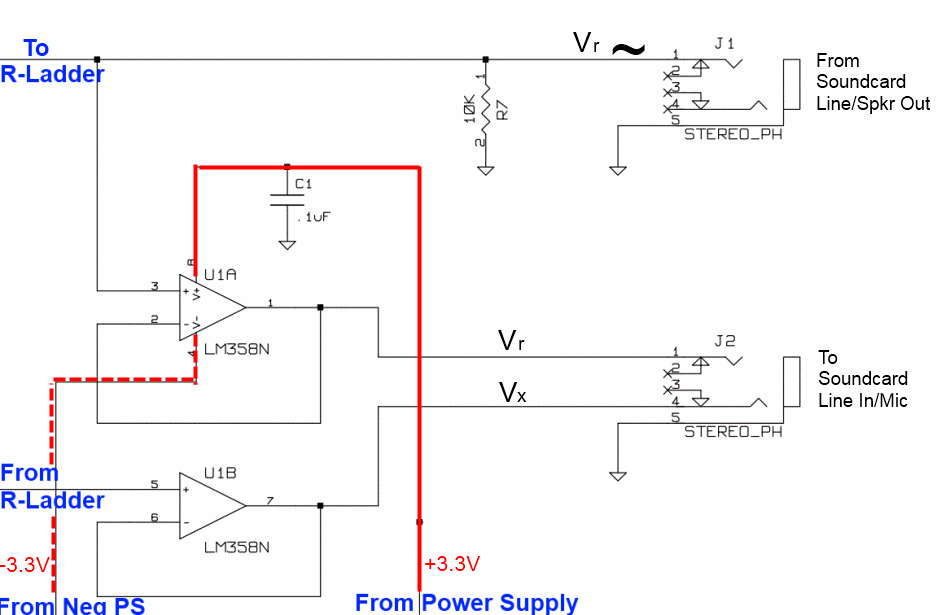
(above schematic has clickable areas that can be used for navigation)
(go directly to build notes)Opamps and I/O Bill of Materials
Stage Bill of Materials
(resistor images and color codes courtesy of WIlfried, DL5SWB's R-Color Code program)
| Check | Designation | Component | Marking | Category | Orientation | Notes | Circuit |
|---|---|---|---|---|---|---|---|
| ❏ | J2 | 3.5mm stereo jack - PCB mount (rt-angle) |
 | Jack-RA | Opamps and I/O | ||
| ❏ | U1 | LM358N dual OpAmp 0-70 deg C | LM358N dual OpAmp 0-70 deg C
 | DIP-8 | Opamps and I/O | ||
| ❏ | R7 | 10 k 1/4W 1% | brn-blk-blk-red-brn
 | 1/4W | Opamps and I/O | ||
| ❏ | J1 | 3.5mm stereo jack - PCB mount (rt-angle) |
| Jack-RA | Opamps and I/O | ||
| ❏ | C1 | 100 nF(0,1 uF) | 104
 | Ceramic | Opamps and I/O | ||
| ❏ | cbl2 | 1/8" M-M Stereo Audio Shld Cable | User-Supplied | Not provided with kit | Opamps and I/O | ||
| ❏ | cbl3 | 1/8" M-M Stereo Audio Shld Cable | User-Supplied | Not provided with kit | Opamps and I/O |
Opamps and I/O Summary Build Notes
- Install OpAmp IC
- Install Passive Components
- Install stereo audio jacks
- Download and Install The Program
- Do Initial Program and SoundCard Settings
- Test the Stage
Opamps and I/O Detailed Build Notes
Top of the Board
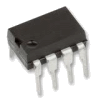
Install OpAmp IC
Be very careful to correctly orient the OpAmp IC U1 and its 1-pin correctly. Remember, you are soldering this in and the resulting permanance suggests the old maxim measure twice, cut once. The one pin on U1 is indicated by the dimple on the chip's top:
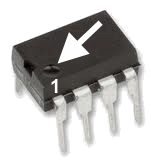
Insert the chip's 8 pins into their respective holes. Be sure to verify that all 8 pins went through their respective holes. If one of the pins gets folded under during insertion, it is nearly impossible to detect and can lead to a frustrating trouble-shooting experience.
"Tack Solder" two opposite pins to hold the chip in. Then turn the board over from the bottomside to the topside and DOUBLE CHECK YOUR WORK before soldering, then, CHECK AGAIN. You do not want to have to remove the chip because it was improperly oriented!
Also, take ESD precaustions in handling this chip.
| Check | Designation | Component | Marking | Category | Orientation | Notes |
|---|---|---|---|---|---|---|
| ❏ | U1 | LM358N dual OpAmp 0-70 deg C | LM358N dual OpAmp 0-70 deg C
| DIP-8 | Take ESD precautions |
Install Passive Components
| Check | Designation | Component | Marking | Category | Orientation | Notes |
|---|---|---|---|---|---|---|
| ❏ | R7 | 10 k 1/4W 1% | brn-blk-blk-red-brn
| 1/4W | ||
| ❏ | C1 | 100 nF(0,1 uF) | 104
| Ceramic |
Install stereo audio jacks
Jacks
Install J2 ("LineIn"), then J1 ("LineOut"). For each, insert the jack's pins into their respective holes on the board and use your fingers to hols the jack firmly to the board. Turn the board over and, as you did with the Ics, "tack solder" a couple of pins to hold it firmly in place. Then you can go over all of the pins and solder them firmly.
Cables
You can avoid later problems if you label your (user-supplied) stereo audio cables as "LineIn" and "LineOut". This will help avoid the issue the author had when the cables were reversed and several hours were lost trying to figure out why the software "wasn't working"!
During testing and regular operation, the "LineIn" cable will connect between your computer's soundcard "LineIn" input and jack J2 on your kit. "LineOut" cable will connect between your soundcard's "lineOut" (or "Speaker" out output jack and jack J1 on your kit.
| Check | Designation | Component | Marking | Category | Orientation | Notes |
|---|---|---|---|---|---|---|
| ❏ | J2 | 3.5mm stereo jack - PCB mount (rt-angle) |
| Jack-RA | ||
| ❏ | J1 | 3.5mm stereo jack - PCB mount (rt-angle) |
| Jack-RA | ||
| ❏ | cbl2 | 1/8" M-M Stereo Audio Shld Cable | User-Supplied | Not provided with kit | ||
| ❏ | cbl3 | 1/8" M-M Stereo Audio Shld Cable | User-Supplied | Not provided with kit |
Download and Install The Program
There are two programs that "dock" with the RLC Meter kit. The author will use the "QST Program". (The other program from Elecktor magazine's website has issues with screen realestate on the newer computers.)
Download the zip file (LMSPROG.zip) for the "QST Program" from Dave Brainerd's WB6DHW site.
Unzip the "LMSProg.zip" file into a directory of your choice.
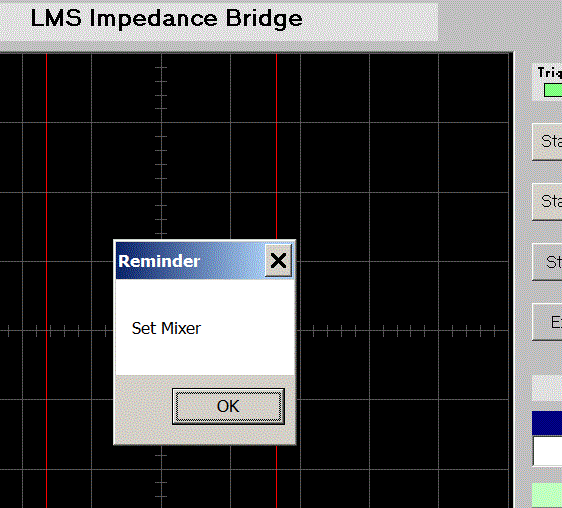
To run the program, click on the LMSBridge.exe file in the LM SProg folder within the directory/folder you chose. You will see the following (and likely hear a loud sine wave tone which you can temporarily kill by muting your speakers).:
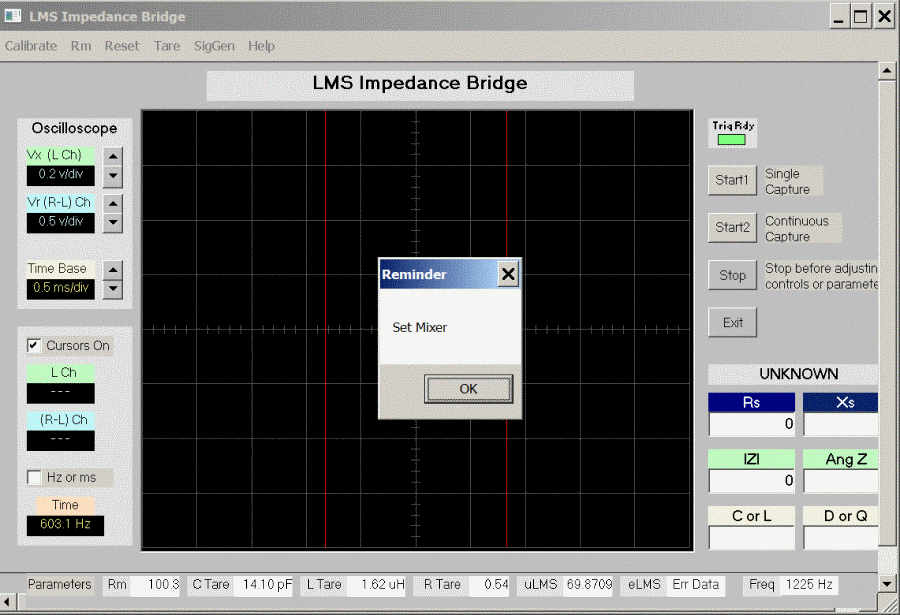
Click on the OK button in the "Set Mixer "NAG box". You have successfully installed the program.
Hint: you can hover your mouse over the buttons and controls in the graphic of the program's screen to get a short description of the role/function of the control. Clicking on some of them will link you over to the point within these builder notes at which the function is discussed.
Do Initial Program and SoundCard Settings
Initial Setting Soundcard (Mixer) Settings
When the Program starts up for the first time, you will hear a tone and see a pop-up box telling you to "Set Mixer". Click oon the "OK" button and proceed to set up your soundcard's mixer controls. Mixer software for the sound card is already installed on your system by Windows. The mixer has a Play(back) and Record section.
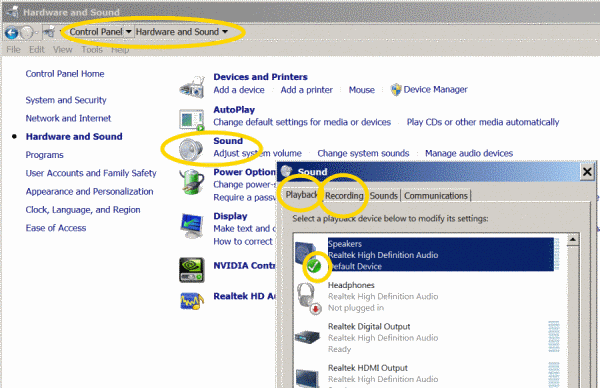
Unfortunately, soundcard mixers vary wildly, depending upon your operating system version. The examples here are from the author's Windows 7 (64 bit) and Vista 32bit systems. Your mileage may vary! To access the mixer for that system:
- Go to:
"Control Panel" / "Hardware and Sound"/ - Click on "Sound" to bring up a dialog box listing the sound devices available.
- Select the default soundcard for the system
- Set the gains and balance controls for the selected device.
-
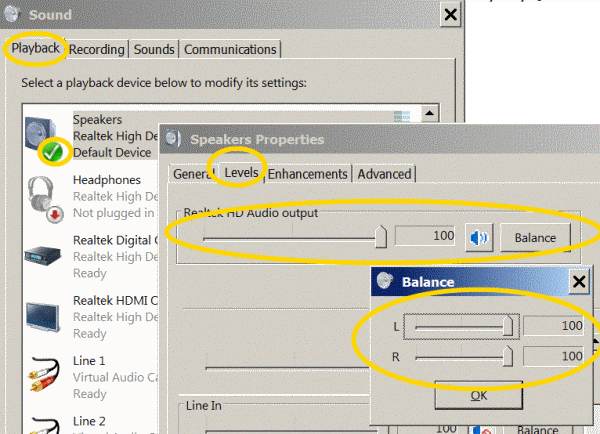 Adjust the level and left and right balance controls to100% (Max) in Playback
 -
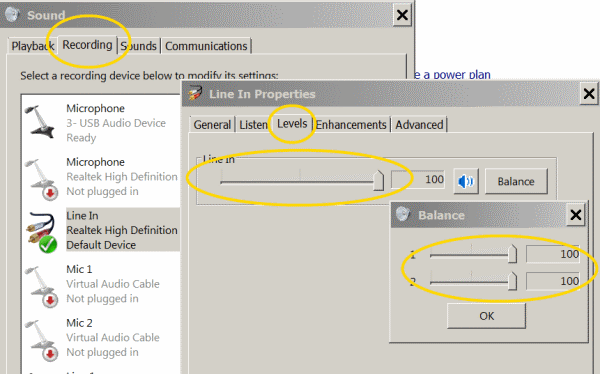 Set the "line in" level and left/right balance controls to 100% (MAX) in the Record section.
-
- Mute all others.
- If these setting are changed between uses of the program, they will need to be reset as described here to maintain accuracy.
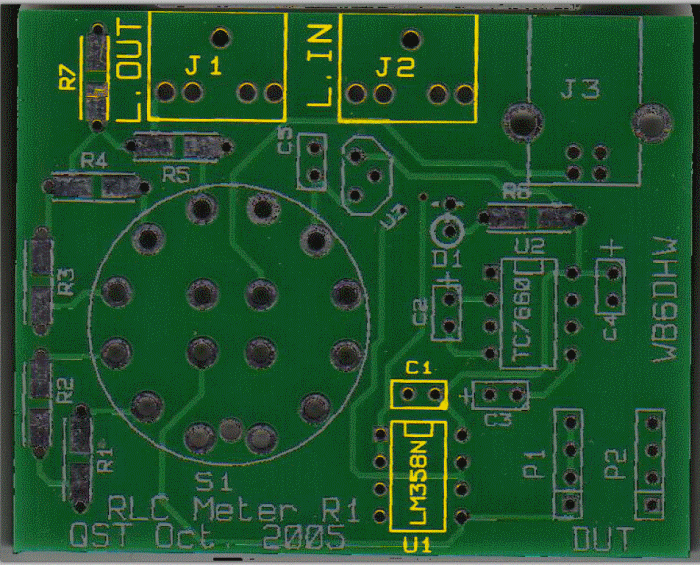
Opamps and I/O Completed Stage
Top of the Board

Opamps and I/O Testing
Measure with No Component (Open Circuit)
Test Setup
Check Mixer Setings
Before going into a measurement session, check the mixer for the required MAX settings, as you may have changed its settings.
Setup Board
Power the board using the USB cable
Connect the stereo cables:
- "J2 ("L-In") to Soundcard "LineIn" jack
- "J1 ("L-Out") to Soundcard "LineOut" (or "Speaker") jack
Select Rm In Program and on Board
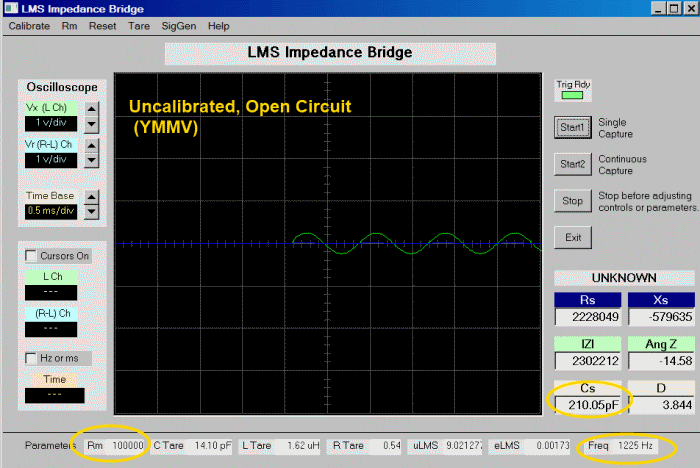
Make sure the Rm is set to 100k (both in the program and on S1).

Measure
- Put the P1 and P2 leads in the "Open Circuit" position (i.e., DO NOT CLIP together).
- Click the "Start" Button and review the results.
You should see a value for Cs, due to the stray capacitance in the leads/circuit. The actual value is unimportant, but it should be a capacitance.
We will be able to compensate for stray capacitance in the next (Calibration) stage.
Please note that these measurements are made with an "out-of-the-box program setup, before any calibration. In the next stage, we will calibrate the program for better accuracy. Thus, your readings may not completely agree with those shown in the pictures in this test section, i.e., "your mileage may vary" (YMMV).
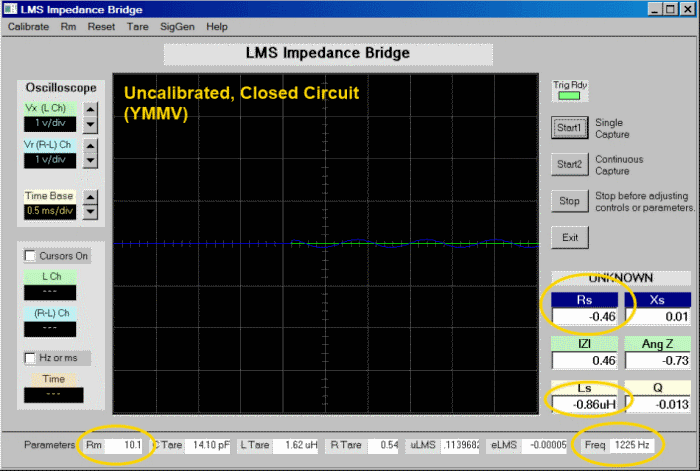
Measure with Clips Connected (Closed Circuit)
Test Setup
Setup as in the preceding test, except for thje following:
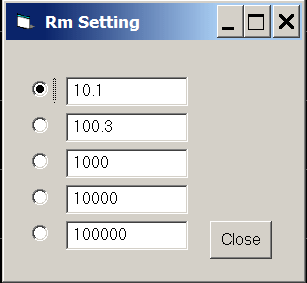
- Set the Rm (reference resistance) value to the 10 ohm selection in the Rm menu in the program and on S1 on the board
- clip the ltest leads (P1 and P2) together to close the circuit
(the measurement of inductances and resistances calls for values of Rm that are proportional to the expected value of the component being measured; the value of Rm for capacitors is inversely proportional to the expected value).
Measure
Click the "Start Button"
Here we should see a pure inductance (very little or no resistance; only inductive reactance).. This is due to the stray inductance in the leads/circuit.
We will be able to compensate for stray inductance in the next (Calibration) stage.
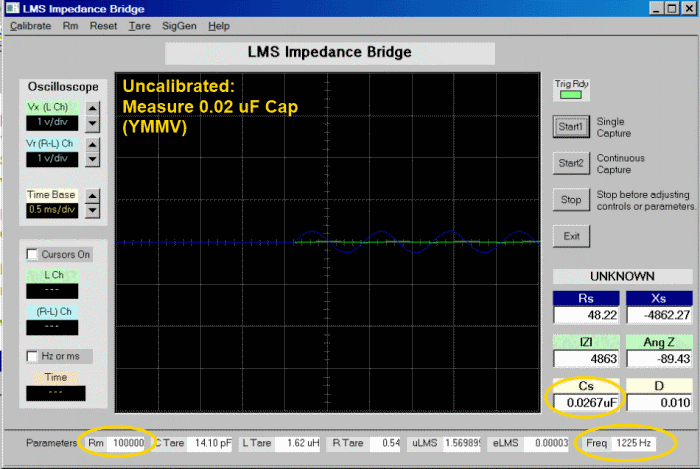
Measure a capacitor
Test Setup
Setup as before, only this time:
- connect a capacitor to the test leads P1 and P2 (example shown is for a nominally valued .02uF capacitor).
- Set the Rm to 100k in the program and on the board (S1)
Measure
Click the "Start Button"
Here, we should see the capacitor value. There may be some stray resistance in addition to the capacitive reactance.
We will be able to compensate for stray resistance in the next (Calibration) stage.