Calibrate the Program Introduction
General
In this optional stage, the user can enhance the accuracy of their program by performing a one-time calibration of the program. So long as the user has the same PC, soundcard, and RLC-Meter board, and the recording and playback levels are set at max and exactly balanced stereo channels, this will not need to be repeated again.
Theory of Operation
The RLC Meter takes an ac voltage from the PC's soundcard which is a known, reference voltage (Vr) at a known frequency (determined by the SigGen setting) and applies it to the input of one of the unity-gain opamps and also to the known reference resistance (Rm) in the resistance ladder.
The component under measurement has an unknown impedance, Z?? (which is the general case of resistance, made up of a resistive (R) part and a reactive (X) part). Z?? and Rm, together, make up a voltage divider whose output, Vx, is fed into the other unity-gain opamp.
The computer receives Vr and Vx via the soundcard's stereo inputs and uses them, plus the knowledge of the frequency and Rm to calculate the unknown impedance.
The calculation assumes away the effects of stray capacitance and inductance in the circuit. The values of "Ctare" and "Ltare" are input by the user and used to allow the computer to compensate for these stray reactances.
(go directly to build notes)Calibrate the Program Schematic
(Click for Full Schematic)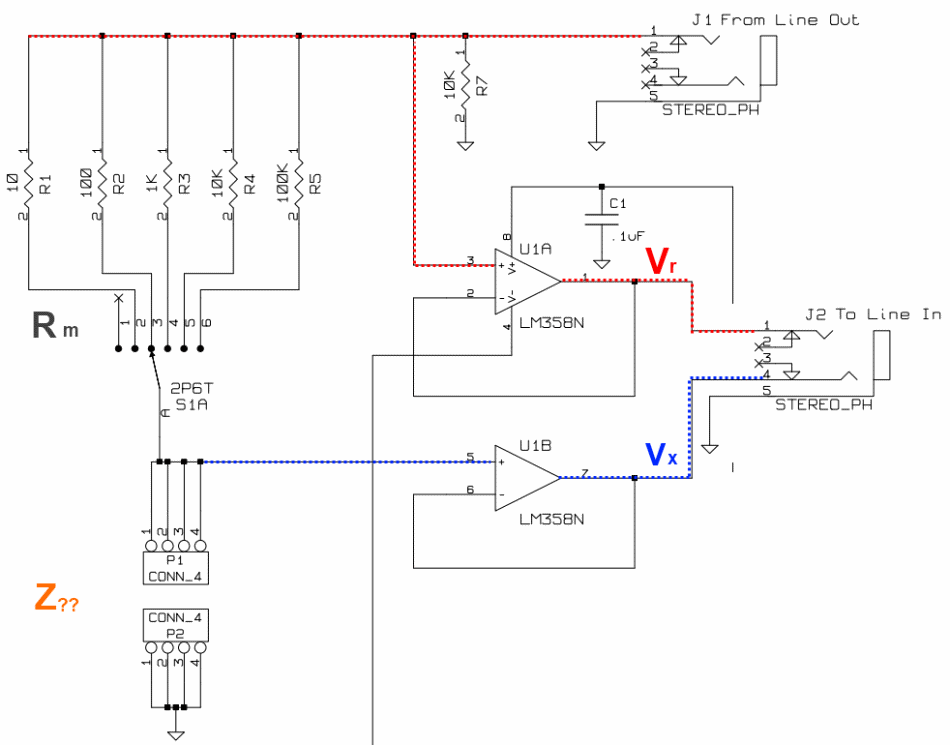
(go directly to build notes)
Calibrate the Program Bill of Materials
Calibrate the Program Summary Build Notes
- Setup the Signal Generator
- Establish the Reference Resistor (Rm)
- Setup the Board
- Capture Some Data
- Calibrate The Program
- Adjust for Stray Reactances and Resistance
- Test the Stage
Calibrate the Program Detailed Build Notes
Top of the Board

Setup the Signal Generator
Access the Signal Generator via the menu bar at the top of the screen Select a 1225 Hz frequency in the signal generator.

Establish the Reference Resistor (Rm)
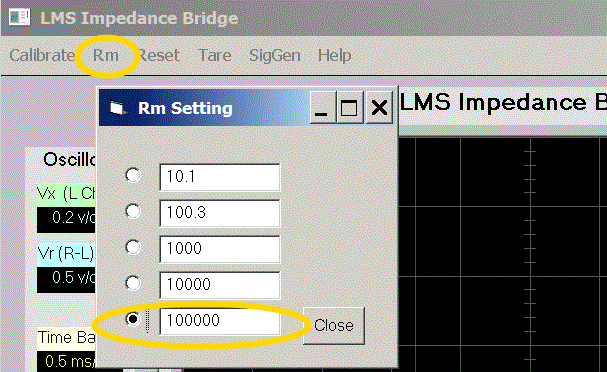
You need to populate the resistance values you measured in the Reference Resistance Ladder stage. Cick on the "Rm" menu item in the top menu to bring up the resistance population dialog and enter the precise measurements.
The Reference resistance (Rm) must be set both in the software AND in the RLC Meter circuit.
Click on the "Rm" menu item in the menu bar at the top of the screen to bring up the Rm setup box and click on the button for "100000", then click "OK". This tells the program that you will use 100k as your Rm:
Using S1 on the circuit, select the 100k Reference Resistor in the Resistance Ladder.
Setup the Board
Hookup the two audio cables between the circuit board and your sound card.
Apply USB Powe
Make sure there is nothing connected at P1/P2 (i.e., remove any component. And leave the two alligator clips unclipped (i.e., Open circuit).
Capture Some Data
Run the Program (assuming soundcard settings are as required (max playback, record, and stereo balances)
Press the "Start" button (Single Capture) on the screen and measure the AC voltage, Vx with respect to ground, at the output (pin 7) of the op-amp (U1), with a good
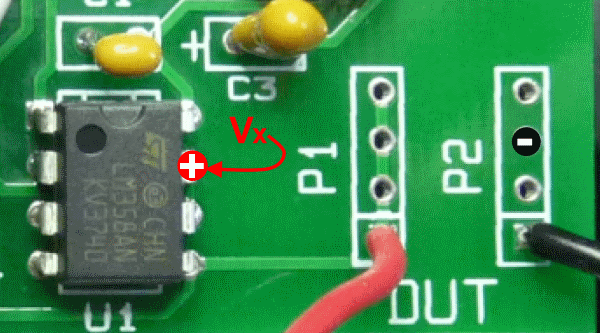
Write down two numbers: (a) this number ( Vx) and (b) the product of Vx and 1.414 (Vpk-pk) so you won't forget it. Author's numbers were:
Vx = 0.543 VacVxpk-pk = 0.768 Vac
(These numbers will be used in the Calibration step, below.)
Look at the data captured by the program. You should see a large sine wave on L channel (Green) and very small sine wave on (R-L) channel (Blue). The data should be clean without much noise.
Calibrate The Program
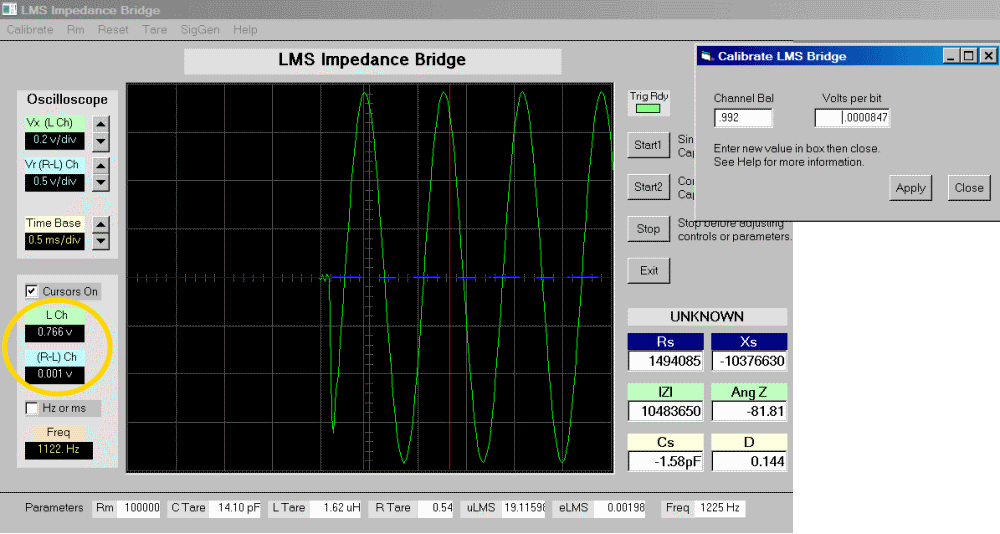
Now that the data is captured it can be used to calibrate the program. There are two items that need to be calibrated. Click on Calibrate to begin. You will change the values shown in the Calibrate box as needed. This may be repeated until the best calibration is achieved.
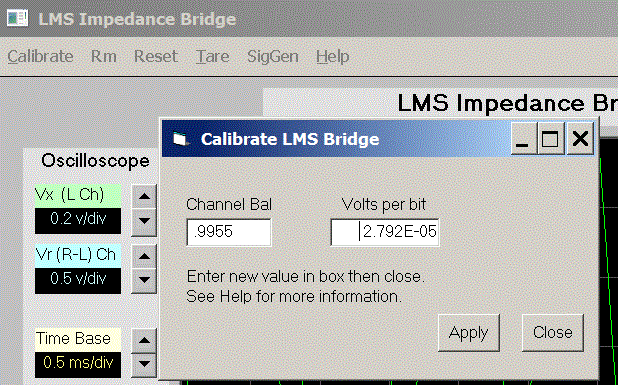
All calibration is done on the originally captured data (from the previous step). It does not need to be recaptured each time. That is, over the next iterative steps you do not need to ever click the "Start" button. You will need only enter your potential calibration values, click "Apply", and "Close" the calibration box, and activate the cursors to place the curor at the peak of the waveform.
The values in the Calibrate Box are:
- Volts per bit. This (optional) calibration is done on the L channel of the sound card. Activate the cursors and measure the peak voltage of the L channel. DO NOT USE THE "START" BUTTON! Adjust until the peak value is close to 1.414 times value you measured with the AC voltmeter earlier. (You might want to do a quick estimate calculation (see the Volts Per Bit Calculation, below).
- Channel Balance. Adjust this value until the (R-L) channel is close to zero. Use small changes. You will not be able to go all the way to zero and there will be a very small sine wave remaining. Also, if Rs (in lower right hand corner of the sceen) is negative, make a tiny adjustment to make Rs positive.
Each time you click "Apply", these values are applied to the previously captured data. You will immediately see the results on the screen (but not in the "L" and "R-L" boxes; you must use the cursor to measure the data on the L and (R-L) channels as needed. Repeat the procedure until the best calibration is achieved. The author's calibration results (channel balance adjusted down to 0.992 from 0.9955 and Volts-per-bit adjusted up to 8.47E-05 from 2.792E-05) are shown below:
Volts per Bit Estimation
If you want to quickly get close to a final volts/bit value, try this:
You can calculate a starting value for the new Volts/bit using:
- Vx (AC at U1 Pin 7 - captured, above)
- Vxpk-pk (1.41414*Vx - captured above)
- Vb (the original volts per bit in the Calibration box)
- VL (the Starting max L-Channel voltage read at a peak using the cursor)
Calculate:
- Vxpk-pk (target max value of VL
- Vbnew (the new Volts per bit)
Formulae:
Vxpk-pk = Vx * 1.414141Vbnew = ( Vxpk-pk * Vb * Vx) / VL
Calibration Defaults
Default calibration values are assigned if you delete the LMSinit file (which stores your values) and start anew.
Adjust for Stray Reactances and Resistance
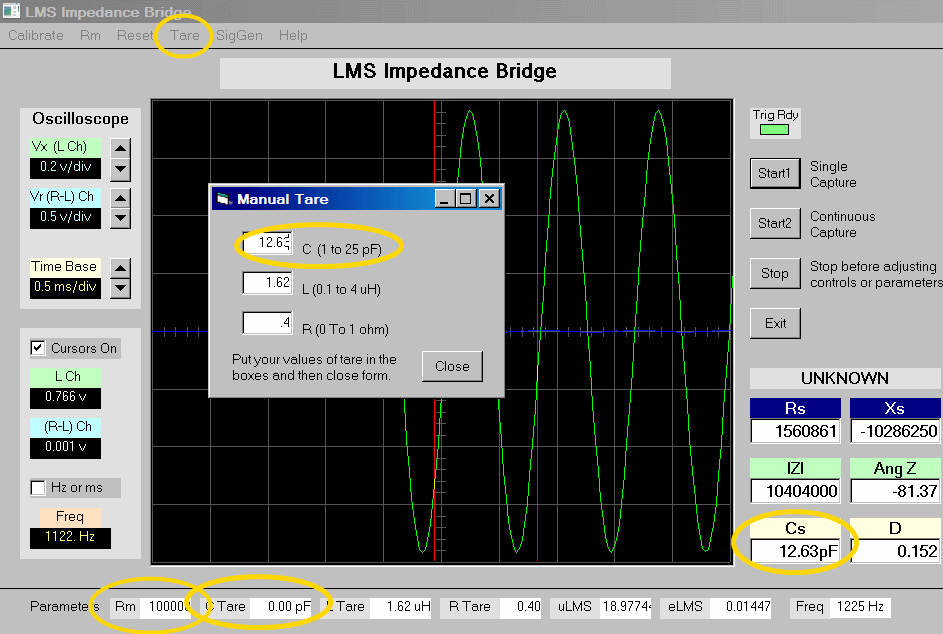
At the high and low ends of the bridge, stray capacitance and inductance can have an effect on the accuracy of the measurement. The program allows the user to tell the computer how to compensate for these, using "tares" (C-Tare and L-Tare).
In an open circuit (nothing present at P1 and P2), the computer will identify some stray capacitance. We can read that off and input it to the "C TARE" parameter of the program.
Similarly, in a short circuit, there will be some stray inductance in the resultant calculations. That can be input to the "L TARE" parameter.
Remember that the reference resistor (Rm) value is directly proportional to the Inductance and Resistance ranges and inversely proportional to the Capacitance Ranges.
| Rref | L-From | L-To | C-From | C-To |
|---|---|---|---|---|
| 10 | 12.99 uH | 12.99 mH | 0.1299 uF | 1299 uF |
| 100 | 129.9 uH | 129.9 mH | 0.01299 uF | 129.9 uF |
| 1k | 1.299 mH | 1299 mH | 1.29 nF | 12.9 uF |
| 10k | 12.99 mH | 12.99 H | 1299 pF | 1.29 uF |
| 100k | 129.9 mH | 129.9 H | 12.99 pF | 0.129 uF |
Determine "C-Tare"
With the PC and Board setup for measuring, disconnect any component from P1 and P2 and leave the clips in an open-circuit condition (i.e., the only impedance that should be there is due to stray capacitance in the circuit).
Set the Rm to 100k on S1 on the board and in the Rm menu in the program (recall that the lower the capacitance, the higher the value of Rm).
Open up the "Tare" menu item at the top of the screen and set the C Tare value to 0 - starting out with the assumption that there is NO stray capacitance
Close the TARE box and click the "Start" button.
Read the stray capacitance in the field headed "Cs", open up the Tare menu, and set the Ctare from zero to the new value found in Cs.
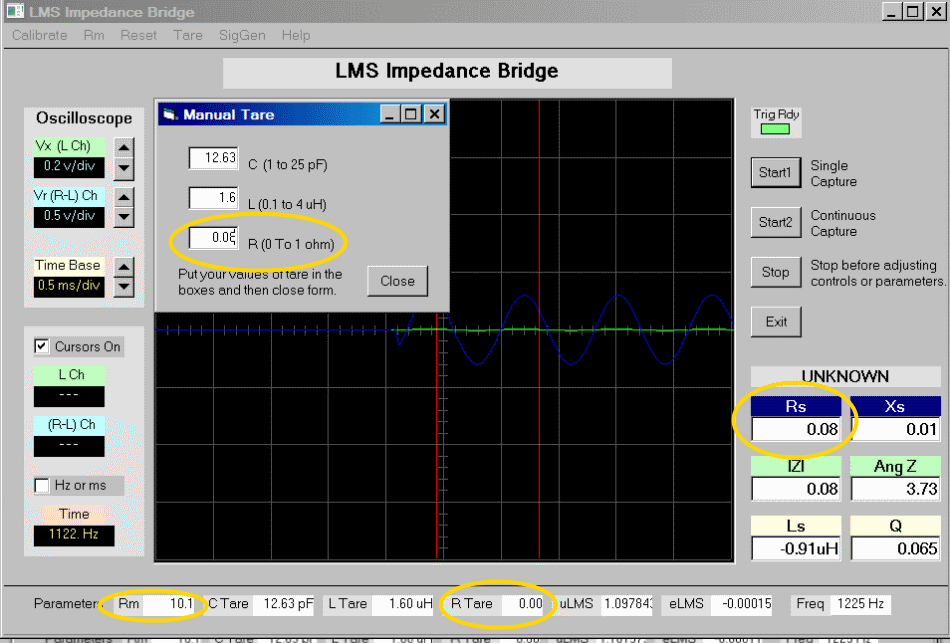
Determine "R-Tare"
Similarly, setup as above, except this time, clip the P1 and P2 leads together (closed circuit) and set the "R TARE" value to 0
Set the Rm to 10 ohms on S1 on the board and in the Rm menu in the program (recall that the lower the resistance, the lower the value of Rm).
Close the TARE box and click the "Start" button.
Read the stray resistance in the field headed "Rs", open up the Tare menu, and set the Rtare from zero to the new value found in Rs.
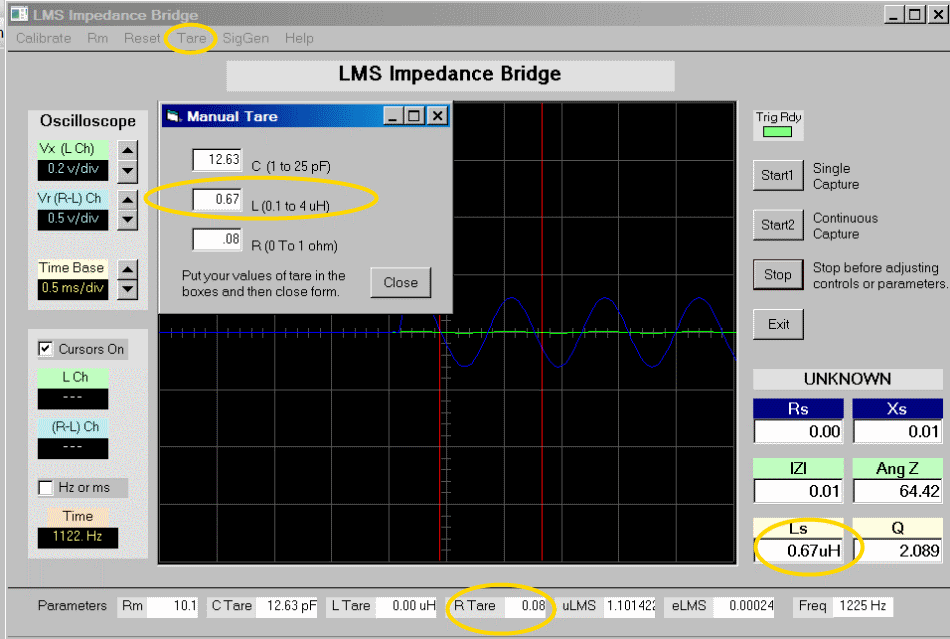
Determine the "L-Tare"
Similarly, setup as in "R-Tare" above, but set the "L-Tare" value in the TARE box to zero.
Set the Rm to 10 ohms on S1 on the board and in the Rm menu in the program (recall that the lower the inductance, the lower the value of Rm)
Clip the P1 and P2 leads together, click the "Start" button, and read the stray inductance in the field headed "Ls", open up the Tare menu, and set the Ltare from zero to the new value found in Ls.
Calibrate the Program Completed Stage
Top of the Board
