Local Oscillator Introduction
General
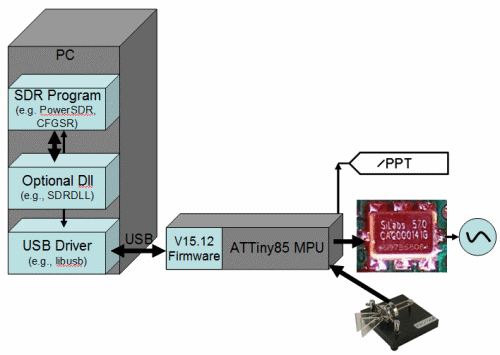
This stage introduces the microcontroller that controls the programmable Si570 oscillator (as well as handle the paddle input and provide ptt signaling for switching functions.
(go directly to build notes)Local Oscillator Schematic
(Resistor testpoints (hairpin, top, or left-hand lead), as physically installed on the board, are marked in the schematic with red dots)
(Click for Full Schematic)
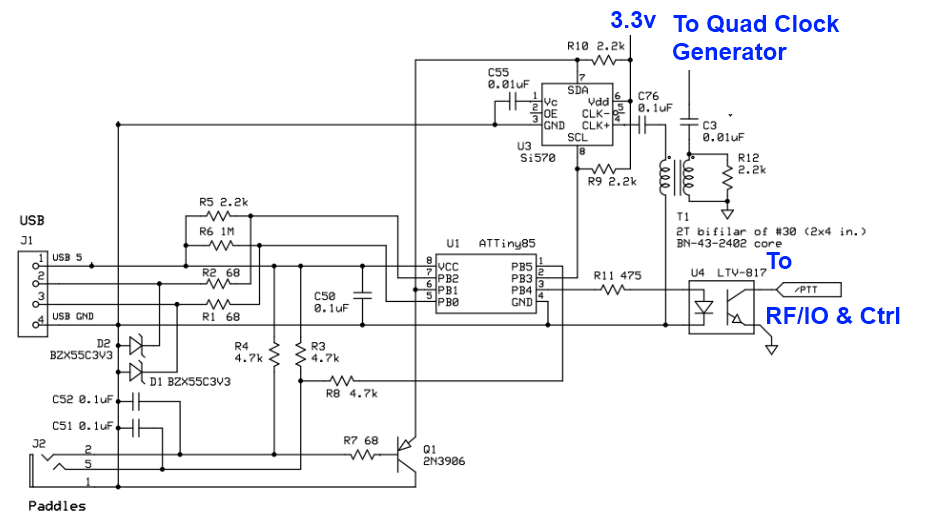
(above schematic has clickable areas that can be used for navigation)
(go directly to build notes)Local Oscillator Bill of Materials
Stage Bill of Materials
(resistor images and color codes courtesy of WIlfried, DL5SWB's R-Color Code program)
| Check | Count | Component | Marking | Category |
|---|---|---|---|---|
| ❏ | 1 | 475 1/4W 1% | y-v-grn-bl-br
 | 1/4W |
| ❏ | 1 | 1 M 1/6W 5% | brn-blk-grn-gld
 | 1/6W |
| ❏ | 4 | 2.2k 1/6W 5% | red-red-red-gld
 | 1/6W |
| ❏ | 3 | 4.7k 1/6W 5% | yel-vio-red-gld
 | 1/6W |
| ❏ | 3 | 68 1/6W 5% | bl-gry-blk-gld
 | 1/6W |
| ❏ | 2 | BZX55C3V3 3.3V zener diode | BZX55C
 | Axial |
| ❏ | 1 | BN-43-2402 (no markings!) | none
 | Binocular core |
| ❏ | 1 | 0.01 uF | 103
 | Ceramic |
| ❏ | 1 | ATtiny 85-20 PU w/V15.12 Firmware | AVR ATTINY85-20PU
 | DIP 8 |
| ❏ | 1 | LTV-817 Opto-Isolator | LTV 817
 | DIP-4 |
| ❏ | 1 | Si570 Programmable Oscillator | SiLabs 570
 | I2C |
| ❏ | 1 | 3.5mm stereo jack - PCB mount (rt-angle) |
 | Jack-RA |
| ❏ | 1 | 0.01 uF | (smt)
 | SMT 1206 |
| ❏ | 3 | 0.1 uF | (smt) black stripe
 | SMT 1206 |
| ❏ | 1 | 0.1 uF | (smt) black stripe
| SMT 1206 |
| ❏ | 1 | socket, machine, 8 pin |
 | Socket |
| ❏ | 1 | 2N3906 PNP transistor | 2N3906
 | TO-92 |
| ❏ | 1 | 2T Bifilar #30 (5") on BN-43-2402 |
| Xfrmr |
Local Oscillator Summary Build Notes
- Install SMT Components
- Install USB Control Components
- Install Coupling Transformer
- Install Remaining Topside Components
- Download and Install Software and Drivers
- Test the Stage
Local Oscillator Detailed Build Notes
Bottom of the Board
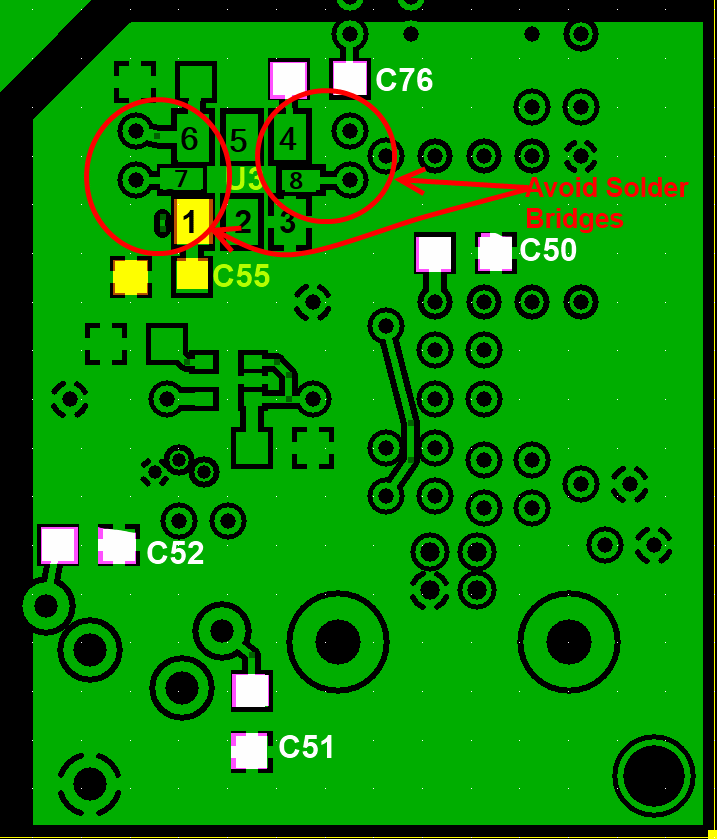
Install SMT Components
Soldering the Si570 must be carefully done Many builders have encountered problems and, in most cases, they are attributable to improper soldering of the Si570 to the (rather tight) pads. Pay special attention to pads for pins 7 and 8, which are quite narrow. These tend to be the biggest source of soldering problems (e.e., solder bridges).
| Check | Designation | Component | Marking | Category | Orientation | Notes |
|---|---|---|---|---|---|---|
| ❏ | U03 | Si570 Programmable Oscillator | SiLabs 570
| I2C | Take ESD precautions | |
| ❏ | C55 | 0.01 uF | (smt)
| SMT 1206 | ||
| ❏ | C50 | 0.1 uF | (smt) black stripe
| SMT 1206 | ||
| ❏ | C51 | 0.1 uF | (smt) black stripe
| SMT 1206 | ||
| ❏ | C52 | 0.1 uF | (smt) black stripe
| SMT 1206 | ||
| ❏ | C76 | 0.1 uF | (smt) black stripe
| SMT 1206 | Added 4/4/10 |
Top of the Board
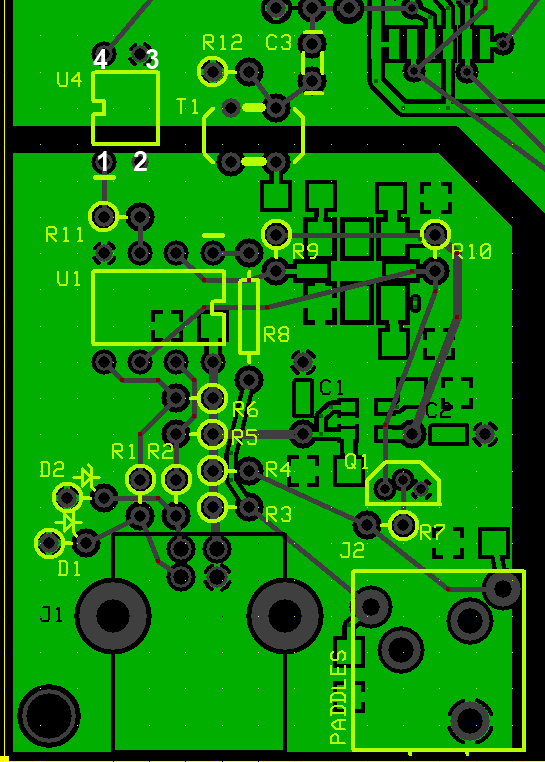
Install USB Control Components
| Check | Designation | Component | Marking | Category | Orientation | Notes |
|---|---|---|---|---|---|---|
| ❏ | D1 | BZX55C3V3 3.3V zener diode | BZX55C
| Axial | ||
| ❏ | D2 | BZX55C3V3 3.3V zener diode | BZX55C
| Axial | ||
| ❏ | Q01 | 2N3906 PNP transistor | 2N3906
| TO-92 | ||
| ❏ | SO01 | socket, machine, 8 pin |
| Socket | For ATTin7 85 | |
| ❏ | U01 | ATtiny 85-20 PU w/V15.12 Firmware | AVR ATTINY85-20PU
| DIP 8 | 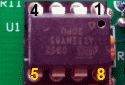 | Take ESD precautions Mount in socket SO01 |
| ❏ | C03 | 0.01 uF | 103
| Ceramic | ||
| ❏ | R01 | 68 1/6W 5% | bl-gry-blk-gld
| 1/6W | N-S | |
| ❏ | R02 | 68 1/6W 5% | bl-gry-blk-gld
| 1/6W | N-S | |
| ❏ | R07 | 68 1/6W 5% | bl-gry-blk-gld
| 1/6W | E-W | |
| ❏ | R11 | 475 1/4W 1% | y-v-grn-bl-br
| 1/4W | W-E | |
| ❏ | R05 | 2.2k 1/6W 5% | red-red-red-gld
| 1/6W | E-W | |
| ❏ | R09 | 2.2k 1/6W 5% | red-red-red-gld
| 1/6W | N-S | |
| ❏ | R10 | 2.2k 1/6W 5% | red-red-red-gld
| 1/6W | N-S | |
| ❏ | R03 | 4.7k 1/6W 5% | yel-vio-red-gld
| 1/6W | W-E | |
| ❏ | R04 | 4.7k 1/6W 5% | yel-vio-red-gld
| 1/6W | W-E | |
| ❏ | R08 | 4.7k 1/6W 5% | yel-vio-red-gld
| 1/6W | flat-vert | |
| ❏ | R06 | 1 M 1/6W 5% | brn-blk-grn-gld
| 1/6W | E-W |
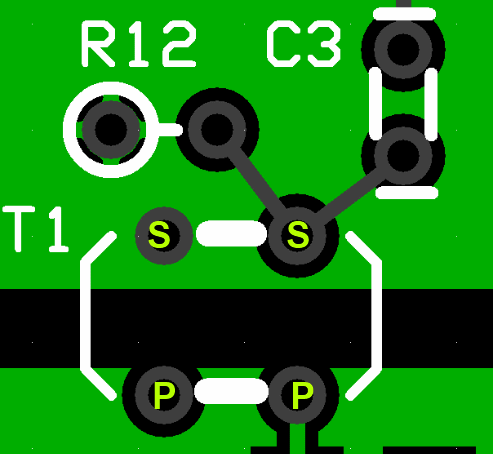
Install Coupling Transformer
Wind and Install the transformer (T1) that couples the Si570 output across the galvanic "border" to the Dividers stage. This requires winding a bifilar (2-wire) length onto a binocular transformer. See the notes at WB5RVZ Transformer Winding Instructions if you are unfamiliar with winding binocular transformers, and refer to the diagram below.
You should take two 5" strands of #30 wire and twist them together ("bifilar") so you get around 3 twists to the inch. Using the resultant bifilar strand, thread it through the binocular core for two turns. Remember a turn is a trip that:
(1) starts at a particular hole
(2) goes into that hole and out of the other end
(3) goes into the hole nthat is across from the hole out of which it just exited, and
(4) Comes out of the hole at the opposite end and across from the original entry hole.
Do that series twice with the twisted pair and you have a transformer with two windings (each winding corresponding to one of the two twisted single wires).
Each winding (primary and secondary) is two turns. Since the windings are identical in length and number of turns, you can arbitratily pick either one as the primary, with the remaining winding serving as the secondary winding.
(Hint: use an ohmmeter (or other continuity checker) to identify which wire-ends go together to make the ends of a winding.
| Check | Designation | Component | Marking | Category | Orientation | Notes |
|---|---|---|---|---|---|---|
| ❏ | T1 | 2T Bifilar #30 (5") on BN-43-2402 |
| Xfrmr | ||
| ❏ | R12 | 2.2k 1/6W 5% | red-red-red-gld
| 1/6W | N-S |
Install Remaining Topside Components
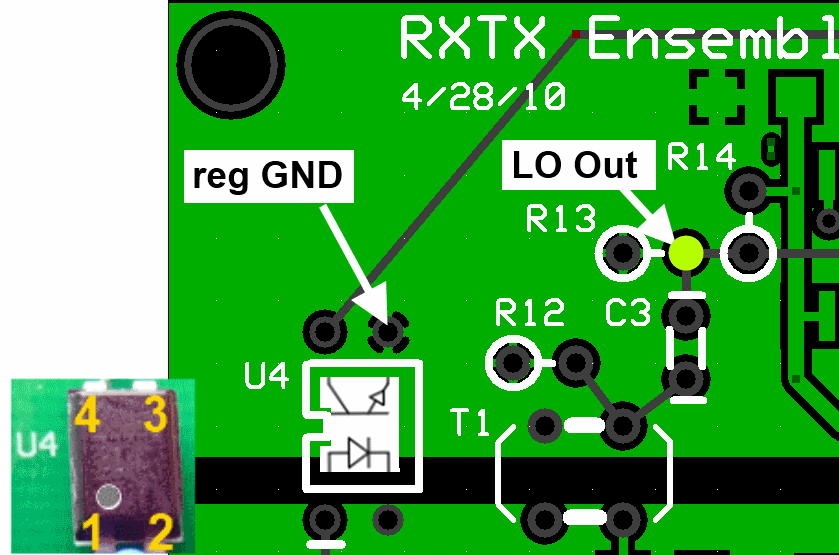
U4 is oriented with the dot lined up with the barrel of R11 (i.e., the dot is toward the bottom of the board, closest to the left hand edge
| Check | Designation | Component | Marking | Category | Orientation | Notes |
|---|---|---|---|---|---|---|
| ❏ | J2 | 3.5mm stereo jack - PCB mount (rt-angle) |
| Jack-RA | ||
| ❏ | U04 | LTV-817 Opto-Isolator | LTV 817
| DIP-4 | 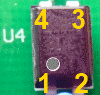 | Take ESD precautions |
Download and Install Software and Drivers
In order to test (and later, operate, your rig, you must download and install required software (SDR programs and Dynamic Link Libraries, along with hardware drivers. The actual steps and programs may vary, depending upon your computer's windows operating system version (XP, Vista, or Windows 7) and architecture CPU/memory (32 bit or 64 bit).
The following links are provided and, as of 7/8/2010, are current:
| Software | Role/Purpose | Download Link | Notes |
|---|---|---|---|
| CFGSR | Configure/Control Ensemble microcontroller | download | (latest version is 2.3) |
| SRDLL | dll for Softrock controllers | (now included in CFGSR installation file) | |
| USB driver(s) | drivers for ATTiny85 USB | download | Zip file with 32 and 64 bit drivers (latest version is 1.2.0.1)*. |
| WinRadHD | Simple SDR (RX only) Program | download | |
| (Windows XP) PowerSDR-IQ V1.12.20 | Version of FlexRadio's PowerSDR tailored for I/Q Soundcard-based SDRs | download | Has Si570 Control Capability |
| (Windows 7, Vista) PowerSDR-IQ V1.19.3.15 | Version of FlexRadio's PowerSDR tailored for I/Q Soundcard-based SDRs | download | Has Si570 Control Capability (Please see Christos' message 43204 on the Yahoo Reflector) |
*Note on installing PE0-FKO's USB Drivers: Fred's website has an excellent step-by-step guide to instaling the USB driver.
Install Driver
The correct procedure is to download the driver and put it in a suitable folder, then plug in the USB lead, Windows should detect new hardware has been found and you need to manually point it to the folder containing the drive. It should then install correctly. Certainly does on Win2000 and XP. On Vista or Windows 7, there used to be some issues with driver signing. There have been messages on the forum describing methods of working around these issues. One such solution is addressed in the author's MOBO4.3 builders notes.
LibUSB - "Unknown Device" Error
Others have experienced the dreaded "Unknown Device" problem upon plugging in the USB cable after having installed the LibUsb driver. This "unknown device" problem (and a remedy for those who are using Logitech cordless mouse) are discussed in message #45071 on the Yahoo Softrock40 Group
Another valueable resource for troubleshooting the "unknown device" error is Alan's webpageInstalling the ATTiny45/85_USB Controller
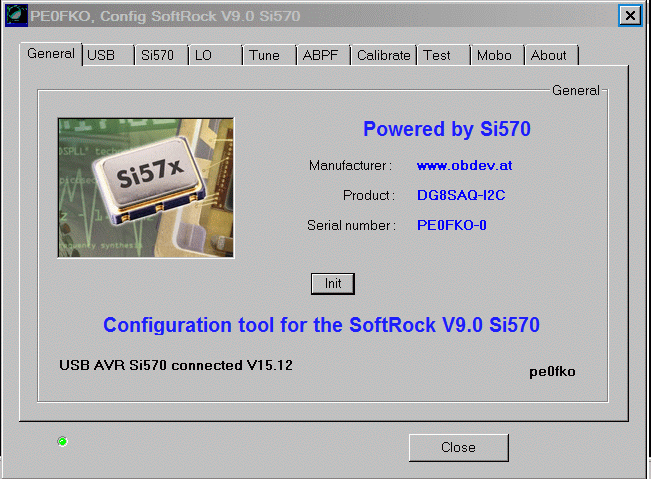
Install/Run CFGSR ("ConFiGureSoftRock")
Once the driver is installed, if you run 'CFGSR' that will either automatically 'open' the firmware, or if not, you need to go to the 'USB' tab and select it from the list displayed in the bottom box. Which way depends on if you have 'CFGSR' set up to auto connect on program start or not.
Disable ABPF
it is essential before any functional tests are carried out, as soon as you have the PC talking to the Ensemble using the USB interface is to use 'CFGSR' and go to the 'ABPF' tab and remove the check from the 'Enable Filter (ABPF) box. You must then unplug and reconnect the USB lead in order to reinitialise the AVR chip so it has the PTT and CW key functions enabled. If you do not do this, the AVR chip is supplied with the defaults set for use with the v9.0 RX and BPF module, so will catch a lot of people out, in the same way as the USB to I2C interface has.
Test Paddles
In 'CFGSR' if you select the 'Test' tab, and check the 'Repeat' box, there are three LEDs at the bottom of the screen that display the status of the PTT, CW1 and CW2 lines. You can exercise the CW1 and CW2 key inputs and you will see the LEDs change.
For further discussions of the software side of SDR and soundcard issues, see Alan G4ZFQ's pages.
Test Local Oscillator
You can use 'CFGSR' to exercise the Si570 using the 'Tune' tab that makes it into a 'VFO'. Just a case of setting the frequency, and the Si570 should output a signal at 4 times the frequency displayed on the main display on the screen. The 'Test' tab can also be used to look at all the various Si570 registers etc, but probably unnecessary as if you can hear or measure the Si570 output frequency, you know it is working.
PSDR Issues
There is a lively discussion of the issues in setting up Power SDR (various versions) for the Softrocks at the thread for Message #47707 in the Softrock40 reflector. WB5RVZ has also posted some guidelines in setting up PSDR for the Vista (and supposedly, Win 7) environment..
Local Oscillator Completed Stage
Top of the Board
Bottom of the Board
Local Oscillator Testing
LO Stage Outputs
Test Setup
Here we want to measure the outputs (4x center frequency for dividers and /PTT signals for PTT/RX switching). They are measured WRT (regular) ground (at the R50 hairpion lead).
Setup
Be sure all software and drivers, etc., have been installed. Connect the USB jack via USB cable to the PC. You should hear the "BoopBoop" sound the PC makes when it recognizes a device (the Ensemble) has been attached to a USB port..
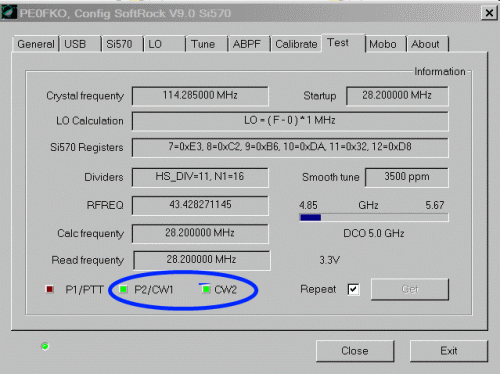
Next, run CFGSR.exe and you should get the following screen:
Then, check out the "Si570" tab. It should look like this:
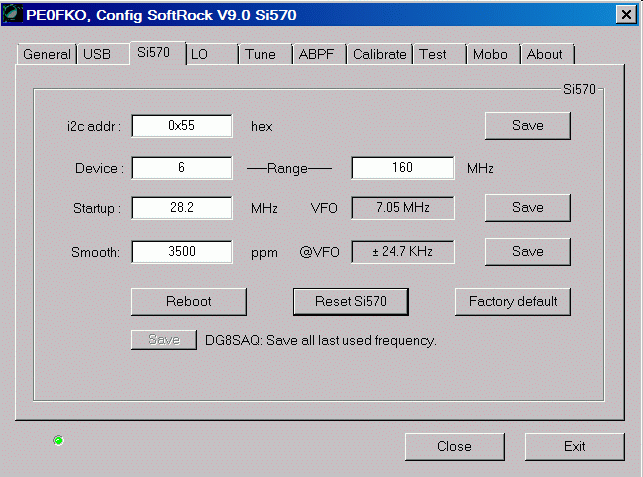
Note that the Local Oscillator's outputs are measured with respect to the analog ground plane, NOT with respect to the galvanically isolated USB groundplane
Using the CFGSR Software (at the "Tune" tab), test scenarios for setting the center frequency (remember, the Si570 produces a signal that is 4 times the desired center frequency) and PTT on/OFF. Measure the outputs at the points indicated as "LO Out" and "/PTT". Below is an example of tuning the Si570 in CFGSR, selecting a center frerquency of 6.05 MHz (with an Si570 output frequency of 4x, or 24.2MHz. (Pay no attention to the lousy oscilloscope behind the curtains - the output is really a square wave, but the scope is a cheap USB scope that doesn't sample HF square waves very well.)
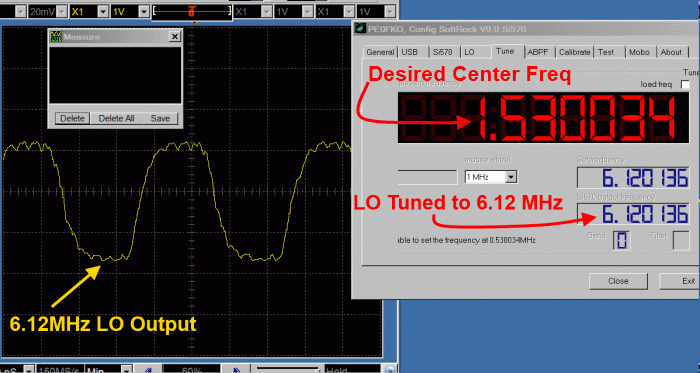
You can place your mouse on the frequency in the center frequency field and turn your mouse wheel. The center frequency will increase or decrease and the LO Output frequency (4x) will increase or decrease at a rate 4 times that of the center frequency.
John, KB6QL, discovered this trick for those with no scope, counter, or HF radio to use in testing LO output:
"Turns out that local oscillator can be tuned for a frequency that is in the FM band. So, as a quick and dirty, I got out my little MP3 player-cum-FM-radio and tuned it to that frequency and let the headset cord/ant drape over the RXTX. It gave me full quieting. Then I switched the RXTX to another frequency and the quieting was gone."
Troubleshooting Hints
Device Not Recognized
If your computer does not recognize the ATTiny 85 device, the cause could be either hardware or software.
Hardware
Check the resistors (R1-R4) and make certain they are the correct value
Check the alignment and placement of U1 and make sure it is snugly fitting in the socket. It is easy to accidentally bend one or more of the pins when inserting the chip into the socket.
Software
Review the WB5RVZ software "schematic" and then:
Check out Alan G4ZFQ's great webpage on Si570/ATTiny85 issues.
Si570 Does Not Respond to Control Signals
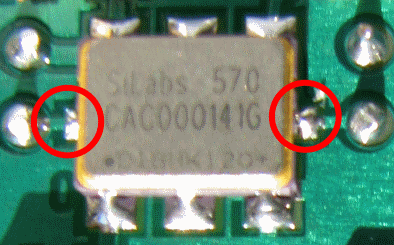
Soldering on the Si570 is the most usual problem with lack of control, providing the USB is properly recognised.
Frequency Will Not Change
If the LO oscillates at the factory default frequency but will not respond to your attempts to change the frequency, the very first place to look is on the soldering of the Si570, most especially pins 7 and 8. Those pins - and their soldering - constitute the single most often found cause of inability to change the frequency of the Si570.
Opto-Isolator Voltage Test
Test Setup
Power up the board in (default) RX mode
Measure the voltage at pin 1 of the OptoIsolator
Pin 1 of the isolator should be less than 0.5 volts with respect to the isolated ground.

Test Measurements
| Testpoint | Units | Nominal Value | Author's | Yours |
|---|---|---|---|---|
| U4-Pin 1 (WRT USB Ground) | Vdc | < 0.5 | tbd | _______ |