Microprocessor Control Introduction
General
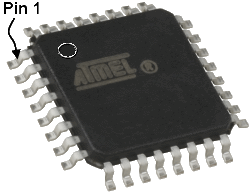
In this stage, we complete the installation of the digital "side" of the board and install the Atmel AT90USB162 AVR MCU. The challenge here will be to successfully solder this 32 pin chip to the tiny pads on the board.
The 16 MHz crystal which clocks the chip must be installed in the correct orientation, as explained in the crystal specs.
Notes from BOM file(referenced in BOMs below)
Note #1: For those buying their own parts from Digikey, a generic microprocessor crystal can be used. The PCB will only support the PMR package. For other crystal packages, use hookup wire patch. If the Digikey part is used, order 535-9071-1-ND @ 56 cents each.
Note #3: All zero ohm resistors to be installed. Omit R10, R12 if you are not using the POSWR bridge kit. Omit R40 if you are using the Preamp/Attenuator Kit. Omit R47, R48 if you are using an external uController instead of the onboard AT90USB162.
Note #4: R35/R36 will be omitted or installed, see assembly notes for details.
Processor Update
The project will change the Mobo BOM to use the ATMEGA32U2 for new orders (after the initial batch of orders are shipped in Feb of 2010)..
For builders waiting for your Mobo kits, please note that you may receive either the orginal AT90USB162, or the new ATMEGA32U2. The vast majority of you will recevie the AT90USB162. They are functionaly equivalent with the latest firmware by Loftur. All the hardware functions of the Mobo can be controlled with the AT90USB162.
The ATMEGA32U2 has more program flash space, so it *may* be useful if you are into firmware programming and you want to write your own code to customize/expand on your Mobo setup.
Loftur and Alex will be devoting their development efforts to the Widget. The Widget uses the AT32UC3A3256 processor with 256kbytes of flash which will provide much more programming space for additional and advanced functions, as explained in any eariler post. And also, the Mobo is compatible with the Widget. So whether you are having AT90USB162 or ATMEGA32U2, when you get the Widget, you will be upgraded to the AT32UC3A3256.
It is always a good idea to double check the bill of materials in this set of documentation with the official BOM on the Mobo site. Discrepancies may be introduced inadvertently, as the changes are sometimes not communicated or discovered, making timely update of this site a problem.
Theory of Operation
The theory and detailed functionality of the microprocessing unit installed in this stage are nicely explained on Loftur TF3LJ's website. He does an excellent job of grounding the reader/builder in the MPU. It is a highly recommended read.
(go directly to build notes)Microprocessor Control Schematic
(Click for Full Schematic)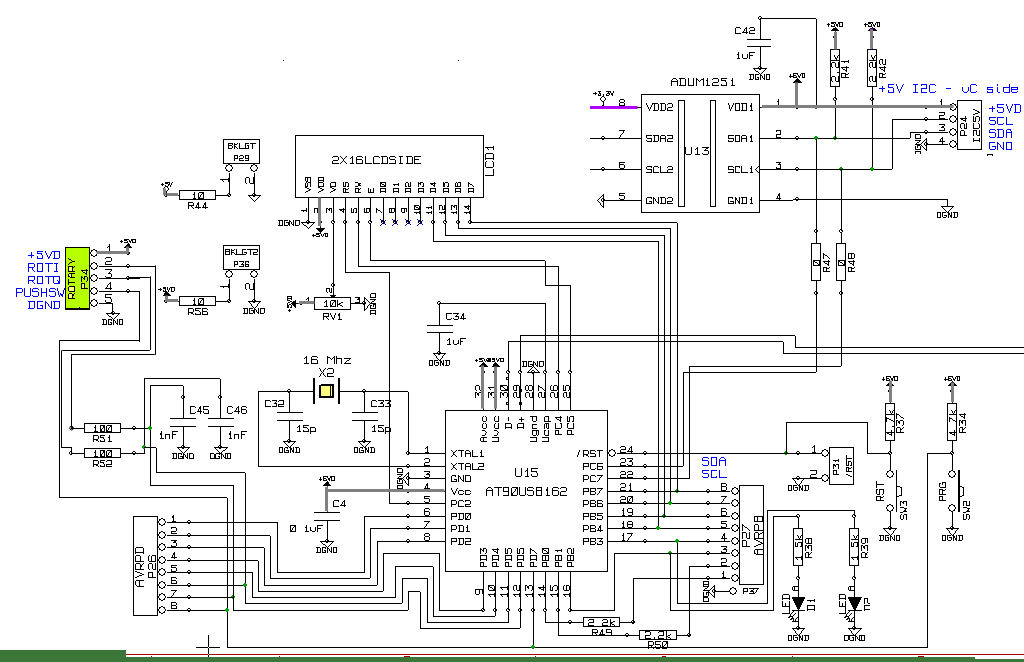
C:\Users\Rob\Documents\HamStuff\SDR\MOBO4_x\mobo43
(go directly to build notes)Microprocessor Control Bill of Materials
Stage Bill of Materials
(resistor images and color codes courtesy of WIlfried, DL5SWB's R-Color Code program)
| Check | Count | Component | Marking | Category |
|---|---|---|---|---|
| ❏ | 1 | AT90USB162 AVR MCU 16K FLASH | AT90USB162
 | 32TQFP |
| ❏ | 1 | 16 MHz Crystal |
 | 49pmr |
| ❏ | 1 | header, 2-pin |
 | Header |
| ❏ | 1 | header, 8-pin |
 | Header |
| ❏ | 1 | header, 9-pin |
 | Header |
| ❏ | 1 | green SMT LED |
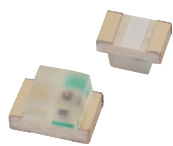 | LED SMT 0805 |
| ❏ | 1 | red SMT LED |
| LED SMT 0805 |
| ❏ | 1 | shunt, 2-pin |
 | Shunt |
| ❏ | 2 | switch, mom, pb,smt |
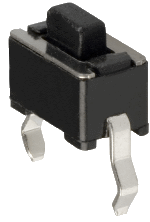 | SMT |
| ❏ | 1 | 0.1 uF | SMT 0805 | |
| ❏ | 2 | 1 uF | SMT 0805 | |
| ❏ | 2 | 1000 pF | 106 | SMT 0805 |
| ❏ | 2 | 15 pF | SMT 0805 | |
| ❏ | 2 | 0 ohm 5% | SMT 0805 1/8W | |
| ❏ | 2 | 1.5 k ohm 5% | SMT 0805 1/8W | |
| ❏ | 2 | 100 ohm 1% | SMT 0805 1/8W | |
| ❏ | 2 | 2.2 k ohm 5% | SMT 0805 1/8W | |
| ❏ | 2 | 2.2 k ohm 5% | SMT 0805 1/8W | |
| ❏ | 2 | 4.7 k ohm 5% | SMT 0805 1/8W | |
| ❏ | 1 | ADUM1251 dual digitl isolator | ADUM1251
 | SOIC-8 |
Microprocessor Control Summary Build Notes
- Install Bottomside Static Components
- Install 16 MHz Xtal
- Install ADUM 1251 Isolator IC
- Install Topside static components
- Install Atmel Microprocessor
- Install Pins and Switches
- Test the Stage
Microprocessor Control Detailed Build Notes
Bottom of the Board

Install Bottomside Static Components
Lyle, KK7P recommends deferring R41 and R42 until the ADUM 1251 is installed
| Check | Designation | Component | Marking | Category | Orientation | Notes |
|---|---|---|---|---|---|---|
| ❏ | R47 | 0 ohm 5% | SMT 0805 1/8W | see note #3 | ||
| ❏ | C32 | 15 pF | SMT 0805 | |||
| ❏ | C33 | 15 pF | SMT 0805 | |||
| ❏ | C34 | 1 uF | SMT 0805 | |||
| ❏ | R38 | 1.5 k ohm 5% | SMT 0805 1/8W | |||
| ❏ | R39 | 1.5 k ohm 5% | SMT 0805 1/8W | |||
| ❏ | R49 | 2.2 k ohm 5% | SMT 0805 1/8W | |||
| ❏ | R50 | 2.2 k ohm 5% | SMT 0805 1/8W | |||
| ❏ | R34 | 4.7 k ohm 5% | SMT 0805 1/8W | |||
| ❏ | R37 | 4.7 k ohm 5% | SMT 0805 1/8W |
Install 16 MHz Xtal
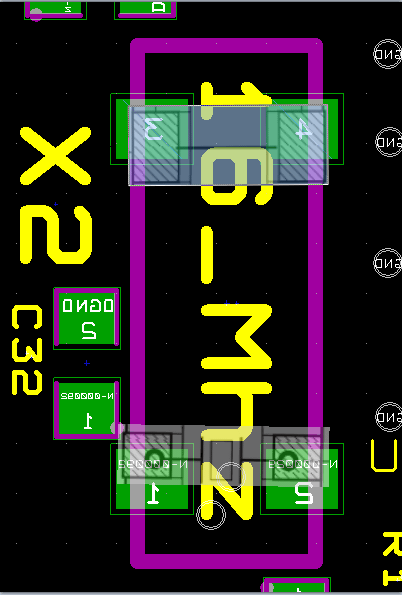
The 16 MHz crystal used in the MOBO does not have bi-directionality with regard to the active connections on PMR cystal package. In order for the oscillator to function, the proper end must be connected to the PCB.
There is one set of pads that is about .8 mm by 1.3 mm, these pads are connected to the active terminals (the "business end) of the crystal.
The other set of pads are about .8 mm by 2 mm, both of these pads are connected to the case of the crystal (presumably to be grounded for shielding purposes). See the graphic below to for identification of the active vs. inactive pads.
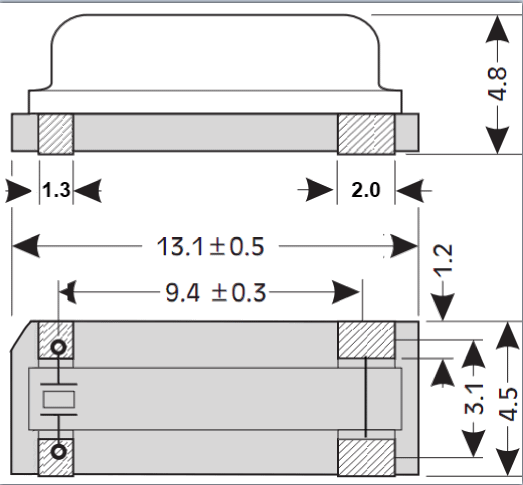
Note that the two "active" pads (the smaller 1.3mm pads) would mount, respectively, to pads "1" and "2" of the X2 padset on the board.
The larger (2.0mm) pads are the shorted pads - shorted together and bonded to the case. The electrically shorted pads go to pads "3" and "4" on the PCB and the smaller, "business" end pads are mounted to the PCB's pads "1" and "2".
This process will take considerable care and patience. Tom, W2TSL, observed: "I found the crystal maddeningly diffcult to solder in place. The pads on the bottom of the crystal assembly did not want to take solder for some reason. Fortunately the assembly appears to take abuse gracefully, but I did partially melt the plastic retainer on the crystal."
Earl, 4Z4TJ, recommends having your flux pen handy to aid in the soldering of this chip.
| Check | Designation | Component | Marking | Category | Orientation | Notes |
|---|---|---|---|---|---|---|
| ❏ | X2 (see note 1) | 16 MHz Crystal |
| 49pmr | Special consideration | see note #1 |
Install ADUM 1251 Isolator IC
| Check | Designation | Component | Marking | Category | Orientation | Notes |
|---|---|---|---|---|---|---|
| ❏ | U13 | ADUM1251 dual digitl isolator | ADUM1251
| SOIC-8 | Take ESD precautions | |
| ❏ | R41 | 2.2 k ohm 5% | SMT 0805 1/8W | Lyle, KK7P recommends deferring this until after the IC is installed | ||
| ❏ | R42 | 2.2 k ohm 5% | SMT 0805 1/8W | Lyle, KK7P recommends deferring this until after the IC is installed |
Top of the Board
Install Topside static components
Lyle, KK7P recommends deferring C4 until after the MPU is soldered (next step)
Ron Ki6FHB added a note on the D1 and D2 installation that the green side of diode should go on the right.
| Check | Designation | Component | Marking | Category | Orientation | Notes |
|---|---|---|---|---|---|---|
| ❏ | D01 | red SMT LED |
| LED SMT 0805 | ||
| ❏ | D02 | green SMT LED |
| LED SMT 0805 | ||
| ❏ | R48 | 0 ohm 5% | SMT 0805 1/8W | see note #3 | ||
| ❏ | C45 | 1000 pF | 106 | SMT 0805 | Take ESD precautions | |
| ❏ | C46 | 1000 pF | 106 | SMT 0805 | Take ESD precautions | |
| ❏ | C42 | 1 uF | SMT 0805 | |||
| ❏ | R51 | 100 ohm 1% | SMT 0805 1/8W | |||
| ❏ | R52 | 100 ohm 1% | SMT 0805 1/8W |
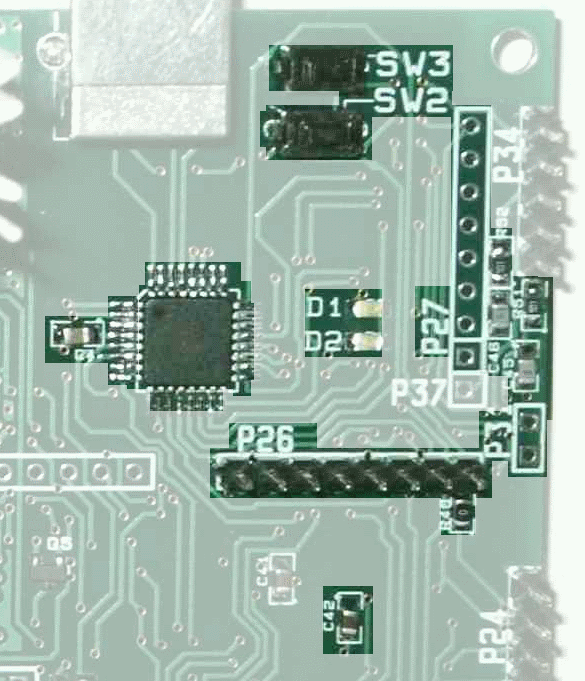
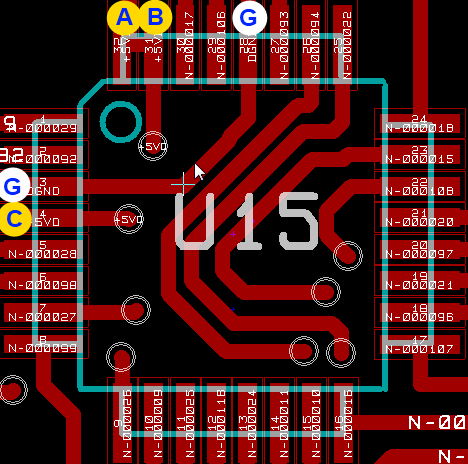
Install Atmel Microprocessor
Make sure the CPU is installed in a correct orientation. Pin 1 (as denoted by the small circle) should be on the upper left corner.
Note that orders shipped after February 2010 will have the newer microprocessor (ATMEGA32U2), which provides more flash memory on-chip.
| Check | Designation | Component | Marking | Category | Orientation | Notes |
|---|---|---|---|---|---|---|
| ❏ | U15 | AT90USB162 AVR MCU 16K FLASH | AT90USB162
| 32TQFP | 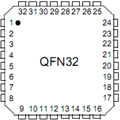 | Take ESD precautions Later kit shipments may upgrade this to the pin-equivalent ATMEGA32U2 (more flash memory) |
| ❏ | C04 | 0.1 uF | SMT 0805 | Lyle, KK7P recommends deferring this til after the MPU is installed |
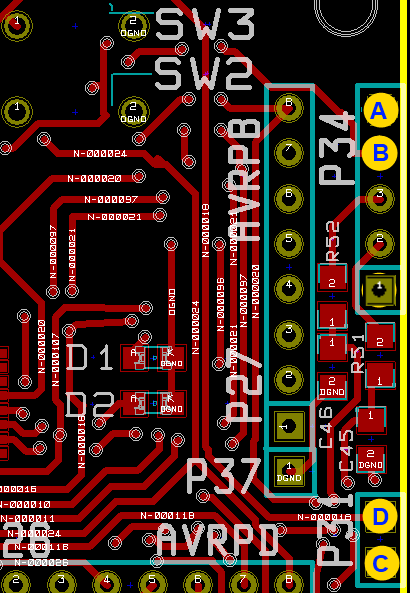
Install Pins and Switches
Note P31_shunt should not be installed for normal operations. It is
meant for the exceptional situation when the AT90USB162's factory
installed bootloader firmware is not functional. P31 and several
other port pins will allow an external hardware programmer to be used
to load a new bootloader firmware.
When the P31_shunt is put in, the AT90USB162 is stalled and put in a
reset state.
| Check | Designation | Component | Marking | Category | Orientation | Notes |
|---|---|---|---|---|---|---|
| ❏ | SW2 | switch, mom, pb,smt |
| SMT | ||
| ❏ | SW3 | switch, mom, pb,smt |
| SMT | ||
| ❏ | P31_Shunt | shunt, 2-pin |
| Shunt | DO NOT INSTALL | |
| ❏ | P31 | header, 2-pin |
| Header | Reset of uC Normally not used | |
| ❏ | P26 | header, 8-pin |
| Header | Port D of uC Normally not used. | |
| ❏ | P27 | header, 9-pin |
| Header | Port B of uC 2 Paddle pins (Pin1 and Pin2) plus P37 form a 3-pin header, ground to P37 (DGND) to activate. (Using 9 pin header to cover P27 +P37) |
Microprocessor Control Completed Stage
Top of the Board
Bottom of the Board
Microprocessor Control Testing
Test Program Requirements
Test Setup
- Program should allow the user to turn each of the red and green LEDs on/off, independently
- Program should allow the user to programmatically apply a measureable test voltage to each of the output ports.
- Program should allow the user to programmatically apply a measureable test voltage to the SDA and SCL outputs of the MPU.
CPU Voltage Tests
Test Setup
Connect the MOBO to the PC using a USB cable and J1. You shoujld get a "do you want to install drivers for this hardware" or other Windows Plug and Play indication that the MPU has not yet been programmed and there is no driver for it. For these voltage tests, you can ignore this warning, leaving the window still open and keeping the cable connected solely to provide the +5VD power from the PC. Once you have completed the voltage tests, you can cancel out of the Plug and Play window and disconnect the USB cable.
Using your DMM, measure the voltages (with respect to digital ground (points "G")) at pins 4, 31, and 32 of the AVR MPU (U15)
Your test results should show the "5Vd" value, nominally +5 Vdc
Test Measurements
| Testpoint | Units | Nominal Value | Author's | Yours |
|---|---|---|---|---|
| U15-4 (Point C wrt point G) | V dc | +5 | tbd | _______ |
| U15-31 (Point B wrt point G) | V dc | +5 | tbd | _______ |
| U15-32 (Point A wrt point G) | V dc | +5 | tbd | _______ |
Test for XTAL Function
Test Setup
If you have a receiver capable of receiving in the 16MHz area, tune it to 16MHz and place its antenna lead close to the board to see if you can "hear" the 16MHZ crystal. (This test recommended by Earl, 4Z4TJ)
SW2/3 Testing
Test Setup
Still with the USB cable connected (for power):
SW2 - measure voltage of P34 pin 4 against P34 pin 5 - it should be +5V, but changed to 0 when SW2 pressed
SW3 - measure volateg of P31 pin 2 against pin 1 - it should be +5V, but changed to 0 when SW3 pressed
Test Measurements
| Testpoint | Units | Nominal Value | Author's | Yours |
|---|---|---|---|---|
| Point A WRT Point B - SW2 OFF | V dc | +5 | tbd | _______ |
| Point A WRT Point B - SW2 ON | V dc | 0 | tbd | _______ |
| Point C WRT Point D - SW3 OFF | V dc | +5 | tbd | _______ |
| Point C WRT Point D - SW3 ON | V dc | 0 | tbd | _______ |
Install FLIP
Test Setup
The MPU can be programmed even when it is installed on the MOBO. It is programmed using an Atmel software called FLIP (Flexible In-System Programmer". You will need to install FLIP and its associated USB driver onto your PC. As of this writing, the FLIP program will NOT run on 64 bit systems under Vista and/or Windows 7. If you have this situation, you may have to borrow a (good) friend's XP or Vista 32 bit laptop to install FLIP and program your MPU
Before programming the MPU, review the FLIP documentation and then download and install FLIP's latest version.
Program the MPU
Test Setup
Get the Firmware
Before running FLIP, download the latest hex file for Loftur's firmware. .
- For the AT90USB162 http://sites.google.com/site/lofturj/mobo4_3_firmware/Mobo-AT90USB162-1-06.zip
- For the ATmega32U2
- Or alternately, the latest firmware is always available at the bottom of the page:
- If you flash with Loftur's hex file version 3 or higher then the previously optional LCD MUST be connected. Tx to Earl, 4Z4TJ for this tip.
You may want to review Loftur's exposition of the features of the firmware
Open the zip file and review the README.TXT file. The zip file contains several variations (hex files) of the firmware. The hex file to be used in this text is "AVR-Mobo_SlowI2C_.hex", which provides the basic functionality, no LCD, no Power/SWR measurements. Extract that file to an appropriate directory on your PC.
Ready the MOBO
Now make sure your Mobo v4.3 is connected to the PC via the USB cable. Press SW2 (PGM/HWB) on the Mobo. While keeping SW2 pressed, press SW3 (Reset) once. Then release SW2.. This places the MOBO into bootload mode.
Load the Firmware
If all goes well, you should hear your PC beeping twice, to indicate that a new USB device is connected.
.USB Drivers for FDLIP
A popup window may appear to ask you to install drivers. You install the driver from the FLIP package. This will be the driver INF file located in the FLIP installation folder (e.g., "C:\Program Files (x86)\Atmel\Flip 3.3.4\usb\atmel_usb_dfu.inf"). This is illustrated in figures 6-1 through 6-4 of the Atmel manual. The actual screens will vary depending upon your operating system
Running FLIP
These steps are illustrated in figures 6-5 through 6-8 of the Atmel manual:
- Fire up FLIP.
- Go to settings -> communications -> USB -> OPEN.
- The AT90USB162 should now be opened and visible by FLIP.
- Next load the firmware. Go to "load hex file", which is the middle of the red colored icons on the right side. Load the desired hex file (see above).
- Now on the left "operations flow", click "run".
- Viola, after a few seconds, the new firmware is uploaded.
- Now you can just close FLIP.
Restart the Firmware/MPU on the MOBO
Press SW3 on the Mobo to restart the firmware.
Load Drivers to PC
The MOBO and its newly loaded firmware needs to talk to appropriate SDR USB drivers on the PC. If you have not installed any USB drivers from Fred, PE0FKO (for use with Tony's USB-I2C Interface) before, a popup may appear to ask you to install drivers. You install the driver from Fred, PE0FKO (from hid firmware website. It should be available from Fred's firmware v15.12 package.)
Blink the Lights!
Once this has been successfully completed, you should see the green LED on the MOBO