Minifilters - A Introduction
General
This stage depicts the building of the minifilter boards for the simpler option "A", using all-SMD components - no toroids to wind :>}.
The board actually is a multi-purpose board with pads for more than the required components. These pads permit (as in the case of the 20m board) the builder to add extra components in parallel to achieve a better fit of values to design requirements
Similarly, the schematic has been modified from the published schematic to limit it to just those components that are actually required in one or more of the minifilter "A" designs.
Notes concerning Band-Specific Values
The minifilters use band-specific capacitor and inductor values to implement the desired bandpass characteristics. These values may change periodically, so they are being made available, via a link, in the official project Bill of Materials spreadsheet.
The spreadsheet is in two versions: a Microsoft Excel version and an Open Office spreadsheet ODS version
The minifilter "A" component values are listed in a worksheet tab named "Set A minifilter, 6 filter set" (see the row of tabs at the bottom of the spreadsheet).
An example of the table listing the component values is shown below:
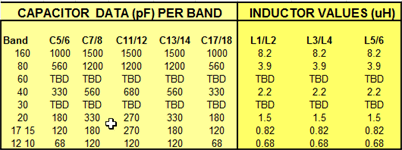
Column headings such as C7/C8 are read to mean "the value applies to the C7 component; if the value is non-standard, the builder can put two capacitors in parallel using the pair of C7 and C8 to arrive at the desired non-standard value"
For example, in the updated 20m version, the capacitance required at C7 turned out to be 280 pF. This non-standard value can be achieved through putting two standard values in parallel at C7 (270 pF) and C8 (10 pF). Similarly, inductance values are shown as being available for "tandem" installation to achieve design results.
It is always a good idea to double check the bill of materials in this set of documentation with the official BOM on the Mobo site. Discrepancies may be introduced inadvertently, as the changes are sometimes not communicated or discovered, making timely update of this site a problem.
Theory of Operation
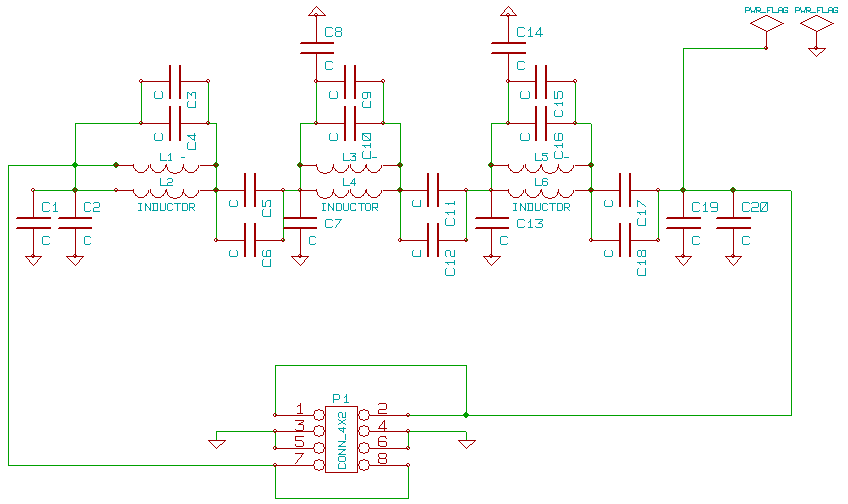
The present SET A and SET B filters are Cauer Band Pass Filters derived from the excellent PA3AKE filters. Other topoligies, such as Wetherhold LPF's, and special IF traps etc. will make use of the "unused" positions found in the PCB (and schematic - the full schematic can be seen here
.
Both SET A and SET B use the same schematic and PCB layouts.. Not all components shown in the schematic and the layouts are used in all SETs as initially rolled out in the kits.
It is the design team's hope that part of the fun factor for builders AFTER they have the Mobo v4.3 working with the basic SET A, is to create (using filter design tools) new filters that they can build up, pluggin, and play with.
The Minifilters and their PCBs are designed to be very flexible, and they will be used in other projects, such as Mobo v5.0.
(go directly to build notes)Minifilters - A Schematic
(Click for Full Schematic)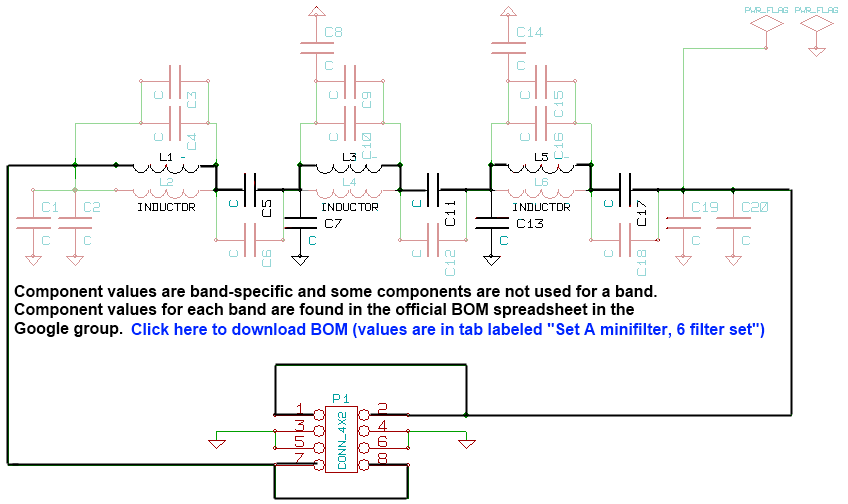
C:\Users\Rob\Documents\HamStuff\SDR\MOBO4_x\mobo43
(above schematic has clickable areas that can be used for navigation)
(go directly to build notes)Minifilters - A Bill of Materials
Stage Bill of Materials
(resistor images and color codes courtesy of WIlfried, DL5SWB's R-Color Code program)
| Check | Count | Component | Marking | Category |
|---|---|---|---|---|
| ❏ | 1 | Gold plated dual board-to-board RA Male Connector | Header | |
| ❏ | 3 | band-specific | misc | |
| ❏ | 5 | band-specific | misc | |
| ❏ | 2 | band-specific | misc |
Band-Specific Components Values
Click for Band-Specific Components values
Minifilters - A Summary Build Notes
- Install SMD Capacitors
- Install SMD 0805 inductors.
- Install P1
- Program crossover points
- Test the Stage
Minifilters - A Detailed Build Notes
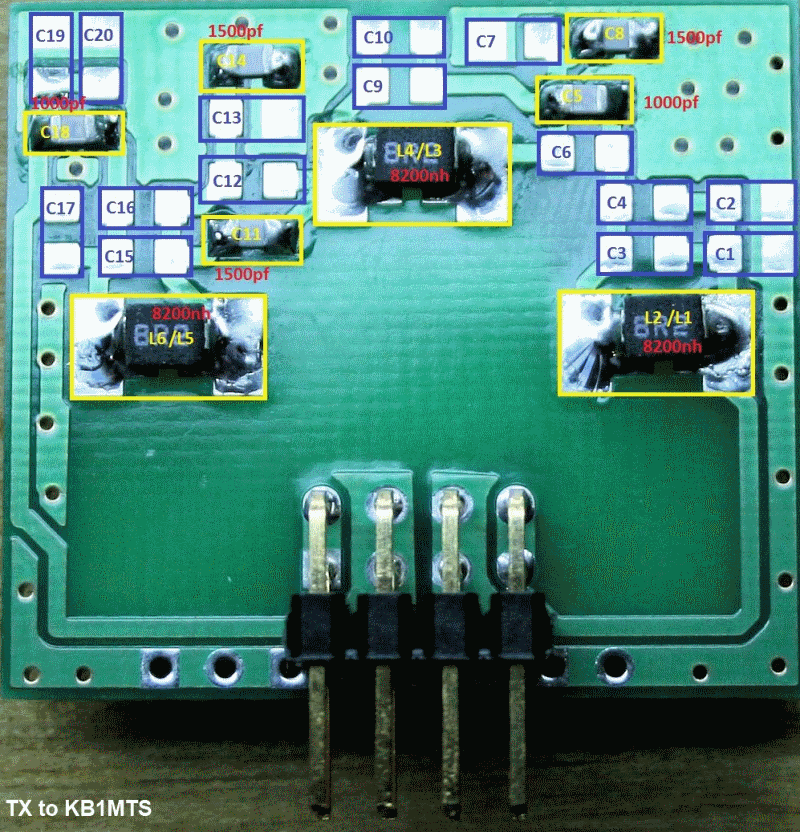
Top of the Board
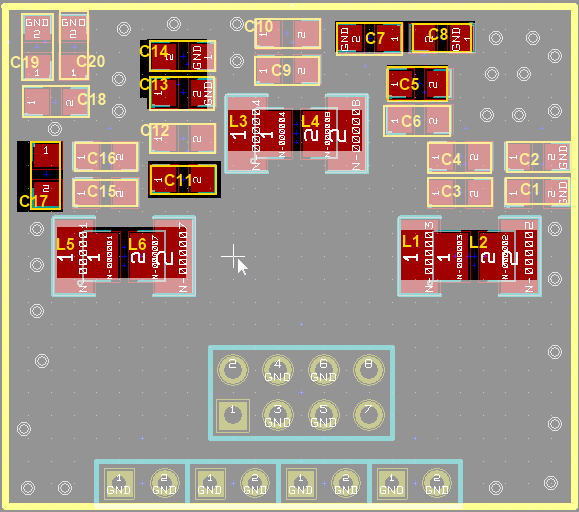
Install SMD Capacitors
Install the SMD 0805 capacitors to the front of the board. Note that in one or more of the bands, there may be two additional capacitors to install (C8 and C14); these are paralled with C7 and C13 to arrive at the desired total capacitance at that point in the filter.
Similar circumstances may exist with resoect to other non-standard capacitances called for in the master BOM.
Refer to Band Specific Values table for values of band-specific comnponents.| Check | Designation | Component | Marking | Category | Orientation | Notes | |||||||||||||||||||||
|---|---|---|---|---|---|---|---|---|---|---|---|---|---|---|---|---|---|---|---|---|---|---|---|---|---|---|---|
| ❏ | C05-A | band-specific |
| misc | |||||||||||||||||||||||
| ❏ | C07-A | band-specific |
| misc | |||||||||||||||||||||||
| ❏ | C11-A | band-specific |
| misc | |||||||||||||||||||||||
| ❏ | C14-A | band-specific |
| misc | Only used for 20m filter | ||||||||||||||||||||||
| ❏ | C17-A | band-specific |
| misc | |||||||||||||||||||||||
| ❏ | C08-A | band-specific |
| misc | Only used for 20m filter | ||||||||||||||||||||||
| ❏ | C13-A | band-specific |
| misc |
Install SMD 0805 inductors.
Install the three 0805 inductors to the front of the board
Refer to Band Specific Values table for values of band-specific comnponents.| Check | Designation | Component | Marking | Category | Orientation | Notes | |||||||||||||||||||||
|---|---|---|---|---|---|---|---|---|---|---|---|---|---|---|---|---|---|---|---|---|---|---|---|---|---|---|---|
| ❏ | L01-A | band-specific |
| misc | |||||||||||||||||||||||
| ❏ | L03-A | band-specific |
| misc | |||||||||||||||||||||||
| ❏ | L05-A | band-specific |
| misc |
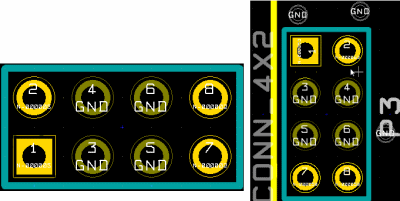
Install P1
Install the right angle dual 4-pin plug to the front of the board
This plugs into the corresponding 4x2 female socket on the board designated as P3 - P10
Filters in the 6 filter minifilter A set are numbered starting with 0. A good starting arrangement to begin with is as follows:
| Filter # | Band |
|---|---|
| 0 | 160m |
| 1 | 80m |
| 2 | 40m |
| 3 | (skip) |
| 4 | 20m |
| 5 | (skip) |
| 6 | 15m |
| 7 | 10m |
That will work pretty well with default software set points.
Good advice: using appropriate marking pen, annotate the upper left-hand corner of each board to specify its band.
Refer to Band Specific Values table for values of band-specific comnponents.| Check | Designation | Component | Marking | Category | Orientation | Notes |
|---|---|---|---|---|---|---|
| ❏ | P01-A | Gold plated dual board-to-board RA Male Connector | Header | Mates with P3-P10 on MOBO |
Program crossover points
Using one of either CFGR or Control MOBO GUI, set up the bands and crosspover points in the MPU to correspond to your board/socket/band assignments.
Check the default crossover points listed. If it does not correspond to the minifitlers that you have installed, you can change the cross over points by clicking/double clicking on the filter listing cell to edit. Note that in CfgSR.exe, you enter in Mhz, but in Control_Mobo_GUI, you enter in khz.
Refer to Band Specific Values table for values of band-specific comnponents.Minifilters - A Completed Stage
Top of the Board
Minifilters - A Testing
Test Correct Filter Switching
Test Setup
To test correct switching in/out of the minifilters, you can measure the voltage of one of the 4 OUTER (i.e., non-grounded) pins on each minifilter (or the corresponding header position). If it reads about 2.5V, then that filter has been selected correctly.