Band Switch Introduction
General
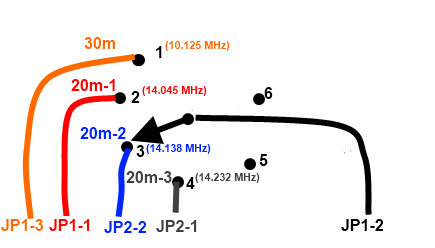
This stage provides the capability to switch among the 4 band segments, corresponding to the four crystals installed.
Optional Approaches
Band Switch from Original Design
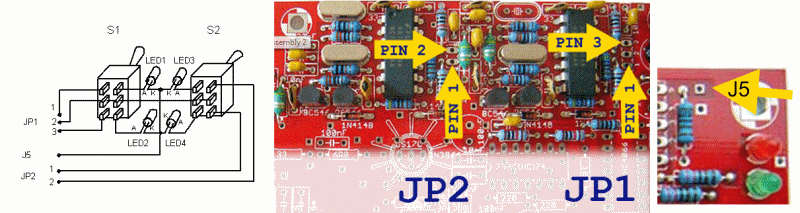
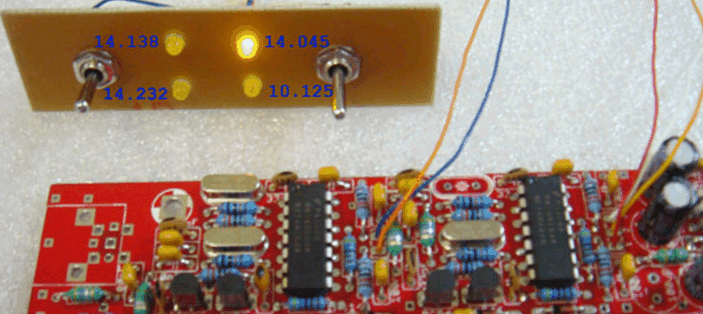
The G3020 band switch consists of 2 DPDT three position switches (ON-OFF-ON) and 4 yellow LED diodes which indicates the selected oscillator.
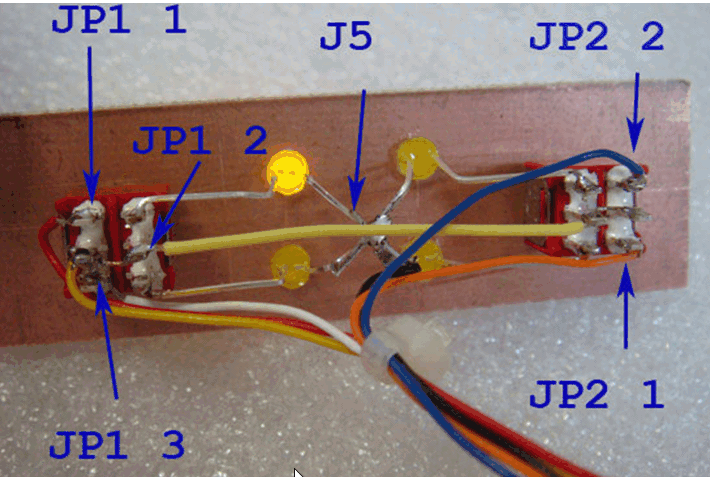
The switches and diodes are connected as per diagram below. The band switch is connected to main PCB board with 6 wires JP1 (1,2,3), J5 and JP2 (1,2). The wires are then connected to pins as marked on photos below.
The JP1 Pin 2 is located between pins 1 and 3. The J5 is located on the top-right corner of PCB.
Band Switch Using Rotary Switch
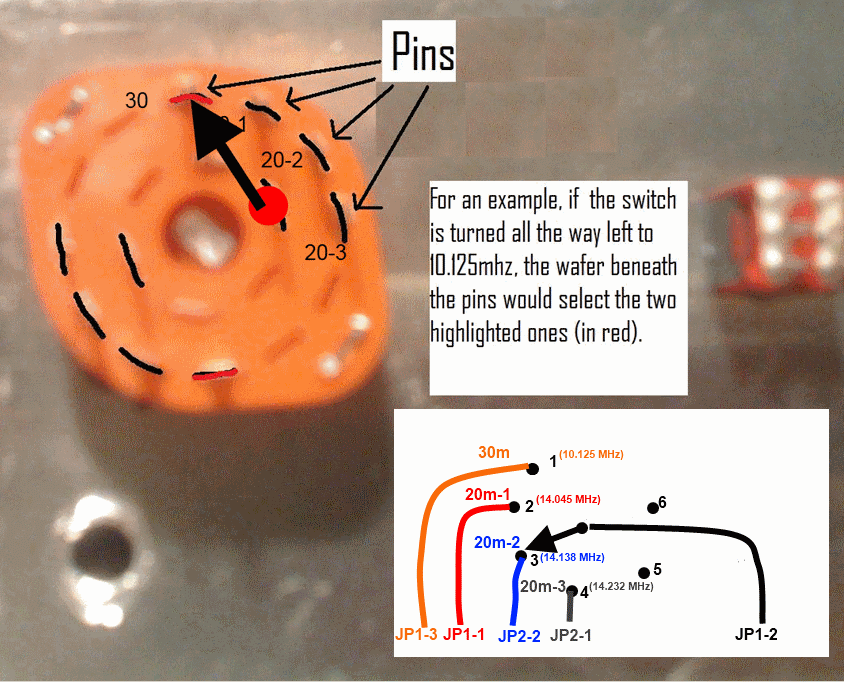
Another version of the bandswitching (uses a rotary switch and no LEDs) is provided, thanks to John Farley (see below)
Connector Option
Nick has provided an elegant way of plug-in/plug-out connections for the band switch, utilizing a single 5 line Molex connector set and some under-board point-to-point wiring
This method can be made to work with either type of switch (but will require a separate power lead for the LEDs, if used). It is described on the reflector in message #521
(go directly to build notes)Band Switch Schematic
(go directly to build notes)
Band Switch Bill of Materials
Stage Bill of Materials
(resistor images and color codes courtesy of WIlfried, DL5SWB's R-Color Code program)
| Check | Count | Component | Marking | Category |
|---|---|---|---|---|
| ❏ | 4 | yellow LED | LED | |
| ❏ | 1 | user-furnished switchboard | Misc | |
| ❏ | 2 | SPDT 3 position | SPDT |
Band Switch Summary Build Notes
- Provide, Cut, and Drill Switchboard
- Install LEDs and Switches
- Wire leds and switches
- Connect the Wires to the Board
- Optional switching Method
- Test the Stage
Band Switch Detailed Build Notes
Top of the Board
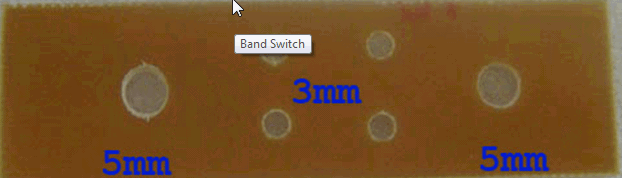
Provide, Cut, and Drill Switchboard
The builder is required to provide a temporary switchboard. (the switches and diodes are provided with the kit).
| Check | Designation | Component | Marking | Category | Orientation | Notes |
|---|---|---|---|---|---|---|
| ❏ | misc3-1 | user-furnished switchboard | Misc |
Install LEDs and Switches
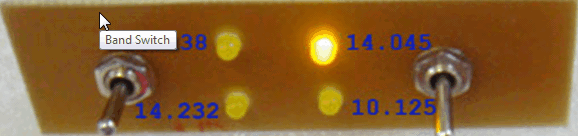
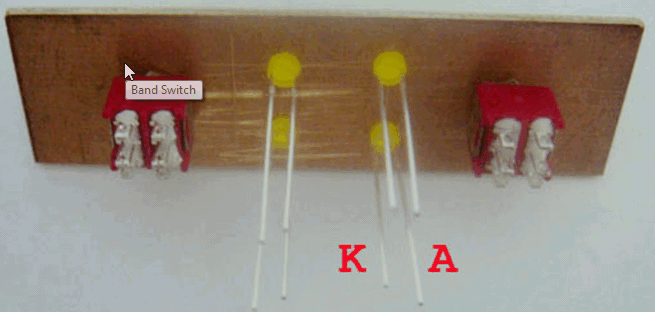
Insert the LED diodes in 3mm holes as shown here: the longer lead (Anode) facing the switches.
| Check | Designation | Component | Marking | Category | Orientation | Notes |
|---|---|---|---|---|---|---|
| ❏ | D3-1 | yellow LED | LED | |||
| ❏ | D3-2 | yellow LED | LED | |||
| ❏ | D3-3 | yellow LED | LED | |||
| ❏ | D3-4 | yellow LED | LED | |||
| ❏ | SW3-1 | SPDT 3 position | SPDT | LO BandSwitch | ||
| ❏ | SW3-2 | SPDT 3 position | SPDT | LO BandSwitch |
Wire leds and switches
Wire the switches and diodes as per photo. For details, refer to the schematic diagram as shown above.
Note: the cathodes ("K") of the diodes are the shorter leads and are wired together with the lead going to J5 on the main board.
Connect the Wires to the Board
Connect to points on the board
You may want to make these connections temporary until you have reached the end of the project. Otherwise, these will cause handling problems as you turn, twist, and otherwise manipulate the board in the follow-on build stages. The stages which will require you to switch from one to another crystal for testing purposes can easily be handled using the "Wire 1-a" through "Wire 1-d" arrangements in the test section of the local oscillator stage.
Optional switching Method
The builder may prefer to use another approach to band-switching. This approach involves obtaining a simple rotary switch with at least 4 poles ( Radio Shack has a model number 275-1386 for $2.99 that is a six-pole switch) and some polarized header pins and plugs.
John Farley, a G3020 builder provided the specs as indicated below. It is strongly adviseable to obtain 2 and 3 pin polarized header pins (and matching plugs) to plug into the corresponding 2 and 3 hole locations JP2 and JP1) such that the bandswitch can be removed for your convenience during follow-on assembly stages
Here is the diagram depicting the band-switching using a rotary switch:
And here is a view mapping the logical switching diagram against the physical (rear view) switch and its corresponding lugs: