PA RX/TX Control Introduction
(go directly to build notes)PA RX/TX Control Schematic
(go directly to build notes)
PA RX/TX Control Bill of Materials
Stage Bill of Materials
(resistor images and color codes courtesy of WIlfried, DL5SWB's R-Color Code program)
| Check | Count | Component | Marking | Category |
|---|---|---|---|---|
| ❏ | 2 | 1 k 1/4W 1% | br-blk-blk-br-br
 | 1/4W |
| ❏ | 1 | 100 1/4W 1% | br-blk-blk-blk-br
 | 1/4W |
| ❏ | 5 | 2k2 1/4W 1% (2.2K) | red-red-blk-brn-brn
 | 1/4W |
| ❏ | 2 | 2k7 1/4W 1% (2.7K) | red-vio-blk-brn-brn
 | 1/4W |
| ❏ | 1 | 47K 1/4W 1% | yel-vio-blk-red-brn
 | 1/4W |
| ❏ | 4 | 4K7 1/4W 1% (4.7K) | yel-vio-blk-brn-brn
 | 1/4W |
| ❏ | 1 | 4K7 1/4W 1% (4.7K) | yel-vio-blk-brn-brn
| 1/4W |
| ❏ | 2 | 1N4148 | 1N4148
 | Axial |
| ❏ | 1 | 1N4734 5V6 Zener Diode | 1N4734
 | Axial |
| ❏ | 1 | Ferrite Bead |
 | Axial |
| ❏ | 6 | 10 nF (.01uF) | 103
 | Ceramic |
| ❏ | 1 | 10 nF** | 103
| Ceramic |
| ❏ | 1 | 10 nF** | 103
| Ceramic |
| ❏ | 11 | 100 nF | 104
 | Ceramic |
| ❏ | 1 | 1000 uF/25Vdc |
 | Electrolytic |
| ❏ | 2 | misc hookup wire | Hookup | |
| ❏ | 1 | misc hookup wire | Hookup | |
| ❏ | 1 | db9 connector - PCB mount |
 | Jack |
| ❏ | 1 | 3.5mm stereo jack - PCB mount (rt-angle) |
 | Jack-RA |
| ❏ | 1 | BD139 NPN Transistor |
 | TO-126 |
| ❏ | 1 | BD140 PNP Transistor |
| TO-126 |
| ❏ | 2 | BC546 NPN Transistor |
| TO-92 |
| ❏ | 1 | BC546 NPN Transistor |
| TO-92 |
| ❏ | 2 | BC556 PNP Transistor |
| TO-92 |
| ❏ | 1 | BC556 PNP Transistor |
| TO-92 |
| ❏ | 1 | 5K (Y502) | Y502
 | Trimpot |
PA RX/TX Control Summary Build Notes
- Install Connectors, Trimmer, and Ferrite
- Install Transistors
- Install Diodes, Resistors, Capacitors
- Install Vcc and Temporary Switch Connections
- Test the Stage
PA RX/TX Control Detailed Build Notes
Top of the Board
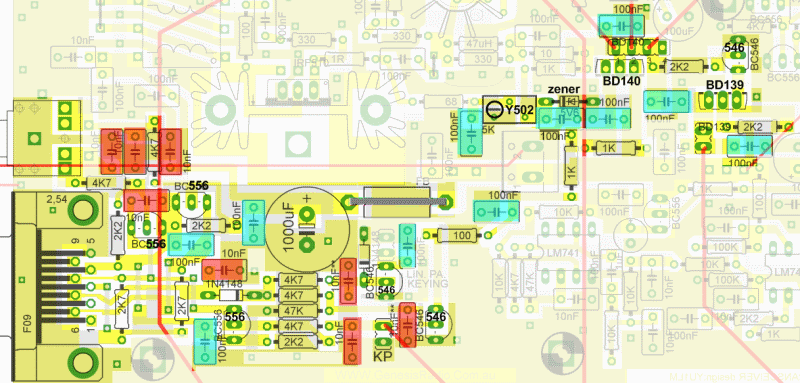
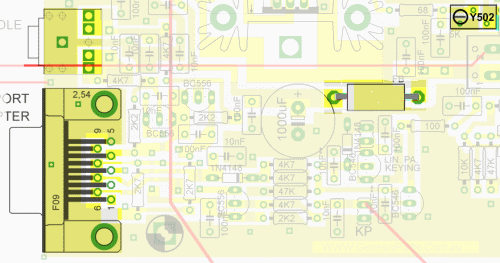
Install Connectors, Trimmer, and Ferrite
| Check | Designation | Component | Marking | Category | Orientation | Notes |
|---|---|---|---|---|---|---|
| ❏ | P8-1 | 3.5mm stereo jack - PCB mount (rt-angle) |
| Jack-RA | ||
| ❏ | P8-2 | db9 connector - PCB mount |
| Jack | ||
| ❏ | L8-1 | Ferrite Bead |
| Axial | ||
| ❏ | R8-16 | 5K (Y502) | Y502
| Trimpot | Needs to be initialized. Before installing this trimmer, adjust the resistance between the middle pin and either of the other pins to 2.5 K Ohm. |
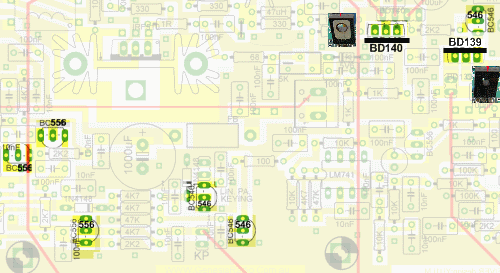
Install Transistors
Be careful to install the correct transistors (BC556s to the left and BC546s to the right) and orient them so their flat sides align with the flat side on the silkscreen.
The BD139 and BD140 have a metallic heatshield on one side of the vertical tab; align that metallic side with the black stripe shown on the graphic below.
| Check | Designation | Component | Marking | Category | Orientation | Notes |
|---|---|---|---|---|---|---|
| ❏ | Q8-1 | BD140 PNP Transistor |
| TO-126 | ||
| ❏ | Q8-2 | BD139 NPN Transistor |
| TO-126 | ||
| ❏ | Q8-3 | BC546 NPN Transistor |
| TO-92 | ||
| ❏ | Q8-4 | BC546 NPN Transistor |
| TO-92 | ||
| ❏ | Q8-7 | BC546 NPN Transistor |
| TO-92 | (reloc) | |
| ❏ | Q8-5 | BC556 PNP Transistor |
| TO-92 | ||
| ❏ | Q8-6 | BC556 PNP Transistor |
| TO-92 | ||
| ❏ | Q8-8 | BC556 PNP Transistor |
| TO-92 | (reloc) |
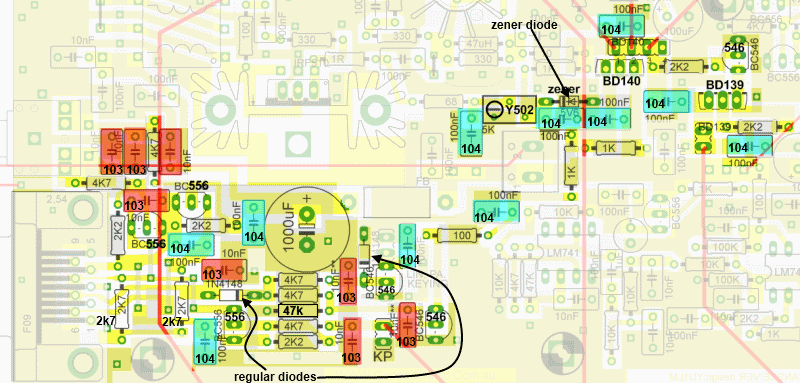
Install Diodes, Resistors, Capacitors
Be careful with some of the similar looking resistor values: 47k vs. 4k7; 2k7 vs 2k2
Also, please note that there are two regular signal diodes and one zener diode and mount them in their appropriate places.
| Check | Designation | Component | Marking | Category | Orientation | Notes |
|---|---|---|---|---|---|---|
| ❏ | D8-1 | 1N4734 5V6 Zener Diode | 1N4734
| Axial | ||
| ❏ | D8-2 | 1N4148 | 1N4148
| Axial | (reloc) | |
| ❏ | D8-3 | 1N4148 | 1N4148
| Axial | (reloc) | |
| ❏ | R8-1 | 100 1/4W 1% | br-blk-blk-blk-br
| 1/4W | ||
| ❏ | R8-2 | 1 k 1/4W 1% | br-blk-blk-br-br
| 1/4W | ||
| ❏ | R8-3 | 1 k 1/4W 1% | br-blk-blk-br-br
| 1/4W | ||
| ❏ | R8-4 | 2k2 1/4W 1% (2.2K) | red-red-blk-brn-brn
| 1/4W | ||
| ❏ | R8-5 | 2k2 1/4W 1% (2.2K) | red-red-blk-brn-brn
| 1/4W | ||
| ❏ | R8-6 | 2k2 1/4W 1% (2.2K) | red-red-blk-brn-brn
| 1/4W | ||
| ❏ | R8-7 | 2k2 1/4W 1% (2.2K) | red-red-blk-brn-brn
| 1/4W | ||
| ❏ | R8-8 | 2k2 1/4W 1% (2.2K) | red-red-blk-brn-brn
| 1/4W | ||
| ❏ | R8-10 | 2k7 1/4W 1% (2.7K) | red-vio-blk-brn-brn
| 1/4W | ||
| ❏ | R8-9 | 2k7 1/4W 1% (2.7K) | red-vio-blk-brn-brn
| 1/4W | ||
| ❏ | R8-11 | 4K7 1/4W 1% (4.7K) | yel-vio-blk-brn-brn
| 1/4W | ||
| ❏ | R8-12 | 4K7 1/4W 1% (4.7K) | yel-vio-blk-brn-brn
| 1/4W | ||
| ❏ | R8-13 | 4K7 1/4W 1% (4.7K) | yel-vio-blk-brn-brn
| 1/4W | ||
| ❏ | R8-14 | 4K7 1/4W 1% (4.7K) | yel-vio-blk-brn-brn
| 1/4W | ||
| ❏ | R8-17 | 4K7 1/4W 1% (4.7K) | yel-vio-blk-brn-brn
| 1/4W | (reloc) | |
| ❏ | R8-15 | 47K 1/4W 1% | yel-vio-blk-red-brn
| 1/4W | ||
| ❏ | C8-1 | 10 nF (.01uF) | 103
| Ceramic | ||
| ❏ | C8-2 | 10 nF (.01uF) | 103
| Ceramic | ||
| ❏ | C8-3 | 10 nF (.01uF) | 103
| Ceramic | ||
| ❏ | C8-4 | 10 nF (.01uF) | 103
| Ceramic | ||
| ❏ | C8-5 | 10 nF (.01uF) | 103
| Ceramic | ||
| ❏ | C8-6 | 10 nF (.01uF) | 103
| Ceramic | ||
| ❏ | C8-7 | 10 nF** | 103
| Ceramic | ||
| ❏ | C8-7a | 10 nF** | 103
| Ceramic | (added) | |
| ❏ | C8-10 | 100 nF | 104
| Ceramic | ||
| ❏ | C8-11 | 100 nF | 104
| Ceramic | ||
| ❏ | C8-12 | 100 nF | 104
| Ceramic | ||
| ❏ | C8-13 | 100 nF | 104
| Ceramic | ||
| ❏ | C8-14 | 100 nF | 104
| Ceramic | ||
| ❏ | C8-15 | 100 nF | 104
| Ceramic | ||
| ❏ | C8-16 | 100 nF | 104
| Ceramic | ||
| ❏ | C8-17 | 100 nF | 104
| Ceramic | ||
| ❏ | C8-18 | 100 nF | 104
| Ceramic | ||
| ❏ | C8-8 | 100 nF | 104
| Ceramic | ||
| ❏ | C8-9 | 100 nF | 104
| Ceramic | ||
| ❏ | C8-20 | 1000 uF/25Vdc |
| Electrolytic |
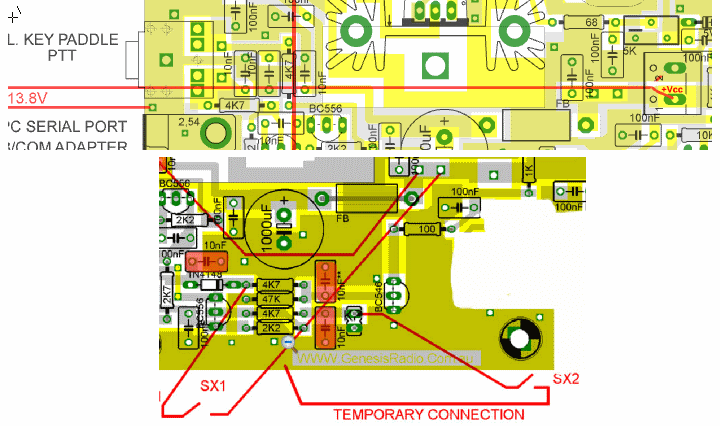
Install Vcc and Temporary Switch Connections
Install the 13.8 Vdc connection to its final place and temporarily wire in switches SX1 and SX2 to support testing
You may use any convenient technique to simulate switches sx2 and sx2 (e.g., alligator clips or clip leads)
Note: the diagram shows the "partial stack" of resistors where the leftmost lead (lead(1)) of SW1 connects. This is due to the subsequenc add-in of circuitry for controlling an external PA. The connection for SX1 must be made at the junction of the diode (on left) an the resistor (on right), as in this diagram:
.gif)
| Check | Designation | Component | Marking | Category | Orientation | Notes |
|---|---|---|---|---|---|---|
| ❏ | sx1_leads | misc hookup wire | Hookup | (temporary wires) | ||
| ❏ | sx2_leads | misc hookup wire | Hookup | (temporary wires) | ||
| ❏ | Vcc | misc hookup wire | Hookup | Power leads |
PA RX/TX Control Testing
Test Step 1
Test Setup
Using a DMM, measure the voltages at +VTX and +VRX, as indicated below
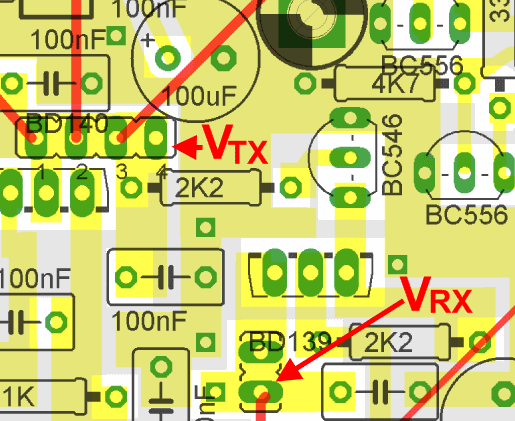
Test Measurements
| Testpoint | Units | Nominal Value | Author's | Yours |
|---|---|---|---|---|
| SX1 OFF: point +VTX | Vdc | 0 | _______ | |
| SX1 OFF: point +VRX | Vdc | +12 to +13.8 | _______ | |
| SX1 ON: point +VTX | Vdc | +12 to +13.8 | _______ | |
| SX1 ON: point +VRX | Vdc | 0 | _______ |
Test Step 2
Test Setup
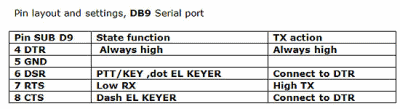
- Turn SX1 OFF. Connect Genesis G40 to the serial PC port directly or via USB/ Serial adapter. Settings in SDR software should be set according to theDB9 connector's Pins as shown below:
-
- Turn on SX2 (temporarily installed in Test Step 1) and +VTX should be +12-+13.8V.
More details on PC to G3020 connection and SDR settings
Test Measurements
| Testpoint | Units | Nominal Value | Author's | Yours |
|---|---|---|---|---|
| SX2 ON: +VTX | Vdc | +12 to +13.8 | _______ |